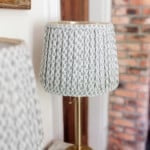
Easy DIY Pleated Lampshades
Learn how to make DIY pleated lampshades using hot glue! This easy tutorial will take your plain lampshade and table lamps and turn them into beautiful statement pieces.
Servings 1 lampshade
Cost 5
Equipment
- Glue Gun
- Iron
- Sewing Machine (optional)
Ingredients
- Lampshade
- Fabric
- Thread
Instructions
- Cut strips of your fabric about 3 inches wide and the length of whatever lampshade you are using.
- Press the long raw edges of each fabric strip in on the back side of the fabric.
- Use a glue gun to glue on each strip of fabric to the lampshade. I am gluing the top and the bottom, leaving about ½ inch from the top and bottom of the lampshade to add a finishing touch later.
- Overlap the strips about half way to get that pleated look. Keep in mind, pending the size of your lampshade, you’ll need quite a few strips
- Cut two more 3 inch wide strips for covering up the raw edges on the top and bottom of the lampshade. Both strips will be fairly long, pending the size of your lampshade.
- Press the long raw edges of each fabric strip in on the back side of the fabric like before.
- Once pressed, fold the fabric in half lengthwise. Press again.
- Sew it all the way down the long side. You could also hot glue it down if you do not have a sewing machine.
- Hot glue the strips along the top and bottom of the lampshades to create a finished look.
Notes
- This ended up taking a LOT of strips of fabric, even though my lampshades were not super large in diameter. So, make sure you have plenty of fabric for this project.
- Because my lampshade was tapered (the top has a smaller diameter than the bottom of the shade), I would overlap the strips a little bit more at the top than at the bottom.
- Sometimes I’d start to get off a bit. But as soon as I noticed it, it was really easy to fix. Even with a few imperfections, the end result looked great!