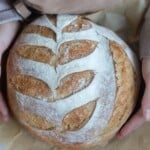
Honey Sourdough Bread
Sweetened with honey instead of granulated sugar, this Honey Sourdough Bread is soft and delicious. With a beautiful airy, fluffy crumb and a golden brown exterior, this has quickly become one of our family favorites.
Servings 12
Calories 157kcal
Ingredients
- 100 grams sourdough starter bubbly and active
- 325 grams water
- 30 grams honey
- 250 grams all purpose flour
- 125 grams bread flour
- 100 grams whole wheat flour
- 10 grams salt
Instructions
- Feed a sourdough starter 4-12 hours before starting the bread, ensuring it is active and bubbly.
- Mix your starter, water, and honey in a large bowl.
- Add in flour and salt and mix with your hands to make a shaggy dough.
- Cover the dough with a damp towel or beeswax wrap and allow to autolyse for 30 minutes.
- To develop the gluten and obtain a nice rise, you will want to do 6 rounds of stretching and folding.
- While the dough is in the bowl, grab the edge and the dough firmly and pull up, stretching it upwards. Then place the dough in your hands into the center. Turn the bowl about a quarter turn and do this stretch and fold again, and again one to two more times. This is considered one stretch and fold round. Repeat according to the directions below. Dip your hand in water if the dough is too sticky.
- First 3 stretch and folds – every 15 minutes.
- Last 3 stretch and folds – every 30 minutes.
- Cover with a wet towel or plastic wrap and allow the dough to bulk-ferment until doubled. The time this takes will vary for everyone and is dependent on many factors, including your environment and the maturity of your starter.
- Shape into a ball by gently spinning it toward you.
- Set out 15-20 minutes uncovered. This allows the surface to develop a skin, so that it doesn’t stick to the tea towel during the overnight rise.
- Turn over and shape. I do this by folding the two sides over to meet in the middle, and then the other two sides.
- Transfer to a floured banneton basket. You can also use a bowl with a floured tea towel instead. Place in your banneton or bowl seam side up. Cover with plastic and proof for 12-15 hours in the refrigerator.
- In a 500 degree oven, preheat your dutch oven for 1 hour.
- Take the dough out of the fridge right before you are ready to bake.
- Dust with flour on top to make the scoring pattern stand out more.
- Score with a razor.
- Add a little flour to the bottom of the dutch oven (or parchment paper if using) and transfer dough to it.
- Bake for 20 minutes at 500 with the lid on.
- Turn the oven temperature down to 475 and remove the lid. Bake an additional 25 minutes or until your loaf is golden brown.
Notes
Nutrition
Calories: 157kcal | Carbohydrates: 33g | Protein: 5g | Fat: 1g | Saturated Fat: 0.1g | Polyunsaturated Fat: 0.3g | Monounsaturated Fat: 0.1g | Sodium: 325mg | Potassium: 64mg | Fiber: 2g | Sugar: 2g | Vitamin A: 1IU | Vitamin C: 0.01mg | Calcium: 9mg | Iron: 1mg