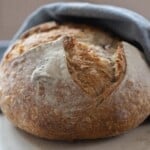
Garlic Sourdough Bread
Garlic Sourdough Bread brings together sweet, freshly roasted garlic flavor and classic sourdough tang, producing a great multipurpose, long-fermentation loaf for all of the garlic lovers.
Servings 10
Calories 188kcal
Ingredients
- 250 grams all purpose flour
- 100 grams whole wheat flour
- 125 grams bread flour
- 100 grams sourdough starter bubbly and active
- 325 grams water
- 10 grams salt
- 2 heads roasted garlic cooled
- 1 tablespoons fresh rosemary finely chopped
Instructions
Roast The Garlic
- Preheat oven to 375 F and prepare a baking tray lined with parchment paper. Alternatively, you can wrap the cloves inside foil on your tray.
- Remove the tops of your heads of garlic with a sharp knife, revealing the cloves inside.
- Placing the cloves on the tray, drizzle with olive oil.
- Bake until soft, around one hour.
- Squeeze the papery lining of the garlic to pop out the soft cloves inside, then allow to cool.
Make The Bread
- Feed your sourdough starter around 4-12 hours before beginning this recipe, letting it become active and bubbly.
- Mix warm water and flour, then let it rest for 30 minutes to autolyse, which is the process of the water hydrating the flour.
- Gently add in your sourdough starter, sprinkling the salt on top.
- Mix for about 5 minutes with your hands to combine all the ingredients.
- Cover with a damp tea towel or plastic wrap and allow to rest for 30 minutes.
- We will use a series of six stretches and folds to develop the gluten for a nice rise.
- After the 30 minute rest, keep your dough in the bowl and pull the nearest edge of the bread dough firmly upwards, then folding it back into the center. Turn your bowl a quarter turn, then stretch and fold again. Repeat this once or twice more to complete your first round. If the dough is too sticky, you can dip your hands in water.
- Repeat this process five more times, according to the times listed below.
*During the second to last stretch and fold, you'll add roasted garlic and rosemary. These will be worked into the dough during the succeeding stretch and folds.*
First 3 stretch and folds: every 15 minutes.
Last 3 stretch and folds: every 30 minutes.
After completing the stretch and folds and having added the garlic and rosemary, cover the dough with a wet towel or plastic wrap and allow to double in size. This could take anywhere from 6-12 hours (or longer). - Shape into a ball by gently spinning the dough toward you on a lightly floured work surface.
- Let the dough rest uncovered for 15-20 minutes so the surface can develop a skin.
- Shape into a boule, by transferring to a floured banneton (or bowl lined with a floured tea towel) with the smooth side (the side you just left up to form a skin) facing down. Pull the sides up to the middle and pinch together. Do this a few times to create more tension.
- Cover with a tea towel or plastic wrap and refrigerate for 12-15 hours. Or if you are in more of a hurry, you can leave it at room temperature until doubled (about 3-4 hours).
- Set oven temperature to 500 degrees and preheat your Dutch oven for one hour.
- Remove dough from refrigerator and place seam side down on a piece of parchment paper. Lightly dust with flour on top, and score with a razor blade or lame.
- Place the still-cold dough with parchment paper inside the very hot Dutch oven.
- Bake with lid on at 500 degrees for 20 minutes.
- After 20 minutes, remove the lid and reduce the temperature to 475, baking an additional 25 minutes or until golden brown.
- Cool on a wire rack completely before slicing.
Notes
- The timing of the bulk rise will depend on several factors, including the temperature where the rise takes place and the maturity of your starter. A more mature starter will bring about a shorter rise time, and a warmer environment will also speed up the rise. The aim is to double the size of the dough, and for more health benefits, you can simply let the dough rise longer (although you will want to be careful not to over-ferment the dough)
- The long rise in the refrigerator is necessary for achieving a beautiful scoring pattern. The chilled dough is more firm and receives the scoring more readily. If you are wanting a speedier loaf, you can skip the chilling and let it double on the counter for 3-4 hours (or longer if your house is on the cooler side).
Nutrition
Calories: 188kcal | Carbohydrates: 39g | Protein: 6g | Fat: 1g | Saturated Fat: 0.1g | Polyunsaturated Fat: 0.3g | Monounsaturated Fat: 0.1g | Sodium: 391mg | Potassium: 99mg | Fiber: 2g | Sugar: 0.2g | Vitamin A: 8IU | Vitamin C: 2mg | Calcium: 21mg | Iron: 2mg