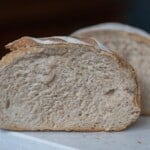
Best Low Hydration Sourdough Bread Recipe
This low hydration sourdough bread recipe is great for beginners! At 60% hydration, it's easier to work with, yet still full of delicious sourdough flavor.
Servings 12
Calories 149kcal
Ingredients
- 250 grams all purpose flour
- 100 grams whole wheat flour
- 125 grams bread flour
- 100 grams sourdough starter bubbly and active
- 285 grams water
- 10 grams salt
Instructions
- Feed a sourdough starter 4-12 hours before starting your bread.
- Combine warm water and flour. Allow to rest for 30 minutes for the water to hydrate the flour.
- Using wet hands, dimple in the sourdough starter. Add the salt and mix the dough with your hands for a few minutes until the dough comes together.
- Cover your bowl with a beeswax wrap, plastic wrap or a damp tea towel and allow it to rest for another 30 minutes.
Stretch And Fold
- For gluten development and to obtain an optimal rise, perform 6 rounds of stretching and folding according to the directions below.
- First 3 stretch and folds – every 15 minutes. Last 3 stretch and folds – every 30 minutes.
- To do a stretch and fold, grab the edge of the dough while it is in the bowl and firmly pull it up, stretching it up towards you. Fold the dough in yoru hands into the center of your dough ball. Turn the bowl about a quarter turn and do this stretch and fold again, and again one to two more times. This is considered one stretch and fold round.
Bulk Ferment
- Cover the dough with a damp towl or plastic wrap once again and allow it to ferment until doubled. The time it takes for this will vary. Keep in mind that the level of hydration plays a role in the bulk fermentation timing. Lower hydration doughs typically take longer.
Shape the Dough
- On a floured work surface, shape into a ball by gently spinning it toward you.
- Let the dough ball sit out uncovered for about 15 to 20 minutes. This helps the top of the dough develop a skin or crust, which ensures it won't stick to the tea towel during the overnight rise.
- Turn the dough ball over and shape again. Do this by folding the two sides over to meet in the middle and then repeat with the other two sides.
- Transfer to a floured banneton or bowl with tea towel, seam side up, smooth side down. Cover with plastic and proof for 12 to 15 hours in refrigerator.
Bake
- Before removing your dough from the fridge, preheat a dutch oven for 1 hour in a 500 degree oven.
- Remove the dough from the fridge. If using, place it on a piece of parchment paper. Dust it with flour to help the scoring pattern stand out.
- Score with a razor blade or scoring lame.
- Transfer the parchment paper and dough to the dutch oven. IF not using parchment paper, add a little flour to the bottom of the dutch oven to keep the dough from sticking to the bottom.
- Bake for 20 minutes with the lid on at 500 degrees.
- Remove the lid and turn the oven down to 475. Bake an additional 25 minutes or until browned.
Notes
- Bulk fermentation time will vary based on a number of factors, including your environment and the maturity of your starter. Keep in mind that lower hydration doughs tend to take longer to ferment. Plan accordingly!
- To avoid a dense loaf, be careful not to under ferment your dough. Low hydration doughs are already more dense than a higher hydration dough.
- You will need an active, bubbly starter for this recipe. I use a 100% hydration starter.
Nutrition
Calories: 149kcal | Carbohydrates: 31g | Protein: 5g | Fat: 1g | Saturated Fat: 0.1g | Polyunsaturated Fat: 0.3g | Monounsaturated Fat: 0.1g | Sodium: 325mg | Potassium: 63mg | Fiber: 2g | Sugar: 0.1g | Vitamin A: 1IU | Calcium: 8mg | Iron: 1mg