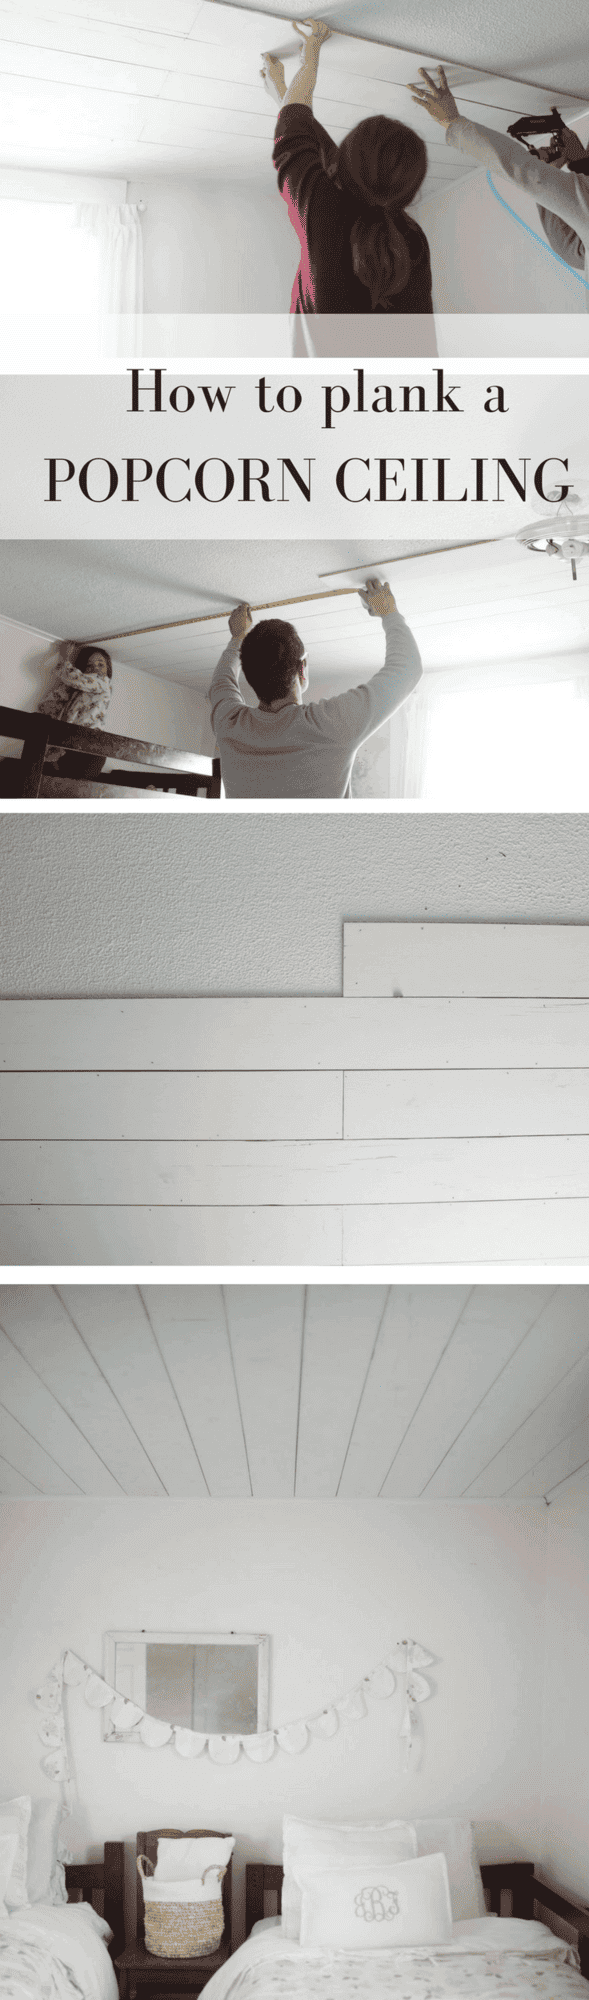
Learn how to plank a popcorn ceiling the easy way with this planked ceiling tutorial.
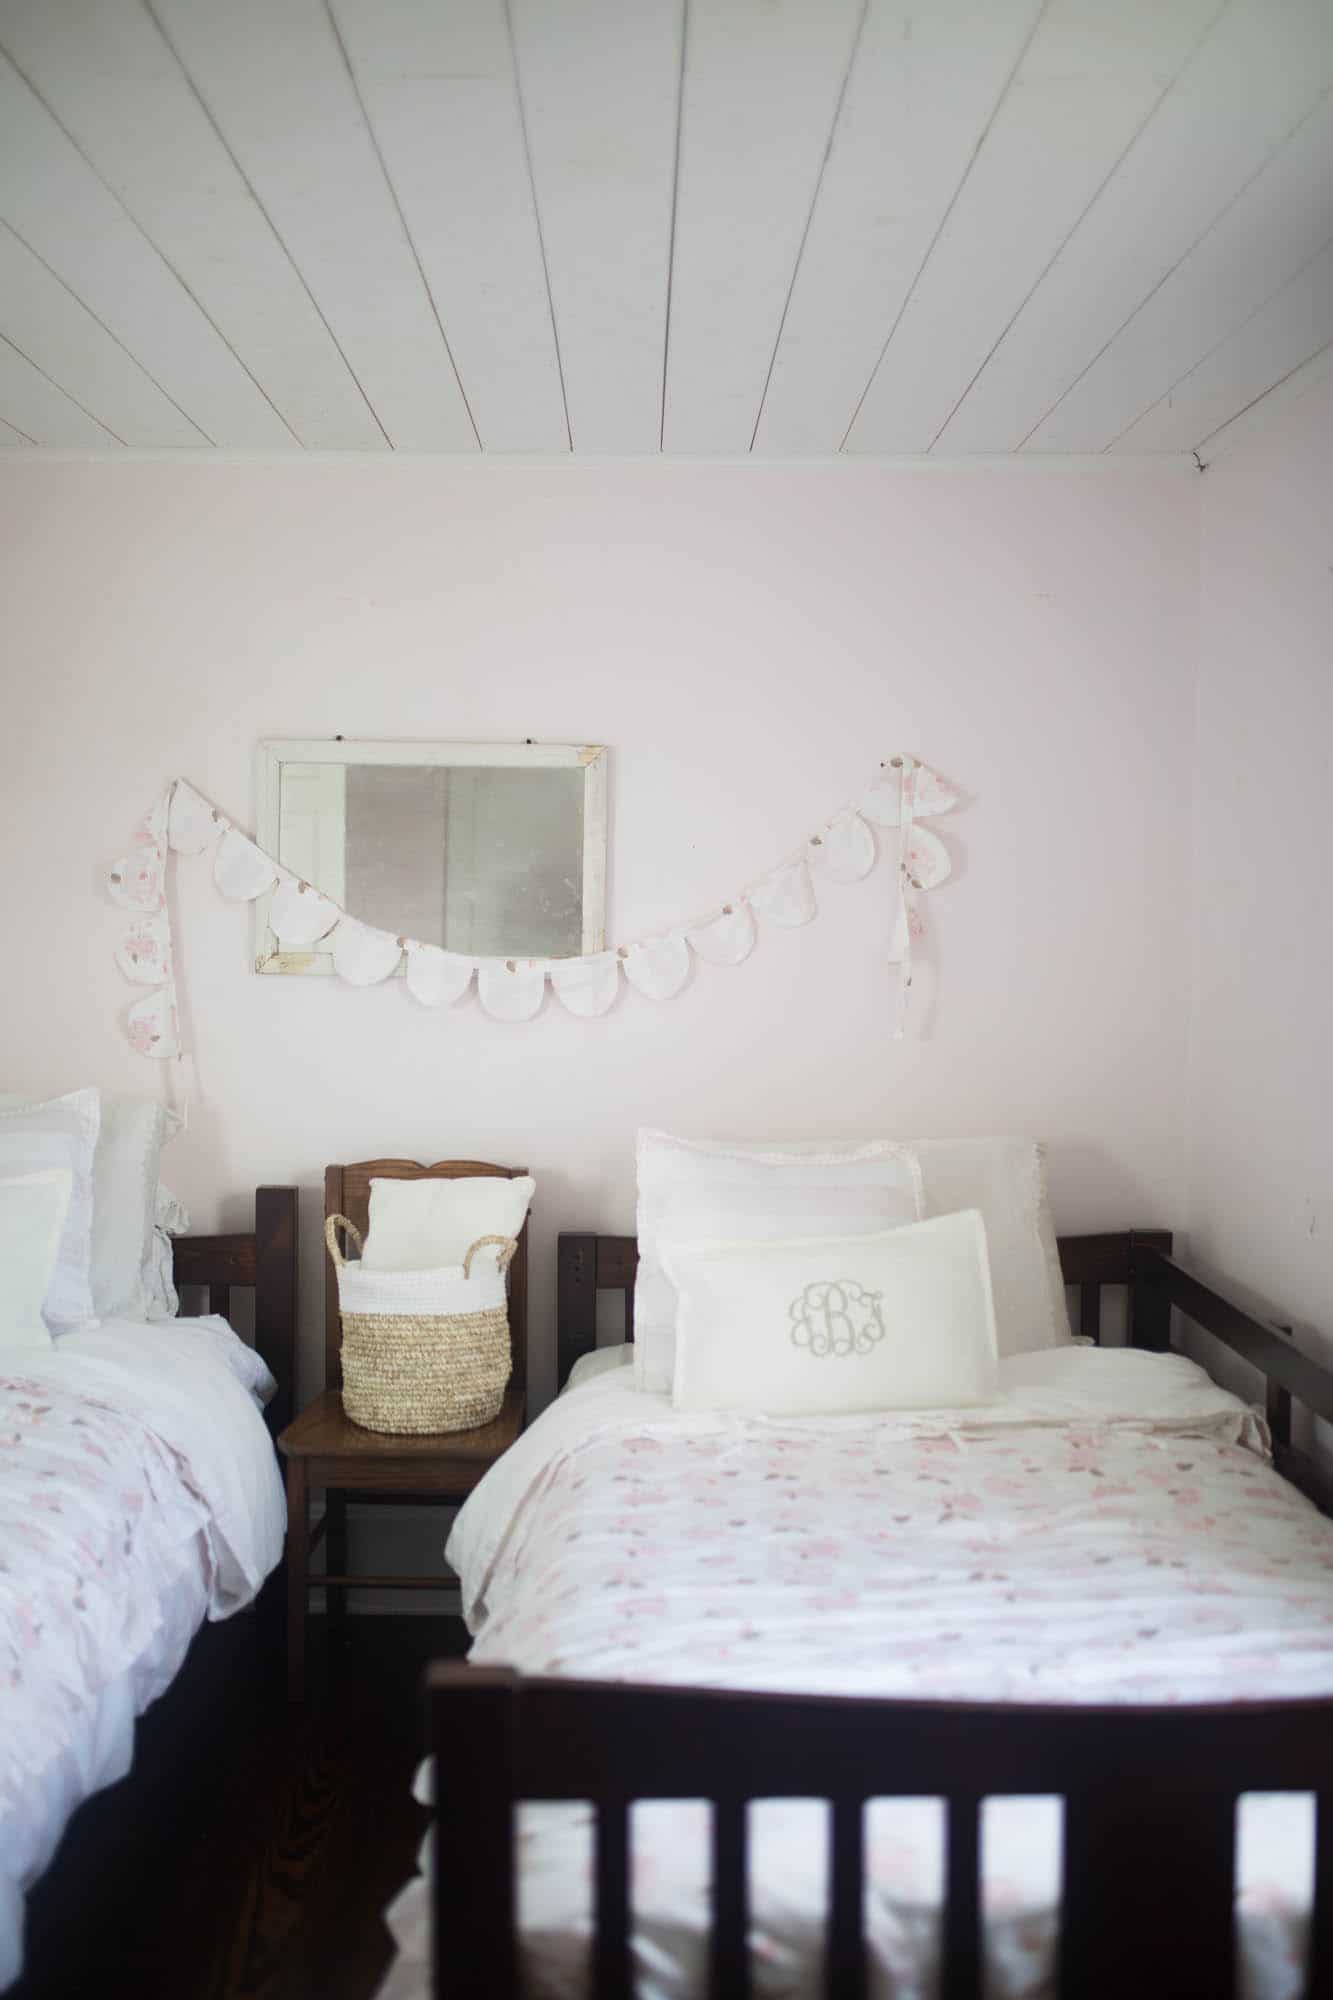
When we moved into our 1920’s home, every ceiling in our house was covered with texture. We fixed this problem easily and inexpensively, starting with our girls’ room.
Learn how to plank a popcorn ceiling the easy way with planked plywood.
How to plank a popcorn ceiling video tutorial
Old house ownership comes with many benefits. Crown molding, five panel doors with glass door knobs, original heart pine flooring, to name a few.
But, it also comes with a few drawbacks. Squeaky floors, outdated electrical and plumbing, and, the dreaded, dealing with renovations done through some less fashionable time periods. Linoleum floors, blue carpet, and my favorite, textured ceilings.
Please tell me, when were popcorn ceilings cool? Apparently they were so desirable that, at some point, someone took the effort to cover every ceiling in our house with the stuff. And since, I’m guessing, it wasn’t hip in the 1920’s, someone probably added the lovely texture in less romantic times, like the 80’s, for example.
We decided to cover up this ugly trend, starting with our girls’ room.
We covered this ceiling with the exact same process as we did for the shiplap wall in the master bedroom makeover.
The Supplies
- Four sheets 4′ by 8′ sanded plywood at 11/32″ thickness, cut into 6″ strips
- Air compressor and nail gun
- 1 and 3/8″ 18 gague nails
- Nickel for a spacer
- White Paint
We started by purchasing four sheets of 4′ by 8′ sanded plywood at 11/32″ thickness from Lowe’s.
We had them cut it into 6″ strips.
The workers will do this for 25 cents per cut. In my opinion, the convenience of this is totally worth a little added cost.
The Process
We basically planked this ceiling the exact same way we planked our shiplap wall in the master bedroom.
Since our ceiling measured 156″ by 104″, we ran the planks parallel between the door and window (long ways), as opposed to perpendicular to the door. On each line we had a short board that was 60″ and a long board that was 96″. We alternated them, so every other board was a long board and a short board.
Since we were working on the ceiling, we decided to paint the board prior to putting them up. It was so much easier than reaching up with all that paint.
We used a Bostitch air compressor and nail gun and 1 and 3/8 inch 18 gauge nails to nail the plywood planks into the ceiling. It made for a very speedy job.
Between each row, we used a nickel for a spacer. This created just a small line between the planks to make them more visible, yet not allow any of the popcorn texture to show through.
I suggest having 10 nickels on hand. We just kept losing them!
After every few rows, we measured from the start of the planks to the current plank we were working on, to see if they came out evenly. This helped to ensure nothing was getting too far off. On our shiplap wall we used a level, but we couldn’t do that when working on the ceiling.
To go around the light fixture, we notched the boards, to allow enough room for the wires to hang down.

When we reached the last row, on other side of the room with the planks, we had to cut them thinner to make them fit.
Wouldn’t it be great if we lived in a perfect world where ceilings were perfectly divisible by six, and no modifications would be needed to squeeze the last planks in? Unfortunately, that isn’t what we found.
Why didn’t we scrape the popcorn ceilings?
The main reason we didn’t scrape the popcorn ceiling is the asbestos risk. According to the EPA, asbestos was banned in 1977. Since our home was built well before that, I am not willing to take the risk of my family breathing in asbestos. This is why most of the ceilings in our home remain untouched, and probably always will. I could test them all for asbestos, and maybe will eventually, but right now that isn’t a high priority.
The second reason is I love the added farmhouse style. The planked ceiling looks adorable in my farmhouse girls’ room. I hope to add it to the boys’ room next!
[thrive_lead_lock id=’10866′]Hidden Content[/thrive_lead_lock]
Pin it for later


Do you remember the cost for wood in this project.
I do not. It was so many years ago, that I am sure the price has gone up.
We enjoyed your video. We plan on trying this on my mom’s living room ceiling. It is a cathedral with beams. Thank you for sharing your beautiful home and how to video!
Placing planks on the ceiling begs an obvious question: Did you nail any of these into the trusses or just the sheetrock/substrate? I think its a great idea, but in a more contemporary home with a sheetrock ceiling, those planks wouldn’t be secure without those nails finding a solid hold. Don’t get me wrong, I love the idea, just trying to figure out how to locate the trusses up there without taking off the popcorn. thanks!!
Yes, we find the trusses and nail into that spot! Once you have one plank up, it’s very easy to do the rest because you can go off the nail holes of the first plank.
I love how you transformed the look of your ceiling with plywood planks! Your step-by-step guide made the process feel approachable, and the end result is stunning. It’s such a clever solution to covering up popcorn ceilings without needing to go through the mess of scraping. The detailed photos and tips on finding the right materials were also super helpful.
I’m curious, when tackling projects like this, do you ever notice any issues with the home’s foundation affecting the ceiling or overall structure? How important is it to ensure the foundation is solid before starting large-scale interior projects like this? Thanks for the inspiration!
Great idea! Looks good. You didn’t use a lumber grid underneath the plywood? Did you just nail the plywood straight through popcorn plywood directly into the joists? Thanks!
Yes, the latter.
Hi! I so appreciate this post! We just bought a house built in the 90s with those lovely popcorn ceilings! I would definitely love to copy your project! Did the popcorn interfere at all? I imagine the boards aren’t completely flat against the ceiling because of the popcorn?
It didn’t affect things too badly! You can always scrape the popcorn off the ceilings. It’s a pretty easy process.
So now that you’re done with the project, how is it holding up? Are there very many waves you notice? Any places the nails didn’t hold? Do you wish you have used a stapler instead? Thanks so much for all these details and video. I’m trying to talk my hubby into us using this technique to cover our hideous popcorn ceilings! Great work!!!! It looks really fantastic!!!!
It held up great for the time we lived in the house. We moved a few years ago. There really wasn’t anything I would do differently.
Was it pretty easy to determine where the beams were for nailiing to, even through the popcorn ceiling?
Oh I’d love to know the answer to this as well!
If you can believe it I have a pop corn stucco HOUSE. Every single wall🤮. I’m using this technique throughout but hitting a small contractor