Learn how to make a cheap and easy DIY shiplap wall with this easy tutorial. With only plywood and nails you can recreate this expensive look for less.

Shiplap!
Oh the things husbands do for us!
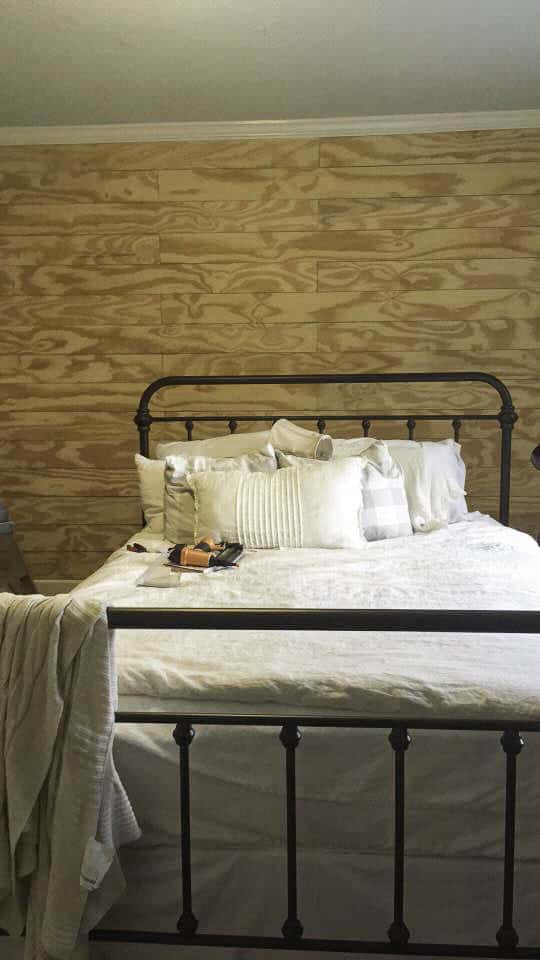
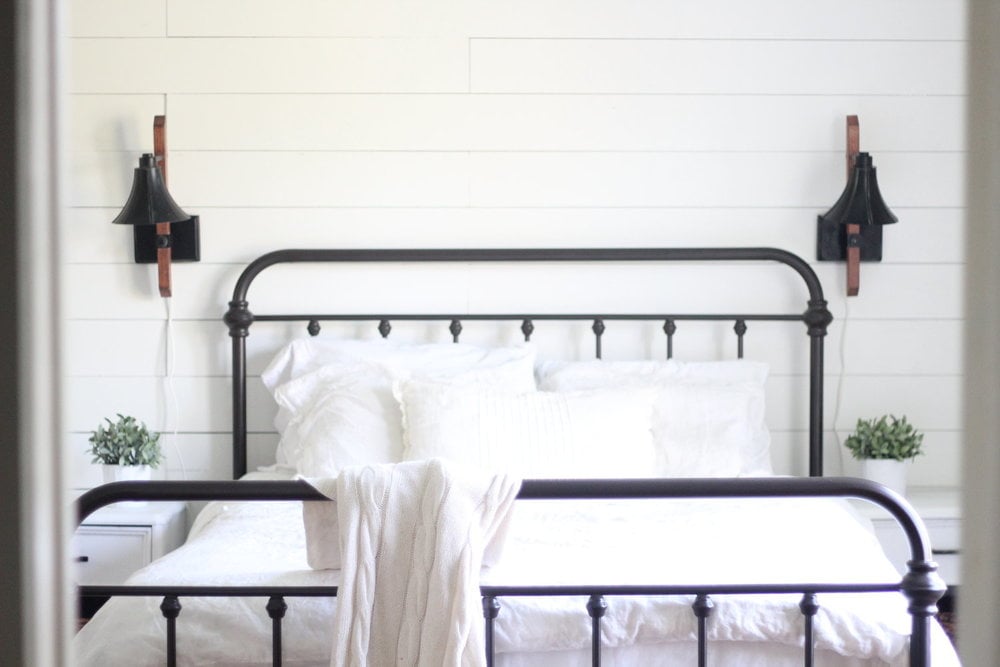
Can I just say I am so happy we did this? It makes the wall behind our bed a focal point and I love the how the plank wall adds texture to the wall.
This project was actually easier than expected and was pretty inexpensive!
The total cost for the project came under $100 for a 160″ by 90″ wall.
Not too bad for such a huge impact. We also did this on the ceilings in the kids rooms to cover up those not so pretty popcorn ceilings. You can find that tutorial here.
Adding this feature completely changes the look of this room and we are so thankful we did it.
Tips For Creating A Shiplap Wall
We used 6″ plywood strips, but you could cut this thinner or thicker depending on what you are going for. We have 8″ original shiplap in our boys closet, but I’ve also seen some really beautiful skinny lap with 3″ strips.
Choose plywood boards wisely making sure they don’t blemishes or are bowed. Smooth and straight will work best.
Speaking of that, we also had a major bow in the plaster to contend with. We solved that by having me hold the boards out a little, to make them even with the others, while my husband shot the nail in.
This post contains affiliate links, which means I make a small commission at no extra cost to you. See my full disclosure here.
DIY Shiplap Supplies And Tools
- Plywood: 4 sheets 4′ by 8′ sanded plywood at 11/32″ thickness, cut into 6″ strips
- Air compressor and nail gun
- 1 and 3/8″ 18 gauge nails
- Nickel for a spacer
- Circular saw: to cut the top piece.
- Miter saw: for cutting pieces to length.
- Jig saw: for cutting out specs for light switches and outlets.
- Painting supples: rollers, paint brush, primer, paint.
- Stud finder
- Level
[thrive_lead_lock id=’10866′]Hidden Content[/thrive_lead_lock]
How To Install Shiplap Wall
Step One: Prepping Materials And Wall
- Purchase and cut plywood down to 6 inch strips. I bought four sheets of 4’X8′ sanded plywood at 11/32″ thickness. I had Lowes cut it in 6″ strips. At $.25 per cut it was worth every penny. You could also use a table saw to rip them down yourself.
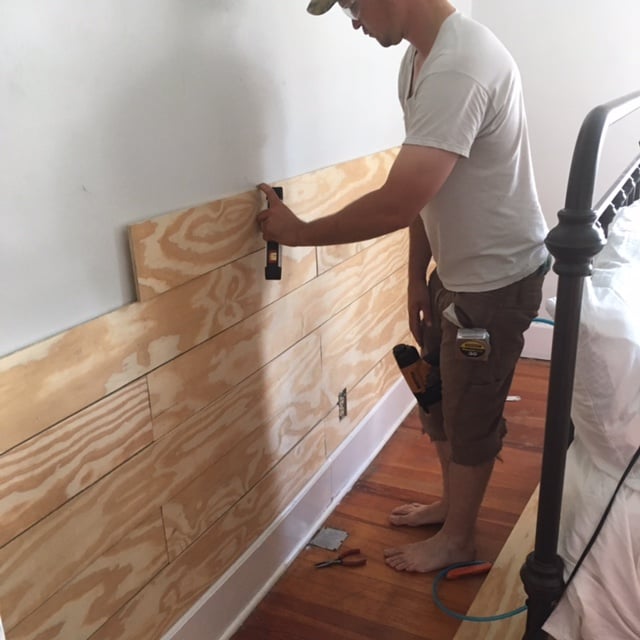
- Mark studs on wall using stud finder and pencil to ensure that each board is nailed into a stud.
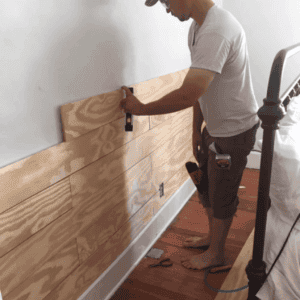
Step Two: Nail Shiplap Onto Wall
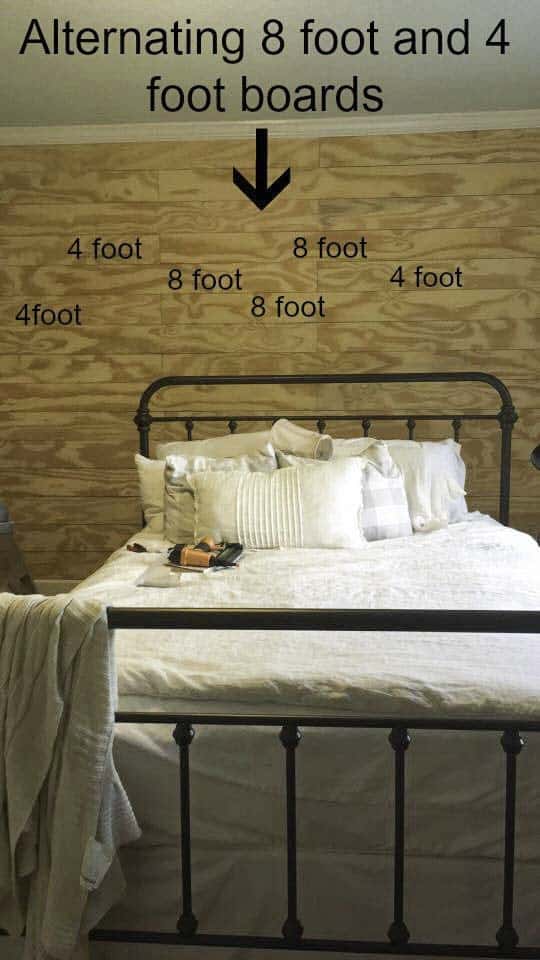
- Starting at the baseboard, we placed one full 8′ board at the edge of the wall and nailed it in place use nail gug.
- Next, cut one to fit the rest of the wall, which for our wall was right at 5 and 1/3 feet. Place besides the 8 foot piece and nail into place.
- This left us with several scraps just under 3 feet. If the wall had been an even 12 feet, we would have done an 8 foot and 4 foot piece in each row and had no leftover pieces, but the world is not perfect and our house is old.

- This left us with several scraps just under 3 feet. If the wall had been an even 12 feet, we would have done an 8 foot and 4 foot piece in each row and had no leftover pieces, but the world is not perfect and our house is old.
- Place 8 foot board on the opposite side of the wall above the previous row and use a nickel as a spacer between each new row, sliding it along as we nailed the board into place.
- We just continued to alternate which side we used the 8 foot board on. We used a Bostitch air compressor and nail gun and 1 and 3/8 inch 18 gauge nails that we purchased at Lowes. It made the project pretty speedy!

- We just continued to alternate which side we used the 8 foot board on. We used a Bostitch air compressor and nail gun and 1 and 3/8 inch 18 gauge nails that we purchased at Lowes. It made the project pretty speedy!
- Use a level every few boards to make sure the boards are staying level and not getting too wonky. We definitely had to fudge a little here and there to get things even.
- Cut around any outlets or switches by placing planks on the wall, marking where they need to be cut, and then cut them out using jigsaw.
- Continue alternating boards and using the nickel spacer to nail the shiplap onto the wall until you get near the top.
Step 3: Cut The Top Shiplap Plank
- Measure the space between the last wood strip and the ceiling.
- Cut last piece of plywood and nail into place.
- We did have to cut the top board (right below the crown molding) to be a little less than 6″ wide, as the the (nickel sized) spaces between the boards caused there to be slightly less than 6″ left at the top.
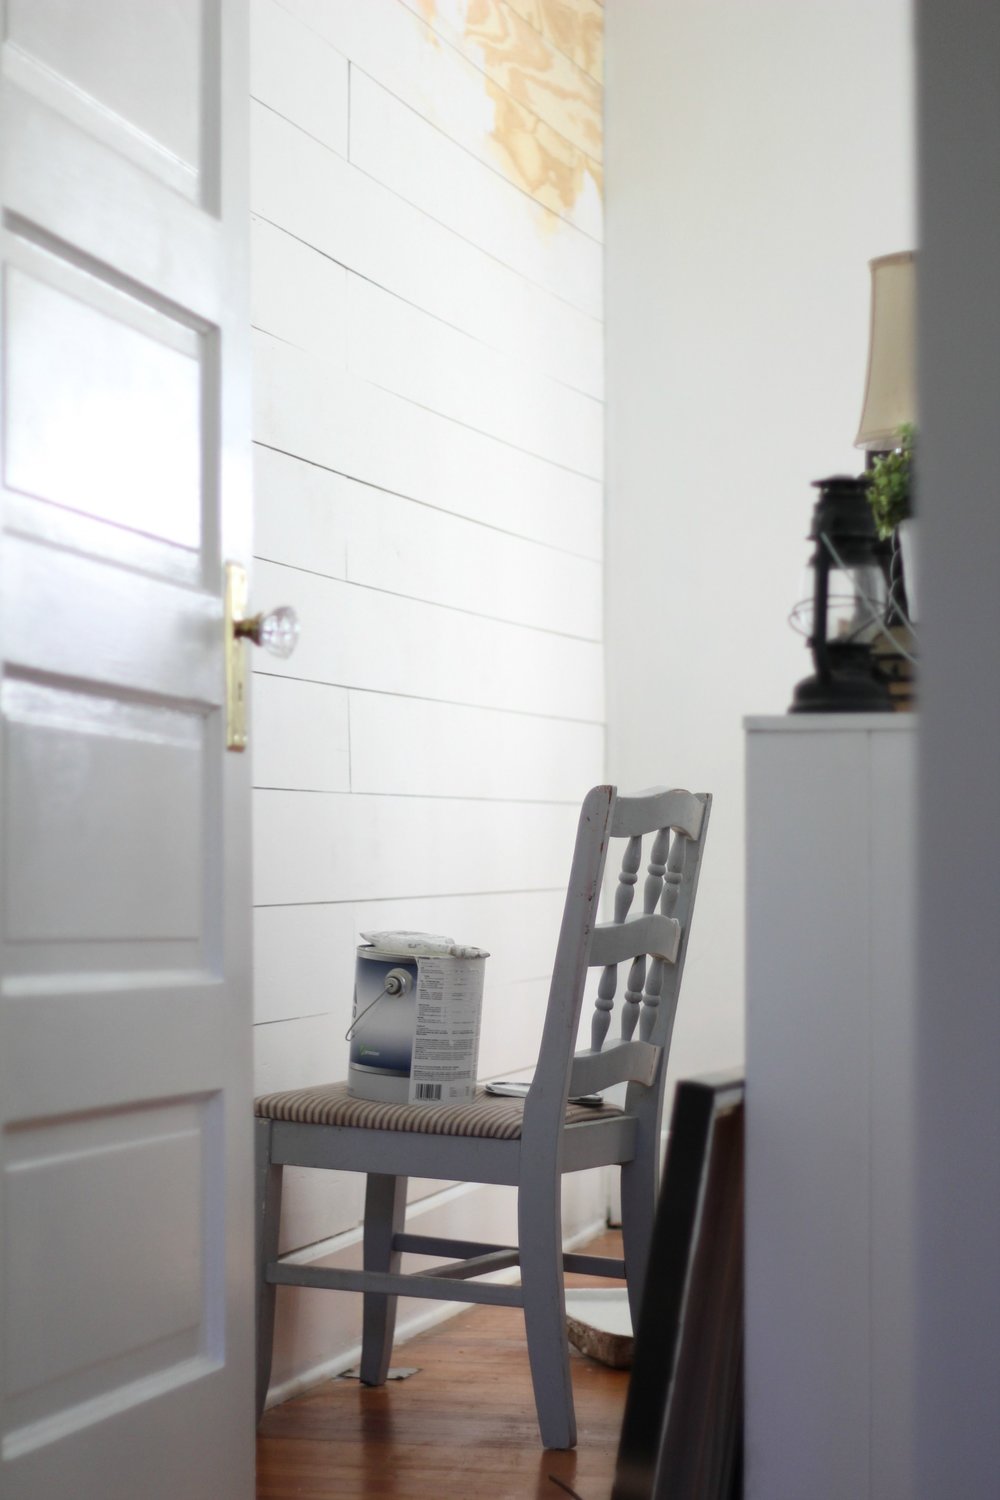
Step 4: Paint
- Optional step: fill nail holes with putty, allow to dry, and then paint. Honestly, we didn’t do this and didn’t mind the small nail holes. You really couldn’t even see them.
- The next day I primed the wall and then painted the whole wall with Benjamin Moore White Dove.
The DIY Shiplap Wall Is Up
After a few hours, the whole wall was done!
I would say most of the time is spent in the prep work, getting the wood and having it cut, cutting the boards to fit and notching it out in the appropriate spots, like on the corners of the baseboards and the electrical outlets.
After all that its smooth sailing!
I love how it turned out! It makes the room feel so light, bright and cozy!
Common Questions People Ask:
How much is shiplap?
Real shiplap has tongue and groove boards that actually fit together, and can be pricey. The shiplap wall in this tutorial cost less than $100. This shiplap tutorial is not actually real shiplap, but is much cheaper.
I have seen real shiplap and I honestly can’t tell the difference between the real tongue and groove and plywood. That ‘s why I opted to go the cheap route!
How wide is shiplap?
The shiplap in this tutorial is 6″ wide, but actual widths can vary. We have real shiplap, from 100 years ago, exposed in our boys’ closet. It is closer to 8″.
What color should you paint shiplap?
We used Benjamin Moore White Dove because I really love the look of white shiplap, but I have seen it look really beautiful in gray and darker colors as well.
You can paint the shiplap before or after your install it. For this tutorial we waited until after it was in place, but you could also paint it before like we did for the ceilings.
Do you put shiplap over drywall?
Yes. You can place it right over drywall or plaster. It it a great way to cover up some wall damage. If you do have a lot of damage you may want to try to repair it before adding shiplap.
Check out the other posts in this bedroom makeover here:
And since so many have asked where my iron bed is from…it is the antique bronze metal bed from Target. I hope to write a review on it in the near future, but *spolier alert* we love it!
Find More Farmhouse Inspired DIY Projects:
- DIY Farmhouse Coffee Table Plans
- Farmhouse Living Room Built Ins
- Victorian Farmhouse Kitchen Reveal
- How to Cover Concrete Steps with Wood
- Ten Foot Office or Craft Room Desk Tutorial
DIY Shiplap Wall
Equipment
- Air compressor and nail gun
- 1 and 3/8″ 18 gague nails
- Nickel for a spacer
Ingredients
- 4 sheets 4′ by 8′ sanded plywood at 11/32″ thickness, cut into 6″ strips
Instructions
- Purchase and cut plywood down to 6 inch strips. I bought four sheets of 4'X8' sanded plywood at 11/32" thickness. I had Lowes cut it in 6" strips. You could also use a table saw to rip them down yourself.
- Mark studs on wall using stud finder and pencil to ensure that each board is nailed into a stud. Starting at the baseboard, we placed one full 8' board at the edge of the wall and nailed it in place use nail gug.
- Next, cut one to fit the rest of the wall, which for our wall was right at 5 and 1/3 feet.
- Place besides the 8 foot piece and nail into place.
- Place 8 foot board on the opposite side of the wall above the previous row and use a nickel as a spacer between each new row, sliding it along as we nailed the board into place.
- We just continued to alternate which side we used the 8 foot board on.
- Use a level every few boards to make sure the boards are staying level and not getting too wonky. We definitely had to fudge a little here and there to get things even.
- Cut around any outlets or switches by placing planks on the wall, marking where they need to be cut, and then cut them out using jigsaw.
- Continue alternating boards and using the nickel spacer to nail the shiplap onto the wall until you get near the top.
- Measure the space between the last wood strip and the ceiling. Cut last piece of plywood and nail into place.
- Optional step: fill nail holes with putty, allow to dry, and then paint. Honestly, we didn't do this and didn't mind the small nail holes. You really couldn't even see them.
- The next day I primed the wall and then painted the whole wall with Benjamin Moore White Dove.
Notes
- We had to cut the top board (right below the crown molding) to be a little less than 6″ wide, as the the (nickel sized) spaces between the boards caused there to be slightly less than 6″ left at the top.
- I would say most of the time is spent in the prep work, getting the wood and having it cut, cutting the boards to fit and notching it out in the appropriate spots, like on the corners of the baseboards and the electrical outlets.
Nutrition information is automatically calculated, so should only be used as an approximation.


Thank you very much for the tutorial, it was really helpful and informative, you guys inspire me to start my own project, you are amazing. Great job and your bedroom looks so beautiful, I love it 👏👏👏👍
Beautiful ! Would this work on a ceiling? that has damaged drywall on it damage is just glue and some paper peel
Yes, it would!
How did u paint in between boards or did u just do a roller and not worry about getting the paint in the lines?
Can you use this on wood paneling?
Yes, you should be able to! As long as you can get it nailed in, it would work!d