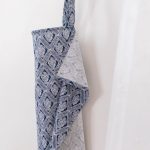
DIY Nursing Cover Tutorial
This super simple, DIY nursing cover is perfect for new moms who want to be able to nurse in public a little more discreetly. Made with boning, this breastfeeding cover allows you to easily see baby while nursing.
Servings 1
Cost 5
Equipment
Ingredients
- 1 1/2 yards of fabric - something lightweight
- Set of 1-inch D rings
- 14" of boning
- Thread
- Sewing Machine
- Sewing Scissors
- Measuring tape
- Steam Iron
Instructions
CUT OUT FABRIC
- Start by cutting out a 26-inch by 36-inch piece of fabric for the main piece.
- Cut out a 28-inch by 3-inch piece for the long strap.
- Lastly, cut out a 10-inch by 3-inch piece of fabric for the side straps with D rings.
SEW THE STRAPS
- Fold the straps in half with the wrong side showing.
- For the long strap, fold down one end about 1/2 inch before sewing. This just allows the one side to have a finished look. The other ends will be tucked in, so you don’t have to worry about them.
- Sew a seam down the long side. Do a back and forth stitch at each end.
TURN THE STRAPS OUT
- Pin a safety pin to one end, catching only 1 layer of fabric.
- Tuck safety pin into the inside out strap and pull it through, scrunching the fabric and pulling it until it has completely turned right side out. Do this for all straps.
- Press them flat with an iron. With the short strap, I like to press them with the seam in the back. For the longer pieces, I like to press them with the seam on the side.
- Run a top stitch down the edges of the straps to hold them in place. This holds down the fabric, helps reinforce the stitch, and makes it pretty.
- Once you have top stitched the small strap, add the D rings and fold it in half.
- Add a top stitch pretty close to the D rings (add a back and forth stitch to start and end) to keep them in place.
HEM THE MAIN PIECE
- Lay the main piece of fabric out with wrong side facing up.
- Fold the edges over 1/2 inch, and press all the way around.
- Fold the edges over 1/2 inch again, and press all the way around.
- Sew 1/2 inch top stitch around the two short sides and one long side, creating a hem on three sides and leaving one long side. We are leaving this part open because we will be sewing in the straps and boning.
- Lay the main piece of fabric out on a work surface, and fold it in half to find the middle of that long, unfinished side.
- From the middle, measure over 7 inches and mark (I used a pin). This is for the boning.
- Tuck the strap under the open hem just outside the mark you made for the boning.
- One side tuck in the short strap with the D rings, and on the other side the long strap. Pin in place.
- Sew all the way down the long side of the main piece, catching the straps.
- Important: Right before you get to the end of the 14 inch section that is for the boning, you will want to start and stop your stitching and leave about a centimeter gap. This is where you will be putting the boning in later. I like to do this by sewing almost all the way to the longer strap, back and fourth stitch, move my needle a centimeter, and then continue to sew (do a back and forth stitch when starting again). Then sew the rest of the way down.
PUT IN THE BONING
- Peel off the fabric boning cover. The boning comes with a fabric cover, I like to take this off because I have a hard time getting it in with the fabric on.
- Place the plastic boning into the little gap you made, and push it all the way through.
- Close up the centimeter gap with a back and forth stitch.
- Sew a top stitch on the two ends of the boning, so it doesn’t go through the entire top piece.
- Optional: Sew a top stitch along the boning (long ways) so that way it doesn’t move around a lot.
SEW THE STRAPS
- Flip the straps up; currently they are sewn facing down, and put a top stitch (starting and stopping with a back and forth stitch) on top, so they are facing the correct direction.
All done!
Notes
How To Fasten And Adjust The DIY Nursing Cover:
- Place the long strap into both D-rings.
- Split the D-rings and slide the long strap end up and over one D-ring and under the other D-ring.
- Then you will be able to adjust the strap to the correct length.