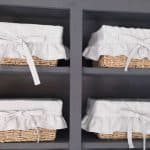
How to Make a Basket Liner
Sewing your own home decor allows the opportunity to choose custom fabrics for your style. Read on to find out how to make a basket liner. It is simpler than you think!
Servings 1 liner
Cost 5
Equipment
- Sewing machine
Ingredients
- baskets
- fabric i used a linen blend
Instructions
GETTING THE MEASUREMENTS
- You will need several measurements for this project. First, find the length and width of the bottom of the basket. If you are using a circle basket, you need the diameter. To these measurements, add 1″ for seam allowance. For example, if the bottom of your basket measures 9.5″ by 6.5″ cut a piece of fabric 10.5″ by 7.5″.
- Next, measure the length and width of the sides of the basket. If it is rectangular, you will have two shorter sides and two longer sides. Normally they are angled, so that the bottom width measurement is 9.5″ (like the width of the bottom of the basket) and the top width measurement is 11.5″, for example.
For the side pieces you also want to account for how far you want the basket liner to come down on the outside of the basket. Since I planned to add more length with a ruffle, I only wanted mine to come down about 2.5″. My basket was 6″ tall, so I made my side pieces 8.5″ long, so they would have that 2.5″ overhang.
CUTTING OUT THE PIECES
- To cut the side pieces shorter at the bottom and longer at the top, use the rectangular bottom piece as a guide, since that is where the side pieces of the basket meet the bottom.Take one of the smaller side pieces and line it up with the shorter side of the bottom piece. With the side pieces centered, make a mark on both sides. Make little slits with your scissors. Fold the side piece in half and line up the slits. Make an angled cut until you reach the longer edge.(If all this sounds confusing, check out the video above. It is definitely easier than it sounds!)
- See how all the side pieces are shorter at the bottom but angled to be longer at the top? They line up with the rectangular bottom liner piece and then get longer to account for the wider top of the basket.
SEWING IT ALL TOGETHER
- Next, sew the sides to the bottom. Keep in mind that you want the seams to be hidden inside the basket, so lay the side pieces on top of the bottom piece, and sew with a 1/2″ seam. Note* If you have a basket where the liner will be visible from the outside, such as a wire basket, the seams should be inside the basket.After all four side pieces are sewn to the bottom piece, sew each side piece to the next one over.Finish all the seams with a zig zag stitch or serger.
- The basket liner really takes shape at this point. Next, measure all the way around the basket to determine how long the ruffle should be. The general rule of thumb for ruffles is to make it 1.5 times the length of what you’re attaching it to.Since my basket was 40″ around, I made my ruffle piece 60″ long. I made it 3.5″ wide.
MAKING THE RUFFLE
- Hem the long edge by folding it over 5/8″. and then another 5/8″. Sew with a 1/2″ seam. Put a gathering stitch in the other long edge. Do this by increasing your stitch length, and tension, as high as they can go. If you are brand new to ruffle making, I share some of my thoughts in this video. Gather the ruffles until they are the same size as the perimeter of the basket liner (in my case 40″).Pin and sew in place.
MAKING THE TIE
- Cut a strip about 2″ wide by the length of the basket liner perimeter + about 14″ overhang on each side (to tie the bow). My piece was about 68″. 40″ basket perimeter + 28″ total for the bow. Fold the strip in half (long ways, right sides together) and both the ends under about 1/2″. Sew all the way down the long edge with a very narrow seam.
- Use a safety pin in one end to push the tie right side out. Fold the tie piece in half to find the center. Find the center of the back of the basket liner. Line the two centers up, and pin in place.
- Find the center of the front of the basket liner, and mark it with a pin. Starting from the back (the centers). Sew the tie to the basket liner. Line it up just above the ruffle. This also acts as the top stitch, so make sure to sew close to the edge of the tie. Stop a few inches from the front center pin.
- Repeat going the other way, starting from the back center. Stop the same distance from the front center pin as the previous stitch. Topstitch the top of the tie, again stopping the same distance from the front center pin as the bottom topstitch. Finish the tie off by topstitching the to ends that are not stitched to the liner.
Notes
- This basket liner can be made for any size basket. Customize it with fabrics that match the space you are decorating. You could even play around with a different color tie and ruffle. The options are endless!