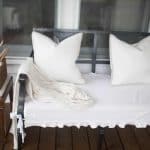
DIY How to Sew a Slipcover for a Wooden Bench
Learn how to make a slipcover to update an outdated bench of any size.
Servings 1
Cost 5
Equipment
- Sewing machine
Ingredients
- Fabric to cover your size bench
Instructions
- To begin, I measured the existing bench cushion. Mine was 23″ by 47″.
- I wanted the slipcover to have a 4″ fall on all sides of the bench (before adding the ruffle). I cut the main piece to accommodate for that “fall” on the front and back. I used white canvas duck fabric and began cutting my pieces. (You could certainly use bleached drop cloth for this project, but I was in a hurry and needed something all ready to go this time.)
- My main piece measured 47″ (the length of the bench cushion) by 31″ (the width of the bench cushion plus 4″ on the front and back) I finished the short edges off with a narrow 1/4″ seam. My bench had a bar in the back, so I cut a slit to accommodate it.
- I finished the slit off by sandwiching it in extra wide double fold bias tape, and sewing it into place. This kept the raw edges hidden inside the neatly folded bias tape. Next, I added the pieces that would hang off the sides of the bench.
- For the side pieces, I cut two pieces 25″ (the width of the cushion plus one inch for seam allowance) by 6″ (the 4″ fall, plus the seam allowance). I finished the raw edges by hemming the sides with a narrow 1/4″ seam. After sewing the two side pieces on, this is the shape I had: (see in blog post)
- For the ruffles, I cut several 5″ strips. I needed enough to add a ruffle to all four sides of the slipcover. The ideal length for ruffles is 1.5 times the width of the piece you will be sewing them to. This allows for those pretty gathers.That’s a lot of ruffle!I finished all the ruffle pieces by hemming them with a 1/2″ seam on one long side of each piece.
- I put the gathering stitch in the other long side of each piece. The easiest way to gather fabric is to turn the machine’s tension and stitch length all the way up. This will cause your fabric to gather all on its own when you put that gathering stitch in.
I also prepared enough piping for the entire project, before I ever started sewing. - Basically, you sandwich a piece of cotton piping between a strip of your fabric of choice. You could make it match your main piece, or use it as an opportunity to create some contrast.
The point of piping is to provide the piece with a little structure. I love the detail it adds to this slipcover. - To sew the ruffles and piping onto the main piece of fabric, I sandwiched the three together with all the raw edges facing the outside.
- I left about an inch of piping and ruffle to overhang the outside of the main slipcover piece, so I could fold them over and sew the raw edges inside. I put the pins in along the sewing line of the piping, and the gathering stitch of the ruffle. I tried to sew as close as possible to the pin line, to ensure I was getting as close to the piping as possible, without sewing over it, and making pretty ruffles.
- When making ruffles, if you stray too far from the gathering stitch, your gathers can start to get really wonky really quickly. Not that I’ve done that a million times before, learning that lesson the hard way! Also, be sure to sew this all veeeeery slowly, because with that many layers (and the possibility of running over piping cord) you are likely to break needles. I may or may not have broken at least five during this project.
- After sewing on all the ruffles, I ran over them with a little topstitch to keep them laying flat. This is an optional step, but I like my ruffles to lay down nicely.
- For the ties, I cut eight 18″ pieces of white double fold bias tape. I folded the ends under, to hide the raw edges inside, and sewed the open edge shut. I added these just above the ruffles in all eight corners, and sewed them in place.
Video
Notes
- The point I want to get across is that you could make this for any bench size, by recreating this shape and technique, with your bench’s specific measurements. If you want it to cover more of the bench, you could have it fall further.
- I only included my measurements for reference, so you are able to understand why I did what I did with this project.