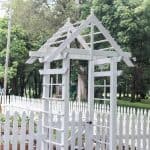
DIY Arbor Plans
Learn how to build an arbor with these simple arbor plans. You can easily build this in a day or two, giving your garden a beautiful entrance.
Servings 1
Cost 5
Equipment
- Drill and drill bits
- Table saw
- Miter saw
- Screws
Ingredients
- 6 – 8′ 4x4s
- 4 – 8’ 2x4s
- 2 – 8’ 1x4s
- Paint or stain
Instructions
- Take four of the 8’ 4×4 posts and sink them in the ground one foot. They should be square, 40 inches apart left to right, and 36” from front to back. These are measurements from the outside of the posts. 4x4 posts laying on top arbor posts Cut the other two 4×4’s down to 66” and lay one across the two front posts and one across the two back posts. Secure with screws.
- This will essentially create the frame, the front and the back. Next, add the points. Rip a 2×4 in half, so you have two 2x2s. Cut them down to three feet. Use a miter saw set to 45° to create the points on each end (as seen in the video). Luke marked the middle of each side of the end of the 2×2 at 3/4 inch down. Cut at 45° to make a triangle, flip to the flat side and cut 45° angles again on both those sides to create the point.
- Center them on the top of the main frame, placing the bottom point 4” from the bottom of the cross post. Screw in place.
ADD DECORATIVE SIDES
- Next, cut the side decorative 2x4s that connect the front to the back. Cut them 48” (or one 8 foot 2×4 cut in half) with 45° at both ends (use a miter saw).
- Put one on each side right under the place where the top 4×4 meets the main 4×4 posts, across to attach the front posts to the back posts. Go down 6” and place another one on each side.
ADD THE ROOF:
- Cut four 2x4s to four feet in length with 45° angles at each end. Meet them to the 3’ center posts, leaving 4” above the pitch of the roof. Drill in from the side of the 2×4 to the center post.
ADD LATTICE ON THE SIDE AND ROOF
- Rip a 1×4 into three-quarter by three-quarter strips (4 per 1×4).You need 12 at 36” (6 horizontal bars for each side), 9” apart, starting from 6” below the lower side 45° 2×4. And two at 60” to go down the center of the horizontal lattice.
Notes
- Your plans and size of arbor may change based on your own location, needs, and desires. You can use this as a guide.
- You could add more embellishments, like corbels, lattice work, etc.
- This was a fairly inexpensive project because we tried to repurpose many materials from previous projects, like some of the wood and paint.
- If you don’t want to paint the arbor, I would recommend using cedar so it will last longer in the elements.