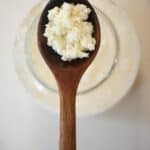
How to Make Milk Kefir
Learn how to make milk kefir. A thick and creamy yogurt like drink, bursting with beneficial bacteria.
Servings: 2 servings
Ingredients
- 2 tablespoons kefir grains
- 2 cups milk preferably whole
Instructions
- Measure two tablespoons of milk kefir grains into a clean half-gallon jar.
- Add two cups of milk.
- Cover with a coffee filter, paper towel, or tea towel, securing with a rubber band. You can also place a plastic lid loosely over the top.
- Let the milk kefir sit out at room temperature until the desired thickness and sourness are achieved. This will be somewhere between 12-36 hours based on preference. I like the probiotic benefits of extra thick and sour kefir, so I leave mine out for about 36 hours. Others prefer 12 hours.
- After fermentation, strain the kefir grains out using a strainer. You can use the kefir right away or keep it in the fridge, with a lid, for up to two weeks.
- You can now start your next batch of milk kefir with those grains, or you can store the grains between batches in the refrigerator in a glass jar covered with milk.
Notes
-
- When milk kefir grains are “fed” regularly with fresh milk, they will multiply like crazy. Soon you will have more than you even know what to do with! Pass them along to your naturally-minded family and friends.
- The temperature of your kitchen will impact the fermentation time. In the winter, when the temperature is cooler, it may need to ferment longer than during the summer.
- It is normal for the whey to start separating from the milk. This naturally happens with fermentation.
- Kefir grains will last years. I’ve been using the same ones for over six years now.
- You don’t want to add too many kefir grains to your milk or it will ferment much faster than you want.
- When you first start using kefir grains, your milk kefir may not turn out as well as you'd like. This is because they are adjusting to a new environment. Give them a few times to start making really good batches.
- The amount of milk you use will correspond to the amount of kefir grains. If you have a lot of grains, you will be able to use more milk to make more homemade milk kefir.
Nutrition
Calories: 146kcal | Carbohydrates: 11g | Protein: 8g | Fat: 8g | Saturated Fat: 5g | Polyunsaturated Fat: 0.3g | Monounsaturated Fat: 2g | Cholesterol: 29mg | Sodium: 93mg | Potassium: 366mg | Sugar: 12g | Vitamin A: 395IU | Calcium: 300mg
