DIY Shiplap Wall
Learn how to make a cheap and easy DIY Shiplap wall with plywood. This project is perfect for beginners and can be done in one afternoon, especially if you have the hardware store cut the plywood for you.
Servings 1
Cost 5
Equipment
- Air compressor and nail gun
- 1 and 3/8″ 18 gague nails
- Nickel for a spacer
Ingredients
- 4 sheets 4′ by 8′ sanded plywood at 11/32″ thickness cut into 6″ strips
Instructions
- Purchase and cut plywood down to 6 inch strips. I bought four sheets of 4'X8' sanded plywood at 11/32" thickness. I had Lowes cut it in 6" strips. You could also use a table saw to rip them down yourself.
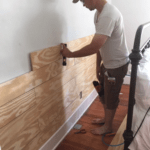
- Mark studs on wall using stud finder and pencil to ensure that each board is nailed into a stud. Starting at the baseboard, we placed one full 8' board at the edge of the wall and nailed it in place use nail gug.
- Next, cut one to fit the rest of the wall, which for our wall was right at 5 and 1/3 feet.
- Place besides the 8 foot piece and nail into place.
- Place 8 foot board on the opposite side of the wall above the previous row and use a nickel as a spacer between each new row, sliding it along as we nailed the board into place.
- We just continued to alternate which side we used the 8 foot board on.
- Use a level every few boards to make sure the boards are staying level and not getting too wonky. We definitely had to fudge a little here and there to get things even.
- Cut around any outlets or switches by placing planks on the wall, marking where they need to be cut, and then cut them out using jigsaw.
- Continue alternating boards and using the nickel spacer to nail the shiplap onto the wall until you get near the top.
- Measure the space between the last wood strip and the ceiling. Cut last piece of plywood and nail into place.
- Optional step: fill nail holes with putty, allow to dry, and then paint. Honestly, we didn't do this and didn't mind the small nail holes. You really couldn't even see them.
- The next day I primed the wall and then painted the whole wall with Benjamin Moore White Dove.
Notes
- We had to cut the top board (right below the crown molding) to be a little less than 6″ wide, as the the (nickel sized) spaces between the boards caused there to be slightly less than 6″ left at the top.
- I would say most of the time is spent in the prep work, getting the wood and having it cut, cutting the boards to fit and notching it out in the appropriate spots, like on the corners of the baseboards and the electrical outlets.