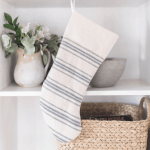
How to Make A Christmas Stocking
Learn how to make Christmas stockings with this simple sewing tutorial. It’s a lot easier than you might think to make your own stockings.
Servings 1 Stocking
Cost $5
Equipment
- Sewing machine
- Scissors
Ingredients
- 1/4 yard grain sack fabric
- 1/4 yard drop cloth
- 1 package extra wide double fold bias tape
Instructions
Cut the pattern pieces:
- 2 "J shaped" fabric pieces from the main fabric (Use an existing stocking as a pattern. See step 2 below.)
- 2 "J shaped" fabric pieces from drop cloth
- 2-9″ long pieces of drop cloth for the top band (The width of the band will be determined by the width of your stocking main stocking piece. See step 3 below.)
- 1-6" piece of ribbon or bias tape
- Take an old stocking and, using it as a guide, make an outline on the fabric for the outside piece. When cutting around the fabric, leave a half inch all the way around for seam allowance. Cut out 2 "J shaped" grain sack fabric pieces for the outside and 2 "J shaped" drop cloth fabric pieces for the inside. I like to use 100% cotton drop cloth because it can be bleached and I also use it for other projects in my house such as making slipcovers for my couch and chairs.
- Cut out the 2 drop cloth fabric pieces for the top band.
- To cut the top band part, measure a piece of coordinating fabric. Cut out 2 pieces of a 9 inch long side x the width of the top of your main stocking piece.
- Sew the main pieces together
- With a 1/2" seam and right sides together, sew around the long sides and "J" of your main stocking pieces. Leave the top open.
- Note: If your outside bottom pieces has stripes, line those up before you sew them together and pin them in place. The grain sack fabric I am using has stripes on both sides, so it doesn’t matter about the inside out thing. If your fabric is a solid pattern on both sides, you don’t need to worry about lining up the pattern.
- With a 1/2" seam and wrong sides together, sew around the long sides and "J" of your main stocking pieces. Leave the top open.
- Sew down the open side of the 6" piece of bias tape you cut in step 1.
- Sew the top band together.
- Fold the band piece in half, so the raw edges are hidden inside. Put the stocking lining inside the main stocking piece.
- The raw edges from the seam of the lining should be facing the raw edges from the seam of the main piece.
- Line the bottom of the band up with the top of the stocking and sew together with a 1/2" seam. Make sure to catch the layers from the main stocking piece, lining and band.
- Serge around the seam or do a tight zig-zag stitch to finish it off.
Video
Notes
Other Optional Embellishments
- Faux fur: Use faux fur for the cuff piece for a fun twist.
- Pom poms
- Fun ribbon
- Bells: I love adding vintage bells or any jingle bells.
- Buttons
- Use fabric paint or an embroidery machine to create beautiful and custom designs.
- Faux candy canes