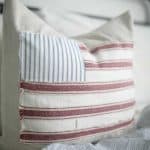
Scrappy Flag Pillow Cover Tutorial DIY Fourth of July Decorations
Fourth of July is right around the corner! This scrappy flag pillow cover tutorial will have you well on your way to some DIY summer decor. It’s a simple project that you can do with any red and blue fabric scraps you have laying around.
Servings 1
Cost 5
Equipment
Ingredients
- Sewing Machine
- Bleached drop cloth
- Red patterned fabric
- Blue patterned fabric
- Heat 'n bond
- Pins
- Fabric scissors
Instructions
FOR THE FLAG, CUT:
- 13.5″ by 9.5″ piece of white material
- 1- 4.5″ by 5.5″ piece of blue material
- 2- 9″ by 1″ pieces of red material
- 3- 13.5″ by 1″ pieces of red material
FOR THE PILLOW, CUT:
- 1- 19″ by 19″ piece of off-white or tan material
- 2- 19″ by 13″ pieces of off-white or tan material
- Now, it is time to appliqué the flag to the 19″ by 19″ piece, using Heat ‘n Bond.
- When you open the package, you will notice it has rough side. This is the side you are going to lay your fabric on and apply heat from the iron. Those little raised bumps are like glue that, when heated, will make your fabric stick to it.
- When it is hot enough, and fully affixed, the paper on the back will peel away, and reveal a shiny film on the back of your fabric.
- You will lay that shiny part down against the fabric you are wanting to stick the appliqué to, and it will act like glue, when you apply the iron to the top of the appliqué.
- Take your 13.5″ by 9.5″ white piece, and cut a piece of Heat ‘n Bond to the same size. Lay your piece on the rough side, lining it up so that the fabric is completely covering the matching piece of Heat ‘n Bond, and apply the iron to the fabric.
- For thicker fabrics, you will need to use high heat and steam. Since my red grain sack fabric and all-purpose canvas drop cloth are so thick, I had to leave the iron on it for quite a while to get it to stick. It did eventually work for me, but I was beginning to wonder.
- Lay the flag piece on the 19″ by 19″ main pillow piece and iron it down, making sure it is centered.
- Next, start the Heat ‘n Bond process with the two small stripes.
- Repeat for the other small stripe.
- Cut away any excess gluey stuff, and iron the first two stripes down.
- Next take your 4.5″ by 5.5″ piece of blue material and Heat ‘n Bond that in the top left corner, like I did in the photo below.
- You want it to overlap the top two stripes.
- Next Heat ‘n Bond your longer three red stripes to the rest of the flag, making sure they are evenly spaced. You want the third stripe down to overlap the blue piece slightly. I left a little extra in the measurements, so there wouldn’t be any gaps.
- Just make sure the top of third stripe is one inch from the bottom of the second stripe.
- I had right at an inch between each red stripe.
- After all the Flag pieces are appliquéd with the Heat ‘n Bond sew around the whole flag, and down each stripe, for good measure.
- After the flag is all sewn on, it is time to sew the back pieces of the pillow to the front piece.
- Since I used drop cloth for my pillow, I didn’t need to hem the back pieces. I just used the drop cloth‘s already hemmed edges, and cut the back pieces there.
- If you are using some other material, hem the long (19″) edges by pressing the fabric over 1/2″, and then another 1/2″, and sewing in place.
Place the front piece on the back pieces, right sides together. - Pin in place.
- Then, sew all the way around.
- Turn the pillow cover right side out and throw an insert in it.
- I like to use the 20″ by 20″ IKEA insert. It makes the pillow look nice and full.
- And, that's it!
Notes
- Use this technique to make any sort of striped design on a pillow cover!