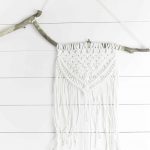
Macrame Wall Hanging DIY
Learn how to make your own wall art with this macrame wall hanging DIY video tutorial
Servings 1
Cost 5
Equipment
- stick (driftwood/tree branch are awesome hanger options!)
- Scissors
Ingredients
- Macrame cord
Instructions
- Start by cutting 20 pieces of rope seven feet long.
- Next, I secured the ropes to the sycamore branch with a reverse larkshead knot. Watch the video tutorial to see exactly what I’m talking about.
- Since the ropes are folded in half to attach them to the branch, I ended up with 40 strings hanging down at three and a half feet long.
- Next, I made a triangle using square knots.
- To do this, I made a whole row of square knots on the first row. On the second row, I left out two on each side, and then made square knots with the remaining 36 ropes. I continued to leave out two more on each side. So, on the third row, I left out four on each side, leaving me with 32 remaining ropes with which to make square knots.
- I continued that on until I had only four ropes left in the middle to make the last square knot with. At the bottom of the triangle I made four square knots.
- Next, I used the half hitch knot, pulled diagonally, to create the lines that run down along the triangle.
- Since, all of this is very difficult to explain in text, I highly recommend watching the video. 😉
I promise this project is super simple. Even if you are a total beginner, you should give it a try!
Video
Notes
- Make sure and use the correct cord so it will lay correctly when completed.