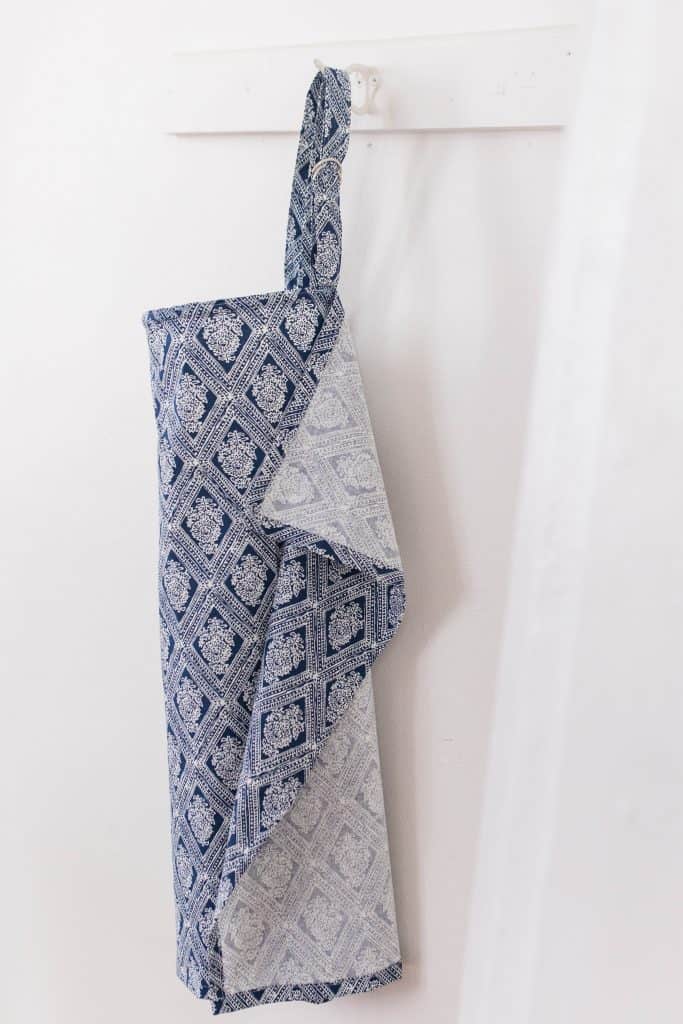
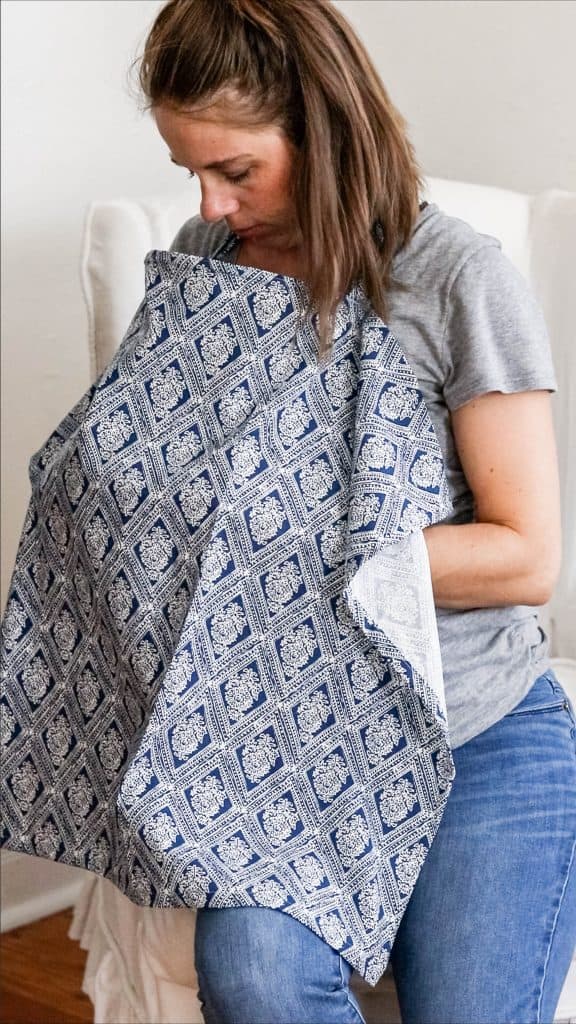
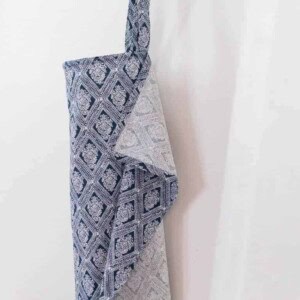
This super simple DIY sewing project makes the best nursing cover. It is perfect for new moms who want to be able to nurse in public a little more discreetly. Made with boning, this breastfeeding cover allows you to easily see baby while nursing.

This post contains affiliate links, which means I make a small commission at no extra cost to you.
This nursing cover pattern is something that I use all the time. From when my babies are newborns until, well, they stop nursing, this thing is a staple. I just throw it into the diaper bag for when we are out and about, making it easy to pull it out and nurse at any time, which you will need to do with a new baby.
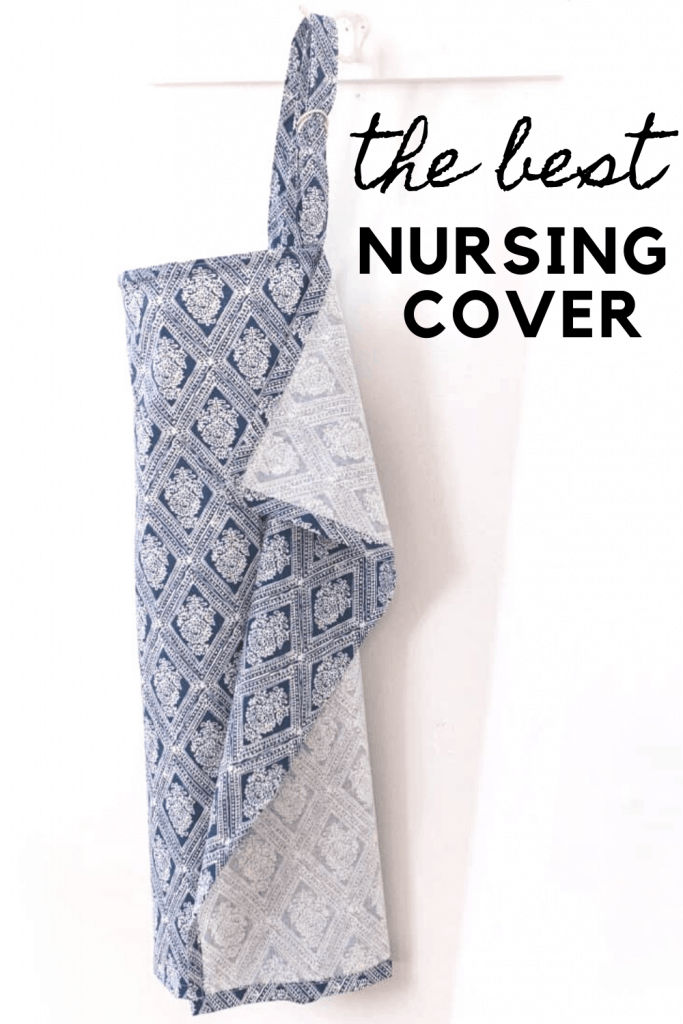
I love that this cover contains boning, so it props up the fabric just enough to be able to easily see how baby is doing, while remaining discreet and covered. Not that you need to cover up while nursing; if that is comfortable for you and baby, go for it! Personally, I feel more comfortable using a nursing cover, and this one makes it so simple.
You just need some basic sewing skills to create this easy nursing cover pattern. If you are totally new to sewing, check out my simple sewing series to learn how to sew. For this tutorial, you will just need to know how to make a basic hem, a basic seam, and a top stitch. That is pretty much it.
I’ve made so many of these covers in the past. I’ve made them for myself and for many friends as baby shower gifts. It seriously makes the best practical baby shower gift, and is always well-received and well-used.
If you’re are expecting, check out my Minimalist Baby Essentials. Also, you can find how to make DIY diaper covers and how to make a muslin blanket.
Alright, let’s get started making this simple DIY nursing cover.
Materials You Will Need:
[show_shopthepost_widget id=”3737570″]
1 1/2 yard of fabric – I like to use something lightweight, like a quilter cotton or a linen fabric. Avoid stretchy fabrics for this particular project.
14 inches of boning – you can head to your local craft store and buy this by the yard.
Thread
Sewing machine – I love this basic and inexpensive sewing machine.
Sewing Scissors
Measuring tape
Steam Iron
Find more handmade projects from the farmhouse:
- How To Make Curtains – Tie-Top Curtain Tutorial
- How to Make Muslin Swaddle Blankets
- DIY Cloth Diaper Inserts
- Easy Girls Dress Sewing Tutorial- Bow in the Back Summer Dress
How To Make A DIY Nursing Cover Step-By- Step Tutorial
Cut Out Fabric
- Start by cutting out a 26-inch by 36-inch piece of fabric for the main piece.
- Cut out a 28-inch by 3-inch piece for the long strap.
- Lastly, cut out a 10-inch by 3-inch piece of fabric for the side straps with D rings.
Sew The Straps
- Fold the straps in half with the wrong side showing.
- For the long strap, fold down one end about 1/2 inch before sewing. This just allows the one side to have a finished look. The other ends will be tucked in, so you don’t have to worry about them.
- Sew a seam down the long side. Do a back and forth stitch at each end.
Turn The Straps Out
- Pin a safety pin to one end, catching only 1 layer of fabric.
- Tuck safety pin into the inside out strap and pull it through, scrunching the fabric and pulling it until it has completely turned right side out. Do this for all straps.
- Press them flat with an iron. With the short strap, I like to press them with the seam in the back. For the longer pieces, I like to press them with the seam on the side.
- Run a top stitch down the edges of the straps to hold them in place. This holds down the fabric, helps reinforce the stitch, and makes it pretty.
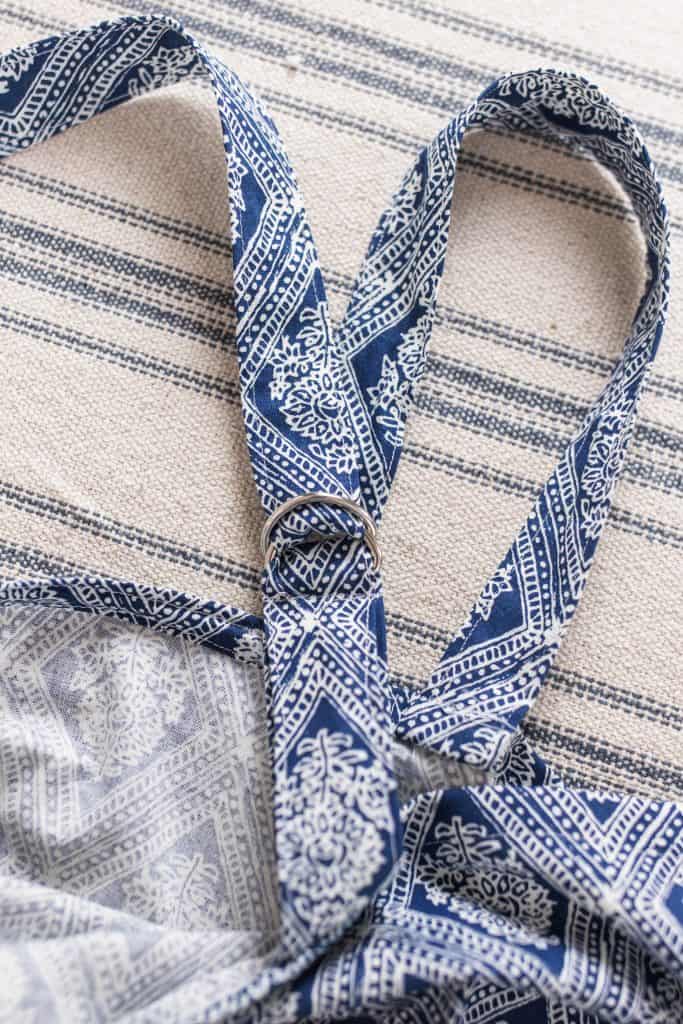
- Once you have top stitched the small strap, add the D rings and fold it in half.
- Add a top stitch pretty close to the D rings (add a back and forth stitch to start and end) to keep them in place.
Hem The Main Piece
- Lay the main piece of fabric out with wrong side facing up.
- Fold the edges over 1/2 inch, and press all the way around.
- Fold the edges over 1/2 inch again, and press all the way around.
- Sew 1/2 inch top stitch around the two short sides and one long side, creating a hem on three sides and leaving one long side. We are leaving this part open because we will be sewing in the straps and boning.
- Lay the main piece of fabric out on a work surface, and fold it in half to find the middle of that long, unfinished side.
- From the middle, measure over 7 inches and mark (I used a pin). This is for the boning.
- Tuck the strap under the open hem just outside the mark you made for the boning.
- One side tuck in the short strap with the D rings, and on the other side the long strap. Pin in place.
- Sew all the way down the long side of the main piece, catching the straps.
- Important: Right before you get to the end of the 14 inch section that is for the boning, you will want to start and stop your stitching and leave about a centimeter gap. This is where you will be putting the boning in later. I like to do this by sewing almost all the way to the longer strap, back and fourth stitch, move my needle a centimeter, and then continue to sew (do a back and forth stitch when starting again). Then sew the rest of the way down.
Put In The Boning
- Peel off the fabric boning cover. The boning comes with a fabric cover, I like to take this off because I have a hard time getting it in with the fabric on.
- Place the plastic boning into the little gap you made, and push it all the way through.
- Close up the centimeter gap with a back and forth stitch.
- Sew a top stitch on the two ends of the boning, so it doesn’t go through the entire top piece.
- Optional: Sew a top stitch along the boning (long ways) so that way it doesn’t move around a lot.
Sew The Straps
Flip the straps up; currently they are sewn facing down, and put a top stitch (starting and stopping with a back and forth stitch) on top, so they are facing the correct direction.
All done!
How To Fasten And Adjust The DIY Nursing Cover:
- Place the long strap into both D-rings.
- Split the D-rings and slide the long strap end up and over one D-ring and under the other D-ring.
- Then you will be able to adjust the strap to the correct length.
Wasn’t that simple? This style really is the best nursing cover, whether you are using it for yourself or as a gift for a new mom.
Thanks so much for stopping by the farmhouse.
Pin It For Later

DIY Nursing Cover Tutorial
Equipment
Ingredients
- 1 1/2 yards of fabric - something lightweight
- Set of 1-inch D rings
- 14" of boning
- Thread
- Sewing Machine
- Sewing Scissors
- Measuring tape
- Steam Iron
Instructions
CUT OUT FABRIC
- Start by cutting out a 26-inch by 36-inch piece of fabric for the main piece.
- Cut out a 28-inch by 3-inch piece for the long strap.
- Lastly, cut out a 10-inch by 3-inch piece of fabric for the side straps with D rings.
SEW THE STRAPS
- Fold the straps in half with the wrong side showing.
- For the long strap, fold down one end about 1/2 inch before sewing. This just allows the one side to have a finished look. The other ends will be tucked in, so you don’t have to worry about them.
- Sew a seam down the long side. Do a back and forth stitch at each end.
TURN THE STRAPS OUT
- Pin a safety pin to one end, catching only 1 layer of fabric.
- Tuck safety pin into the inside out strap and pull it through, scrunching the fabric and pulling it until it has completely turned right side out. Do this for all straps.
- Press them flat with an iron. With the short strap, I like to press them with the seam in the back. For the longer pieces, I like to press them with the seam on the side.
- Run a top stitch down the edges of the straps to hold them in place. This holds down the fabric, helps reinforce the stitch, and makes it pretty.
- Once you have top stitched the small strap, add the D rings and fold it in half.
- Add a top stitch pretty close to the D rings (add a back and forth stitch to start and end) to keep them in place.
HEM THE MAIN PIECE
- Lay the main piece of fabric out with wrong side facing up.
- Fold the edges over 1/2 inch, and press all the way around.
- Fold the edges over 1/2 inch again, and press all the way around.
- Sew 1/2 inch top stitch around the two short sides and one long side, creating a hem on three sides and leaving one long side. We are leaving this part open because we will be sewing in the straps and boning.
- Lay the main piece of fabric out on a work surface, and fold it in half to find the middle of that long, unfinished side.
- From the middle, measure over 7 inches and mark (I used a pin). This is for the boning.
- Tuck the strap under the open hem just outside the mark you made for the boning.
- One side tuck in the short strap with the D rings, and on the other side the long strap. Pin in place.
- Sew all the way down the long side of the main piece, catching the straps.
- Important: Right before you get to the end of the 14 inch section that is for the boning, you will want to start and stop your stitching and leave about a centimeter gap. This is where you will be putting the boning in later. I like to do this by sewing almost all the way to the longer strap, back and fourth stitch, move my needle a centimeter, and then continue to sew (do a back and forth stitch when starting again). Then sew the rest of the way down.
PUT IN THE BONING
- Peel off the fabric boning cover. The boning comes with a fabric cover, I like to take this off because I have a hard time getting it in with the fabric on.
- Place the plastic boning into the little gap you made, and push it all the way through.
- Close up the centimeter gap with a back and forth stitch.
- Sew a top stitch on the two ends of the boning, so it doesn’t go through the entire top piece.
- Optional: Sew a top stitch along the boning (long ways) so that way it doesn’t move around a lot.
SEW THE STRAPS
- Flip the straps up; currently they are sewn facing down, and put a top stitch (starting and stopping with a back and forth stitch) on top, so they are facing the correct direction.
All done!
Notes
How To Fasten And Adjust The DIY Nursing Cover:
- Place the long strap into both D-rings.
- Split the D-rings and slide the long strap end up and over one D-ring and under the other D-ring.
- Then you will be able to adjust the strap to the correct length.
Nutrition information is automatically calculated, so should only be used as an approximation.


I was able to use an underwire that I had cut out of an old bra instead of the boning. lol Now if I can only come up with a hack for the D-rings…
Old dog collar? Or make the strap thinner and is the slide from the bra strap.
I’m confused why this calls for 1 1/2 yards of fabric and is the width 26” or 36”?
Do you have any suggestions why the bonding part of the nursing cover won’t stand up/ pop out?
It just falls flat and I can’t see my baby. So she screamed and pulled it off and we nursed without a cover.
Do you think if I added longer or wider bonding?
Or is the material too soft?
Any ideas?
Possibly the material is too heavy. Sometimes it takes a little adjusting to make it pop out.
I had the same problem, and fought and fought with it. When I tried again, I used the kind of boning you sew through. I made sure the outer edge of the straps was lined up with the outer edge of the boning, and then sewed through the straps and boning together. That gave it the perfect structure and “pop out”. I repurposed a super soft muslin swaddle!
Hi. I am an experienced sewer and am making this for a great grandson due next month. In the pattern I ended up with and extra half of the short strap, D rings in the middle. Then when I go to the part of attaching the long strap to the D rings, it seems that the strap is going up when you tighten them together. I know I am missing something, but can’t figure out what. Do you have a picture of how the straps hook together. I have too many ends, lol. Thanks in advance for your help. Linda
This tutorial looks great! I’m going to make one to have on hand for my upcoming babe. Just wondering if you could make this from an old pillowcase? I have a collection of vintage pillowcases and I thought that this might be a good project for one of them, but curious as to what the exact dimensions would be for the fabric needed. Thanks!
This may seem like a silly question, but the dimensions for the main fabric, 26×36, are 26W x 36L, right? Just making sure before I start cutting all that fabric🙃
I was wondering also .
I’m wondering as well.
Haven’t seen anyone answer this so thought I would. It is 26 long and 36 wide. I used the printed instructions since I am new to sewing and it refers to sewing up two short sides and one long side, so as to attach straps to remaining long side.
Hope this helps someone get started sewing more quickly.
What an awesome tutorial!
Thanks Cathy! Glad you find it helpful 🙂
Slight clarification here….’long’ side is 36″ (which is the width of the fabric – think of it as shoulder to shoulder) and ‘short’ side is 26″ (the length of the fabric – think of top to bottom or shoulder to waist). On one long side (36″ width) you will sew the boning (centered) and straps on either side of the boning. Most fabrics are 42-44″ wide on the bolt. I am just using that instead of cutting it down to 36″. This will allow more coverage across the body while nursing, even wrapping all the way around the shoulder toward mom’s back if needed. I just wanted to make sure no one was confusing ‘long’ with length and ‘short’ with wide. Hope this helps. I’m looking forward to making this gift for a friend who is due in April. I’m using a soft cotton gauze fabric as it will be breathable and lightweight for warmer months.