

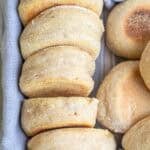


Soft, airy, and cooked on the stove top, these delicious sourdough English muffins begin with simple ingredients, an active starter, and a bit of fermentation time. With a crisp, structured exterior and a bubbly crumb full of sourdough flavor, use these muffins to build the perfect cheesy breakfast sandwiches or slather them with butter and jam for a filling snack.
Homemade sourdough English muffins change the game with their simplicity and versatility. Long-fermented and perfectly tangy, this easy recipe requires only pantry staples and an active starter with an overnight rise. The fermentation time not only adds better flavor, but also better digestion and a delicate, chewy crumb full of bubbly pockets that trap butter and homemade strawberry jam.
The flavor and structure of these muffins lend themselves perfectly to many different uses, such as savory sourdough breakfast sandwiches or even English muffin pizzas with homemade marinara and fresh mozzarella.
For more sourdough favorites, try these soft sourdough pancakes or waffles, sweet sourdough cinnamon rolls or coffee cake, or make a batch of sourdough biscuits or beignets. Making your own sourdough starter requires minimal ingredients and some patience, but the recipe opportunities are endless.
Why You’ll Love This Recipe
Sourdough flavor – Homemade English muffins have a savory, yeasty flavor, and sourdough fermentation adds a delicious tang that complements sweet or savory toppings.
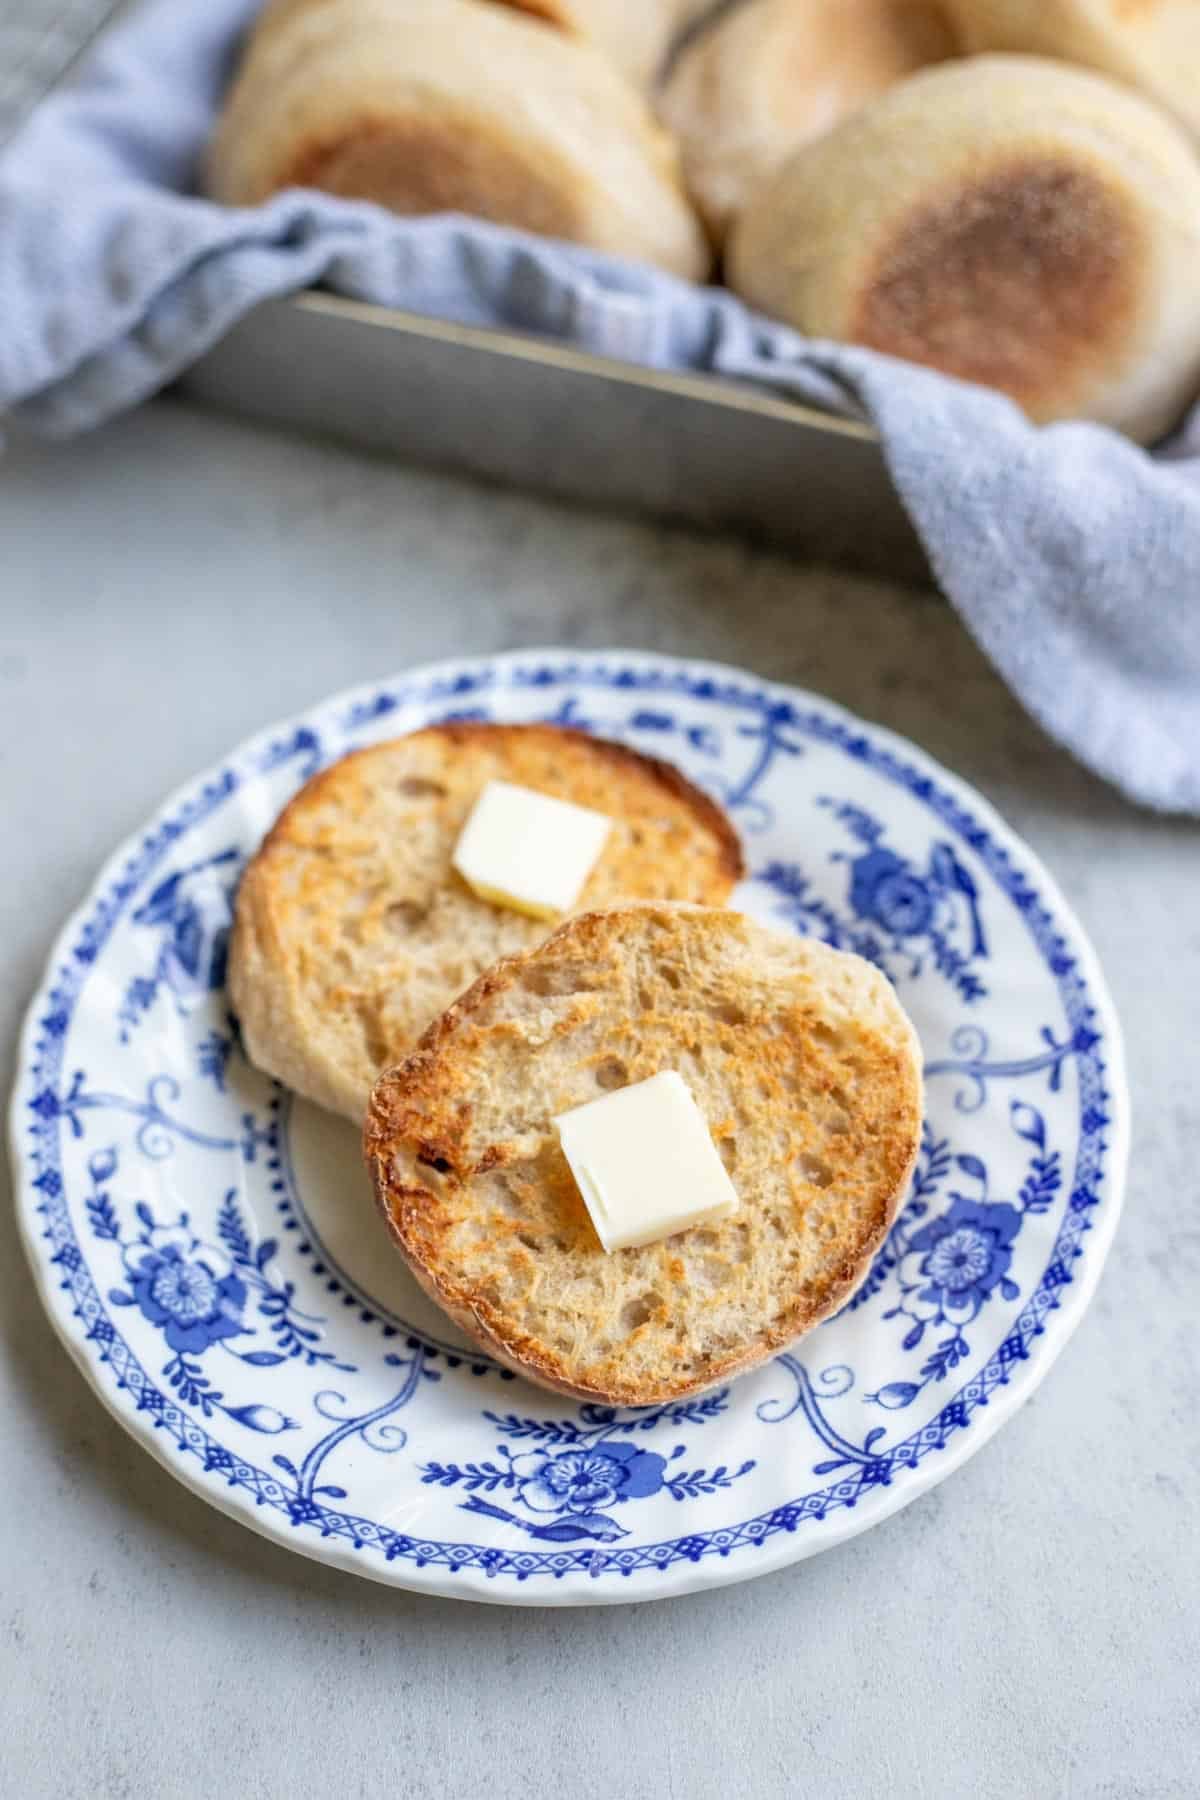
Airy texture – Fermentation creates carbon dioxide, which builds up in the dough as bubbles. These bubbles cook in place, creating a crumb delicately arranged with the characteristic nooks and crannies that hold anything from jams and butters to melty cheeses and mashed avocado.
Versatile use – Use these for cheesy egg sandwiches, like eggs Benedict, or spread with soft butter and peach jelly, drizzle with honey and peanut butter, or pile them high with homemade chicken salad.
Ingredients
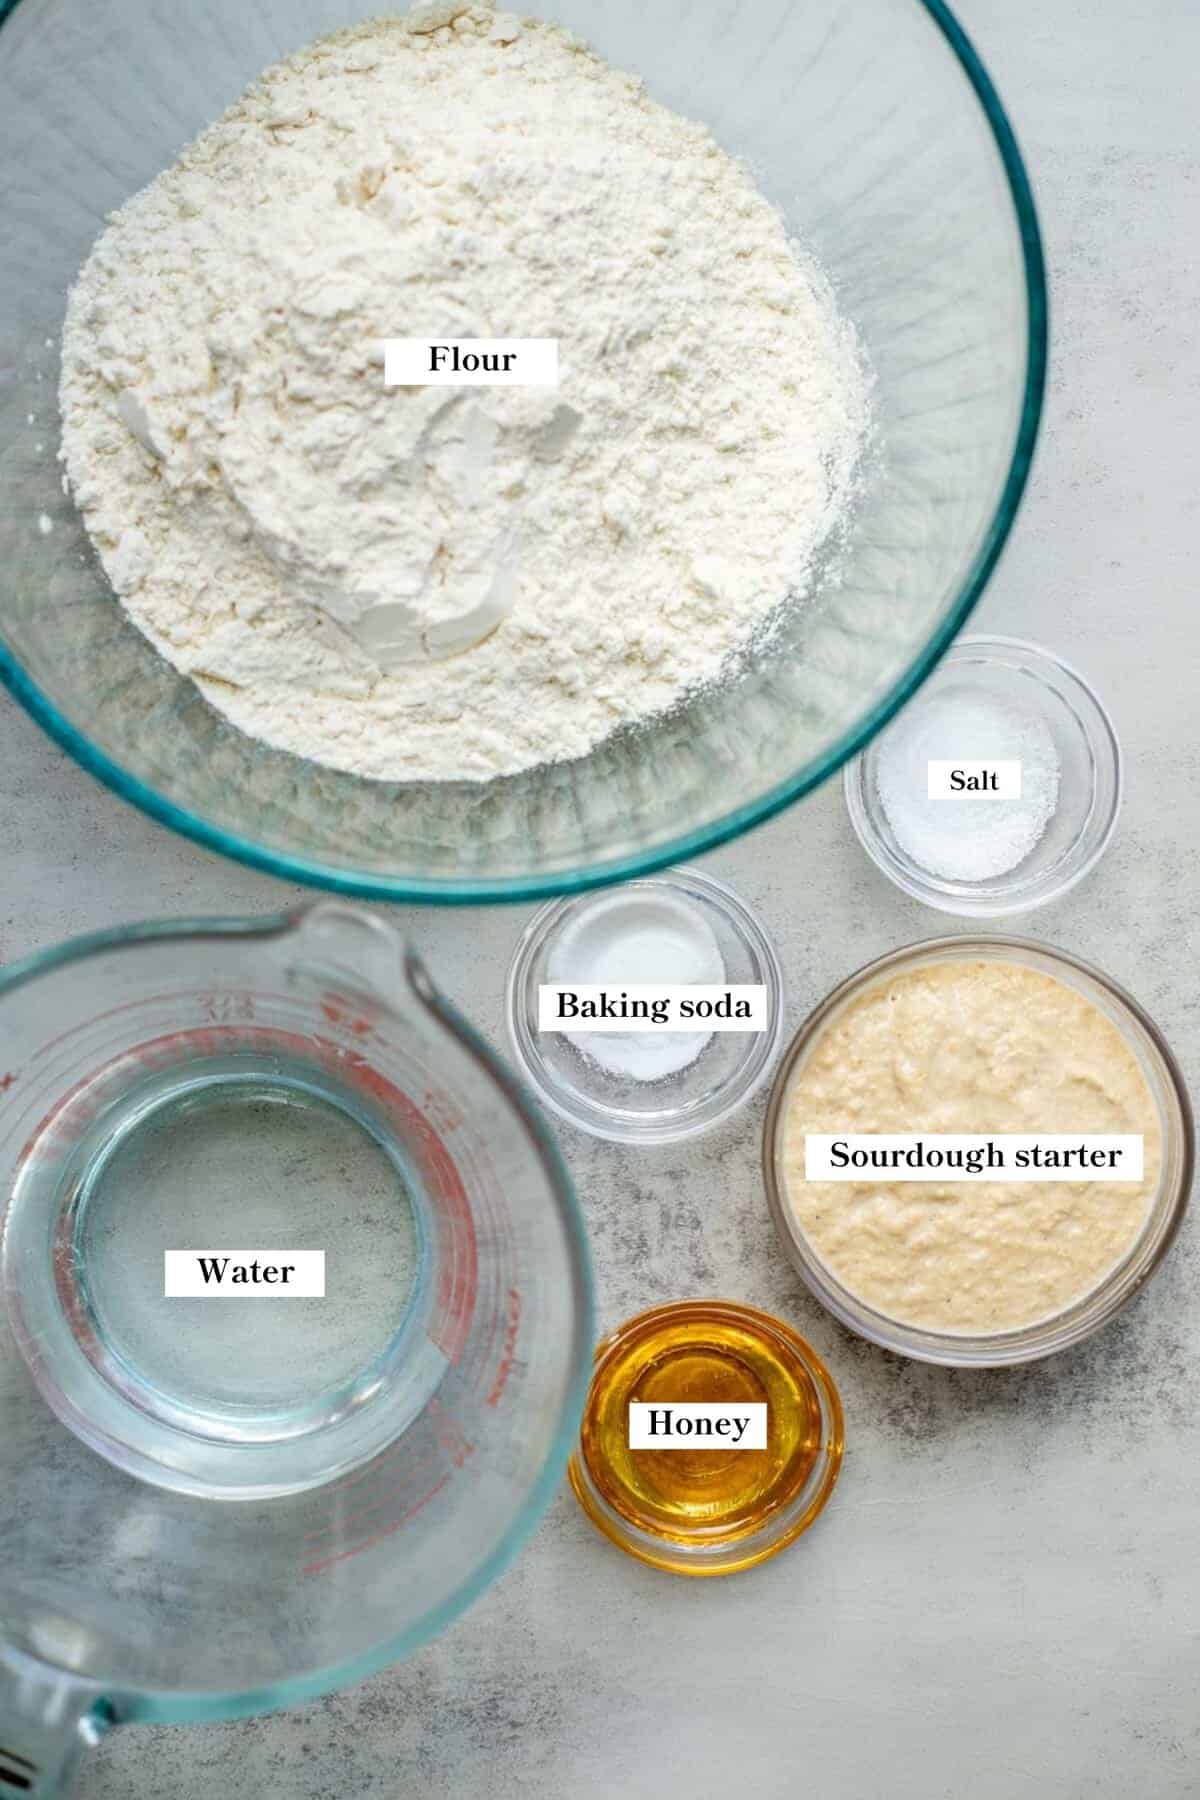
Flour – I use unbleached all-purpose flour for this recipe. Fresh-milled wheat also works, but the liquids need to be adjusted to account for the high absorbency of fresh-milled flour.
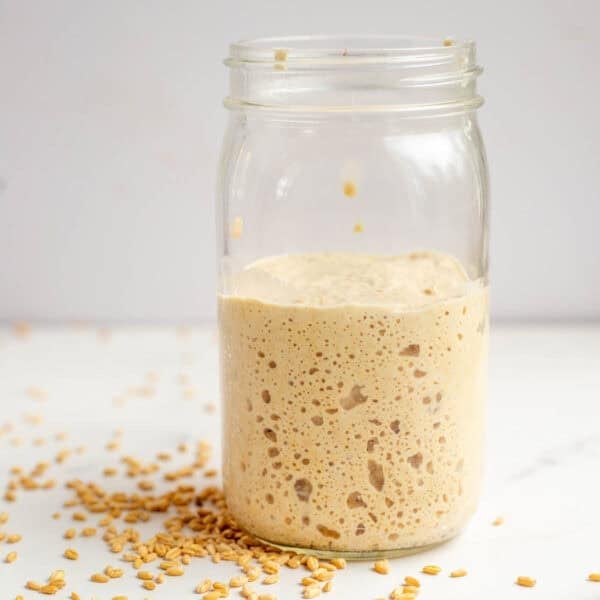
Sourdough starter – Use a recently fed, active, and bubbly starter.
Water – You can use milk in place of the water, if desired.
A full ingredient list with exact amounts can be found in the recipe card below.
How to Make Sourdough English Muffins (with baking soda)
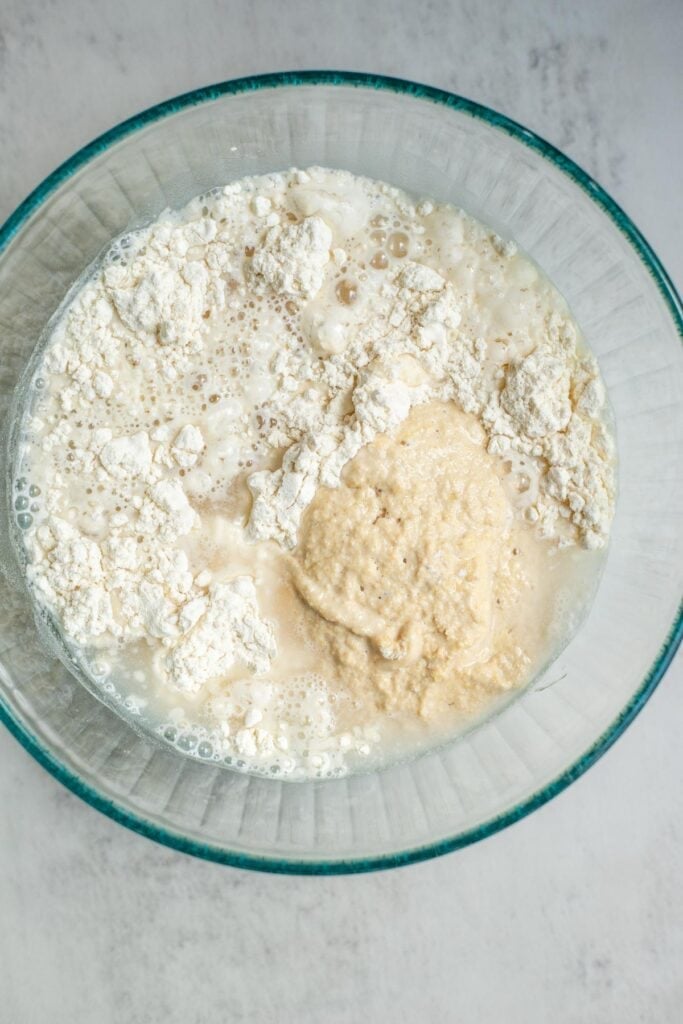
Step 1: The day before you plan to cook the muffins, start with fermenting the grains. Add flour, water, and sourdough starter to a large mixing bowl or the bowl of a stand mixer and mix well. Use an active sourdough starter that has been recently fed.
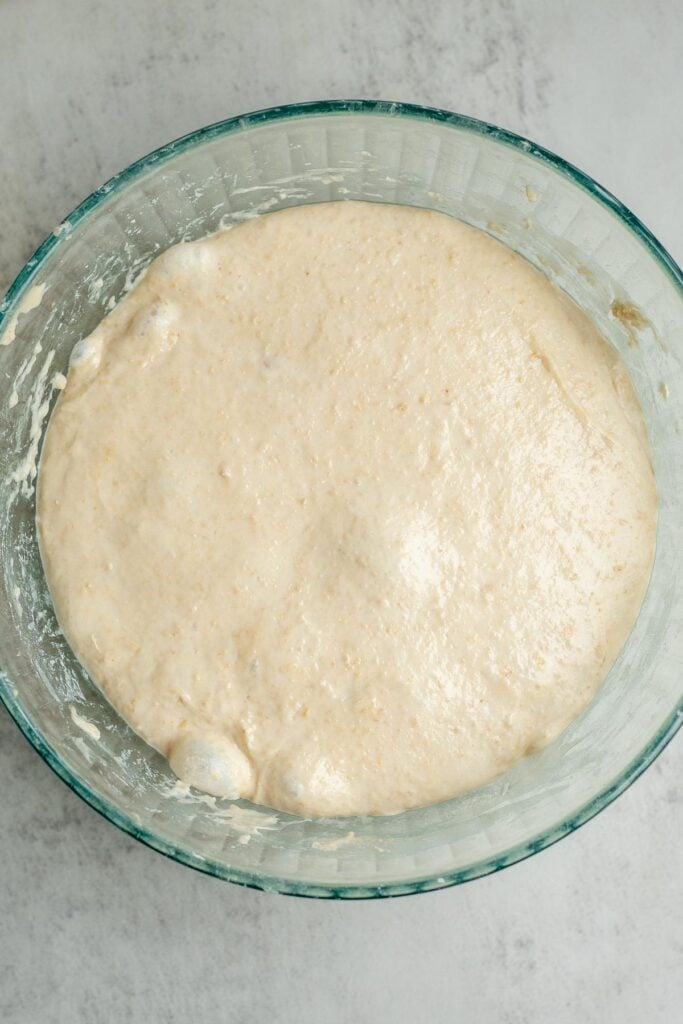
Step 2: Cover the bowl with a towel and let it sit at room temperature for 12-24 hours. The fermentation process speeds up with warmer temperatures and slows with cooler temperatures. Where you place the bowl affects the timing.
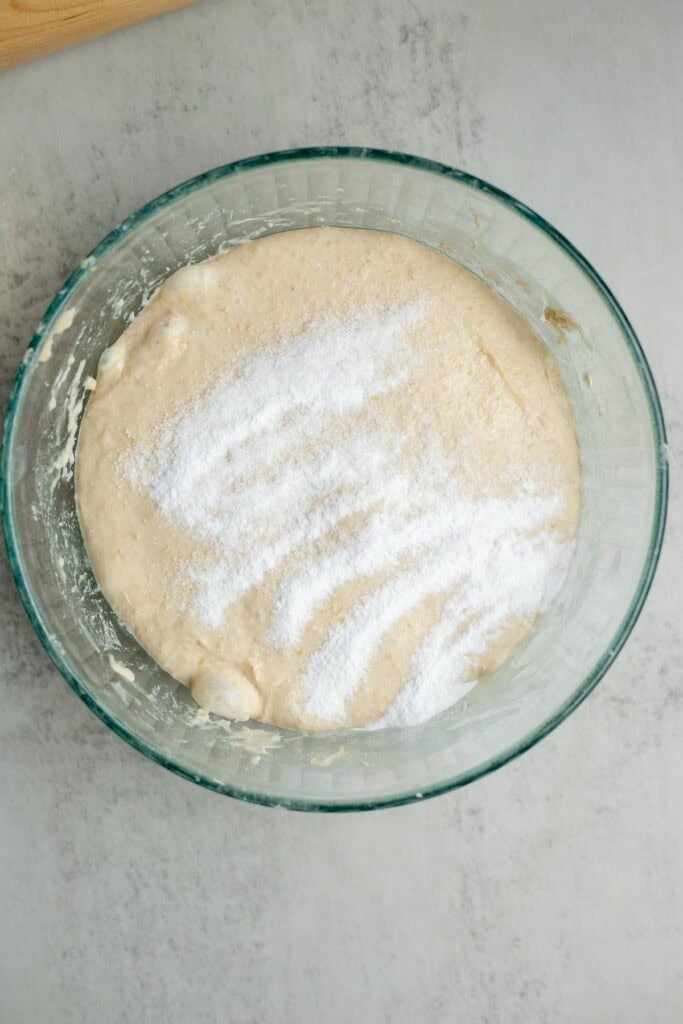
Step 3: After the bulk fermentation, add honey, salt, and baking soda, stirring well.
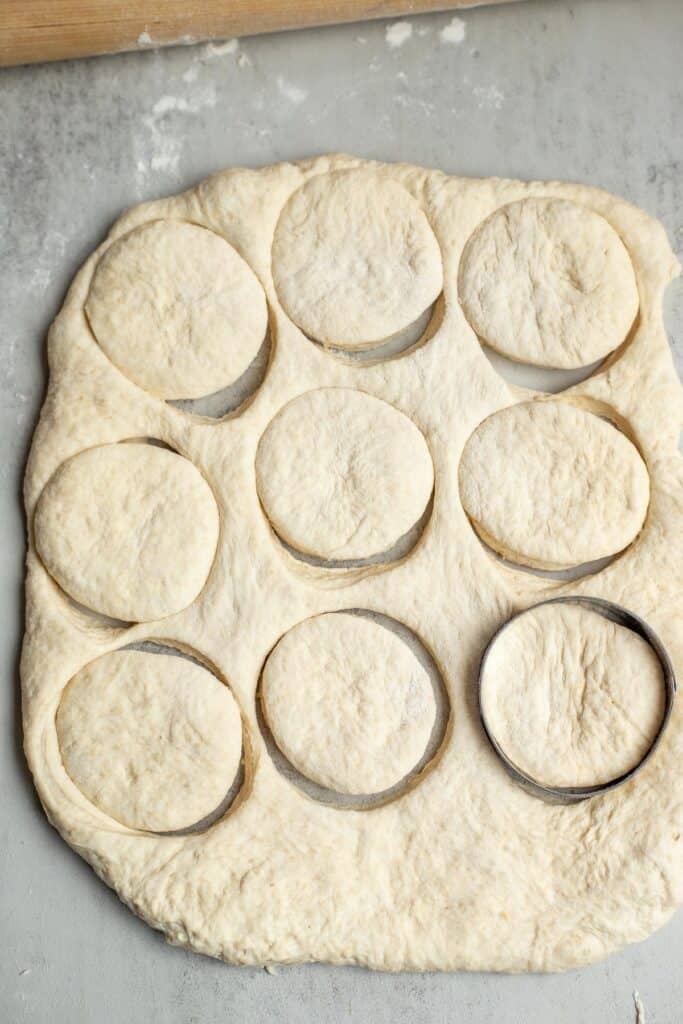
Step 4: Transfer the dough to a lightly floured work surface and roll out to a 1/2 inch thick rectangle. Cut out circles using a biscuit cutter or a wide-mouth mason jar. Sprinkle the biscuits with cornmeal to prevent them from sticking while cooking (optional).

Step 5: Preheat your cast iron pan on medium heat until hot. Add some oil, then place the English muffins into the pan. Immediately reduce the heat to low so the dough has a chance to rise without the exterior burning.

Step 6: Cook until doubled in size, flipping only when the first side is golden. After flipping, increase the temperature a little so that the second side of the muffin cooks until golden brown. Let them cool for a few minutes, then slice and enjoy!
How to Make Sourdough English Muffins (without baking soda)
Step 1: Add all ingredients to a bowl (minus baking soda) and mix well. Let the dough rest for 30 minutes; this is called autolyse. This is the process of allowing the dough to rest so the flour has a chance to hydrate. Also, during this time, the gluten starts to develop, and the dough becomes stretchier.
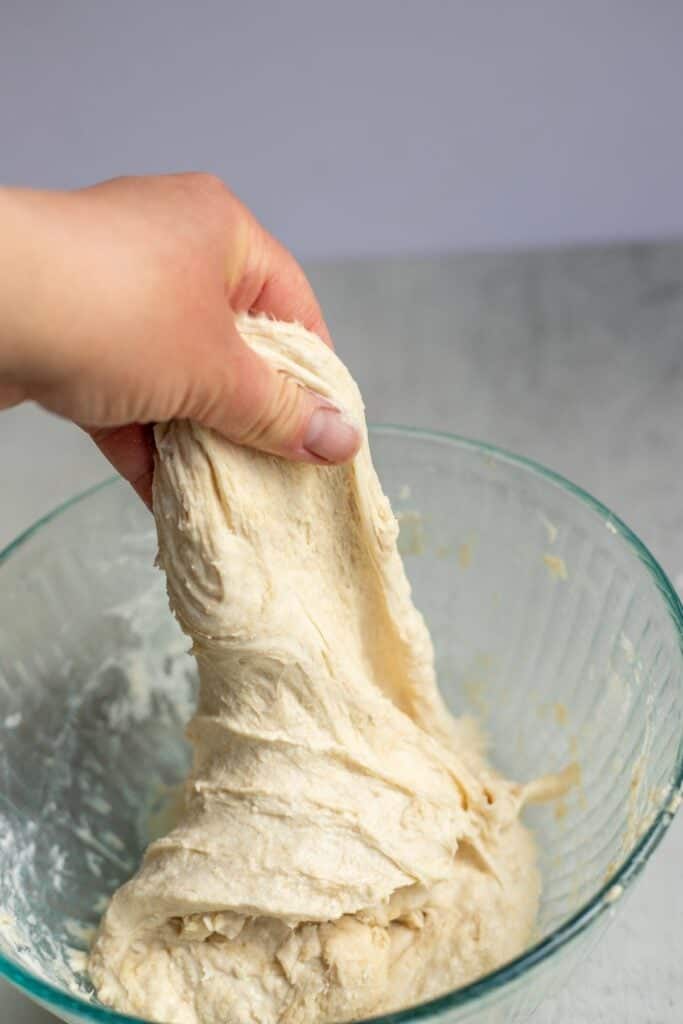
Step 2: With the dough in the bowl, do one round of stretch and folds by grabbing one side of the ball of dough, stretching it upward, and then pressing it back into the center. Repeat with each side of the dough, for one complete round. Repeat the stretch and folds after 30 minutes, then set the bowl in a warm place and let it rise for 5-8 hours. The dough should double in size.
Step 3: After the fermentation, shape the muffins by rolling the dough into a 1/2 inch thick rectangle. Cut out circles using a biscuit cutter or a wide-mouth mason jar.
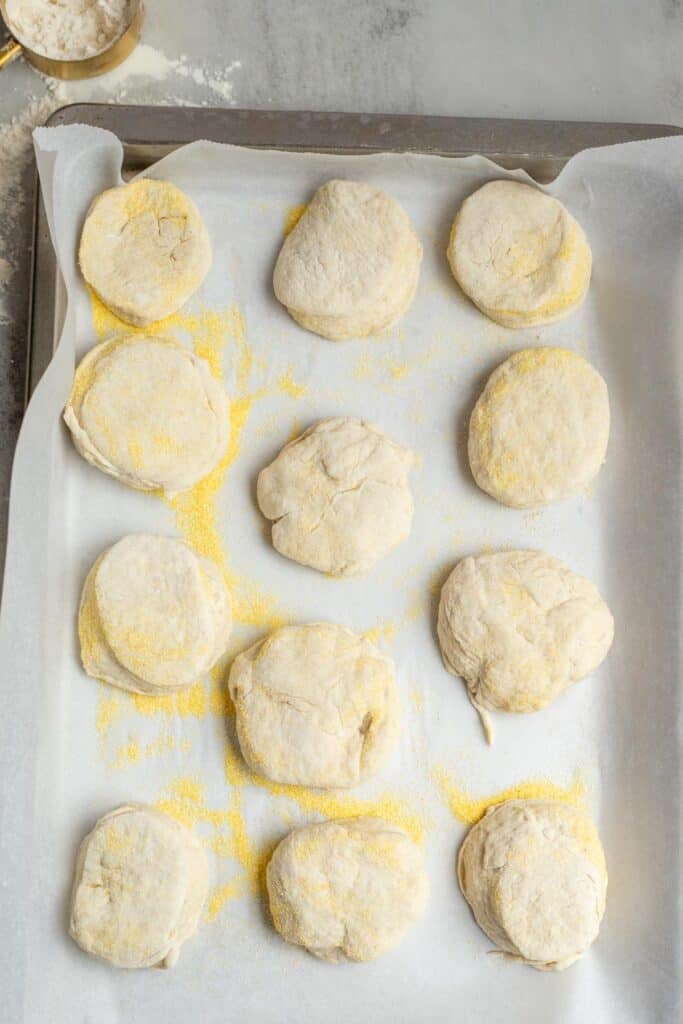
Step 4: Place on a baking sheet lined with parchment paper with a little cornmeal sprinkled on the bottom (optional). Cover and rise again for about an hour in a warm place until doubled in size.
Step 5: Preheat your cast iron pan on medium heat. When the skillet is hot, oil the pan and add the English muffins. Immediately reduce the heat to low so the dough has a chance to rise without the exterior burning. Cover with a lid and allow to cook for about 5 minutes.

Step 6: Flip once they are golden brown on the first side, then cook through until completely done – this usually takes another 5 minutes or so. Place on a cooling rack for a few minutes before slicing.
Tips
- Make sure the sourdough starter you are using is nice and active. This will give the dough those beautiful bubbles. Sourdough discard can be used if it was recently fed, but the rise time may need to be lengthened.
- The type of flour you use, as well as the humidity and quality of the starter, will cause each batch to need slightly different amounts of flour. If the dough seems too runny, add a bit more flour.
- Fermentation time will depend on the temperature of your home. The cooler your home, the longer it will take for the dough to double. Placing the dough in a warm place will speed up the process significantly.
- You can skip the second rise as long as you use baking soda. Without baking soda, allow the shaped muffins to rise for about an hour, or until doubled, before baking.
- The skillet needs to be hot before adding the English muffin dough so it doesn’t stick, but then it needs to be quickly reduced so the dough has a chance to rise and cook through without burning. Monitor the color of the muffins closely so they don’t burn.
- Cook four at a time so they have space to expand, or they will stick together.
- Don’t try to flip the muffins until they come up easily from the pan. The goal is to only flip them one time.
- If they are browned on the outside, but still not done on the inside, put them in a 250 to 300 degree oven for 10 minutes or so.
Recipe FAQs
Keep extra muffins in an airtight container or bag at room temperature for 4-5 days. Freeze them for longer storage.
Yes! Fermentation breaks down phytic acid, an anti-nutrient that hinders absorption, making sourdough English muffins easier to digest, as well as a great source of fiber and B vitamins. Also, homemade English muffins have zero artificial ingredients or preservatives.
You can expect the characteristic yeasty, salty flavor and bubbly, chewy texture of traditional English muffins, with the main difference being a long-fermented sourdough tang.
During fermentation, the natural yeasts in sourdough produce carbon dioxide, which is trapped in the wet dough as bubbles. When handled carefully and cooked on the stovetop, these bubbles cook in place, producing that characteristic “nooks and crannies” crumb.
While sourdough discard can have great results, use a discard that has been fed in the last week or so, and be prepared to adjust the liquid and fermentation times. See my recipe created specifically for sourdough discard English muffins for further instructions.
More Sourdough Recipes from the Farmhouse
- Sourdough Pizza Crust
- Sourdough Tortillas
- Sourdough Irish Soda Bread
- Easy Sourdough Flatbread
- Sourdough Cheddar Biscuits
If you try this recipe and love it, I would love it if you could come back and give it 5 stars! Tag me on Instagram @farmhouseonboone.
Sourdough English Muffins

Video
Ingredients
- 2 1/2 cups flour, 350 grams
- 1 cup water, 236 grams
- 1/2 cup active sourdough starter, 100 grams
- 1 tablespoon honey, 21 grams
- 1 teaspoon salt, 5 grams
- 1 teaspoon baking soda, 5 grams, (optional, see notes)
- Cornmeal, optional
- Oil for cooking
Instructions
How to Make Sourdough English Muffins (with baking soda)
- The day before you plan to cook the muffins, start with fermenting the grains. Add flour, water, and sourdough starter to a large bowl and mix well. Use an active sourdough starter that has been recently fed.
- Cover the bowl with a towel and let it sit at room temperature for 12-24 hours. The fermentation process speeds up with warmer temperatures and slows with cooler temperatures. Where you place the bowl affects the timing.
- After the bulk fermentation, add honey, salt, and baking soda, stirring well.
- Transfer the dough to a lightly floured work surface and roll out to a 1/2 inch thick rectangle. Cut out circles using a biscuit cutter or a wide-mouth mason jar. Sprinkle the muffins with cornmeal to prevent them from sticking while cooking (optional).
- Preheat your cast-iron skillet on medium heat until hot. Add some oil, then place the English muffins into the pan. Immediately reduce the heat to low so the dough has a chance to rise without the exterior burning.
- Cook until doubled in size, flipping only when the first side is golden. After flipping, increase the temperature a little so that the second side of the muffin cooks until golden brown. Let them cool for a few minutes, then slice and enjoy!
How to Make Sourdough English Muffins (without baking soda)
- Add all ingredients to a bowl (minus baking soda) and mix well. Let the dough rest for 30 minutes; this is called autolyse. This is the process of allowing the dough to rest so the flour has a chance to hydrate. Also, during this time, the gluten starts to develop, and the dough becomes stretchier.
- With the dough in the bowl, do one round of stretch and folds by grabbing one side of the ball of dough, stretching it upward, and then pressing it back into the center. Repeat with each side of the dough, for one complete round. Repeat the stretch and folds after 30 minutes, then set the bowl in a warm place and let it rise for 5-8 hours. The dough should double in size.
- After the fermentation, shape the muffins by rolling the dough into a 1/2 inch thick rectangle. Cut out circles using a biscuit cutter or a wide-mouth mason jar.
- Place on a baking sheet lined with parchment paper with a little cornmeal sprinkled on the bottom (optional). Cover and rise again for about an hour in a warm place until doubled in size.
- Preheat your cast-iron skillet on medium heat. When the skillet is hot, oil the pan and add the English muffins. Immediately reduce the heat to low so the dough has a chance to rise without the exterior burning. Cover with a lid and allow to cook for about 5 minutes.
- Flip once they are golden brown on the first side, then cook through until completely done – this usually takes another 5 minutes or so. Place on a cooling rack for a few minutes before slicing.
Notes
- Make sure the sourdough starter you are using is nice and active. This will give the dough those beautiful bubbles. Sourdough discard can be used if it was recently fed, but the rise time may need to be lengthened.
- The type of flour you use, as well as the humidity and quality of the starter, will cause each batch to need slightly different amounts of flour. If the dough seems too runny, add a bit more flour.
- Fermentation time will depend on the temperature of your home. The cooler your home, the longer it will take for the dough to double. Placing the dough in a warm place will speed up the process significantly.
- If using baking soda, you can skip the second rise. Without baking soda, allow the shaped muffins to rise for about an hour, or until doubled, before baking.
- The skillet needs to be hot before adding the English muffin dough so it doesn’t stick, but then it needs to be quickly reduced so the dough has a chance to rise and cook through without burning. Monitor the color of the muffins closely so they don’t burn.
- Cook four at a time so they have space to expand, otherwise they may stick together.
- Don’t try to flip the muffins until they come up easily from the pan. The goal is to only flip them one time.
- If the muffins are browned on the outside, but still not done on the inside, put them in a 250 to 300 degree oven for 10 minutes or so.
Nutrition
Nutrition information is automatically calculated, so should only be used as an approximation.


I haven’t baked them yet but the dough is rising and I am hopeful they will turn out well!
Do you think these would turn out well on an electric griddle?
Yes, you can!
Made these this morning. I think they turned out well. Could you mix the honey, salt and baking soda into the dough in the beginning instead of after it had fermented?
No, it needs to be mixed after it ferments.
I love this recipe! I’ve made 6 dozen for Christmas gifts!!! Thinking about cold prrof bc I have to go to work. I plan to bring dough back out after the cold proof and then add salt honey and baking soda.
Hi! How did cold proofing work out for you on these? I proofed at room temp and it has doubled in size so I am thinking about placing in fridge so I can bake off in the morning.
These sourdough English muffins look amazing! I can’t wait to try making them myself. I love the idea of using sourdough starter for that tangy flavor. Thanks for the detailed instructions!
I’ve done the discard english muffins several times and LOVE them, but want to try this one. My thought is to bulk ferment, make the muffins, then put them in the fridge overnight for extra ferment time. Is that overkill? If not, would you let them come to room temp for a bit before cooking? Thank you Lisa, you have been an indispensable resource on my SD journey!!!
My family loves these english muffins! I do find it interesting that the detailed walk-through of the recipe is VERY different from the recipe card. And I tend to fall somewhere in between whan I make them. I divide the dough, roll the individual pieces into balls, flatten them some, then throw them in the skillet. I have an electric stove, and finding the right temp is exceedingly difficult with this recipe, but the English muffins always turn out great (even if a little dark sometimes)
These turned out great! I had to add a little extra flour in the morning but other than that I stayed true to the recipe. I’m not a particularly good baker but I found these to be very easy and very delicious! I will absolutely be making these on a regular basis.
Dough was very wet even after the updated recipe with 2/12 c flour.added.
They did get dark on bottoms easily in cast iron skillet, so had to really watch them.
Made a second batch using milk as liquid, which I liked better.
Tried another SD recipe which included some melted butter and proportions were a little different so the flower ratio was perfect. They were much more tasty as well.
I think the recipe needs to be revisited. I noticed that Lisa is an incredibly intuitive cook and really makes it look very easy. Some of the recipes followed to the T just don’t work for me. I’m always having to add or subtract some ingredients. I’ve been making bread for 40 years so I have a good sense of how something should look in the stages. Maybe a little more detail in the development of the recipes and consistency with cups and grams. Cups can be wildly different between cooks, so I think that would help a lot.
Thank you for your treasure trove of home cooking and your knowledge about sour dough.
These turned out perfectly and were SO easy to make. Thanks for all of the tips. Can these go in the freezer afterwards and if so for how long?
Thanks,
Reree
Yes, for up to a few months!