


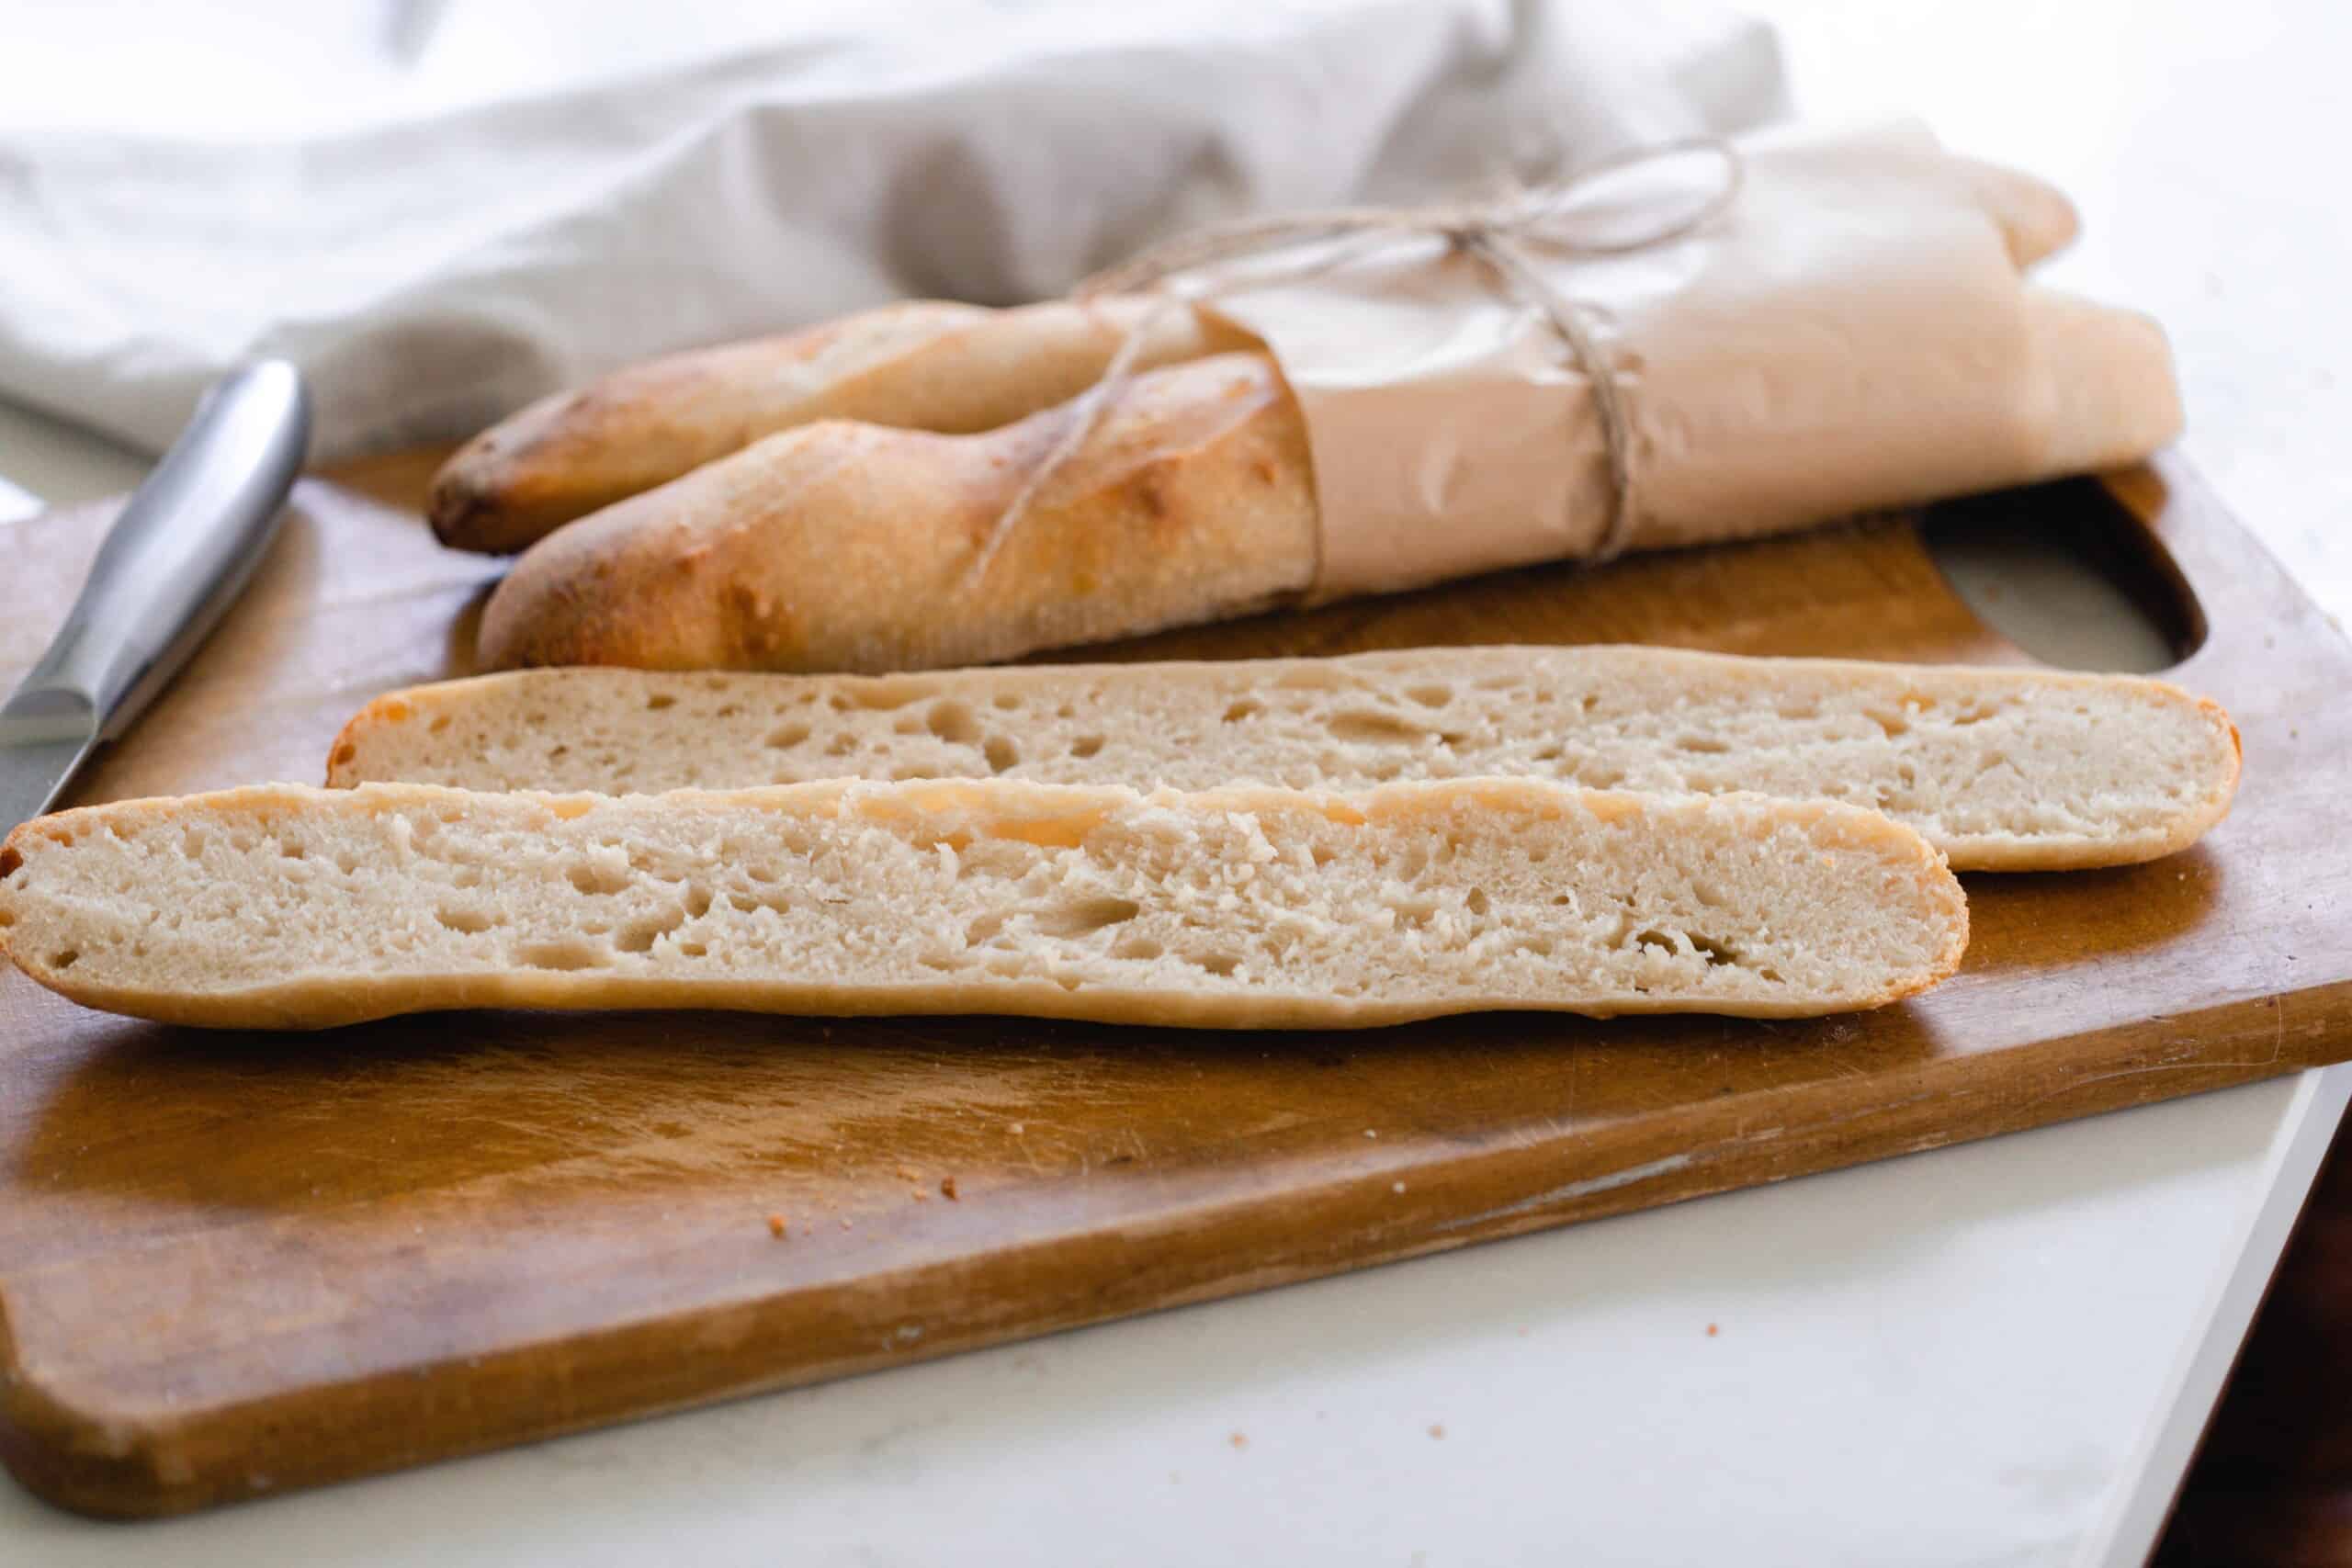
A sourdough baguette is the perfect side to nearly any dinner. With a perfect crispy crust and chewy interior, you’ll love the savory tang of this classic French bread.

Artisan bread seems to elevate any simple dish into a restaurant experience. A homemade meal is made even more special when paired with homemade small batch bread such as sourdough brioche dinner rolls, sourdough French bread or sourdough garlic bread with rosemary.
These homemade sourdough baguettes are no exception. With this detailed sourdough baguette recipe, you can recreate this Italian classic in your own home oven. They are perfectly browned and have that craveable, crunchy crust and airy interior that baguettes are known for.
All you need is a little patience, time, and a handful of ingredients to be left with the perfect side to any pasta dish, or simply a delicious vessel for homemade herb butter.
Why You’ll Love This Recipe
Flavorful – Traditional baguettes are made with a few staple ingredients. Having the sourdough starter added gives this bread a bit more of that sourdough tang we all know and love! If you want even more flavor, these are perfect for pairing with this bread dipping oil recipe.
Nutritious – Since you are using sourdough, you get all the benefits of fermented grains. This means it is more easily digested and the nutrients are more available for your body to absorb.
Impressive – You’ll impress all of your dinner guests when you have a beautiful, homemade, golden crusted sourdough baguette on the dinner table.
Ingredients
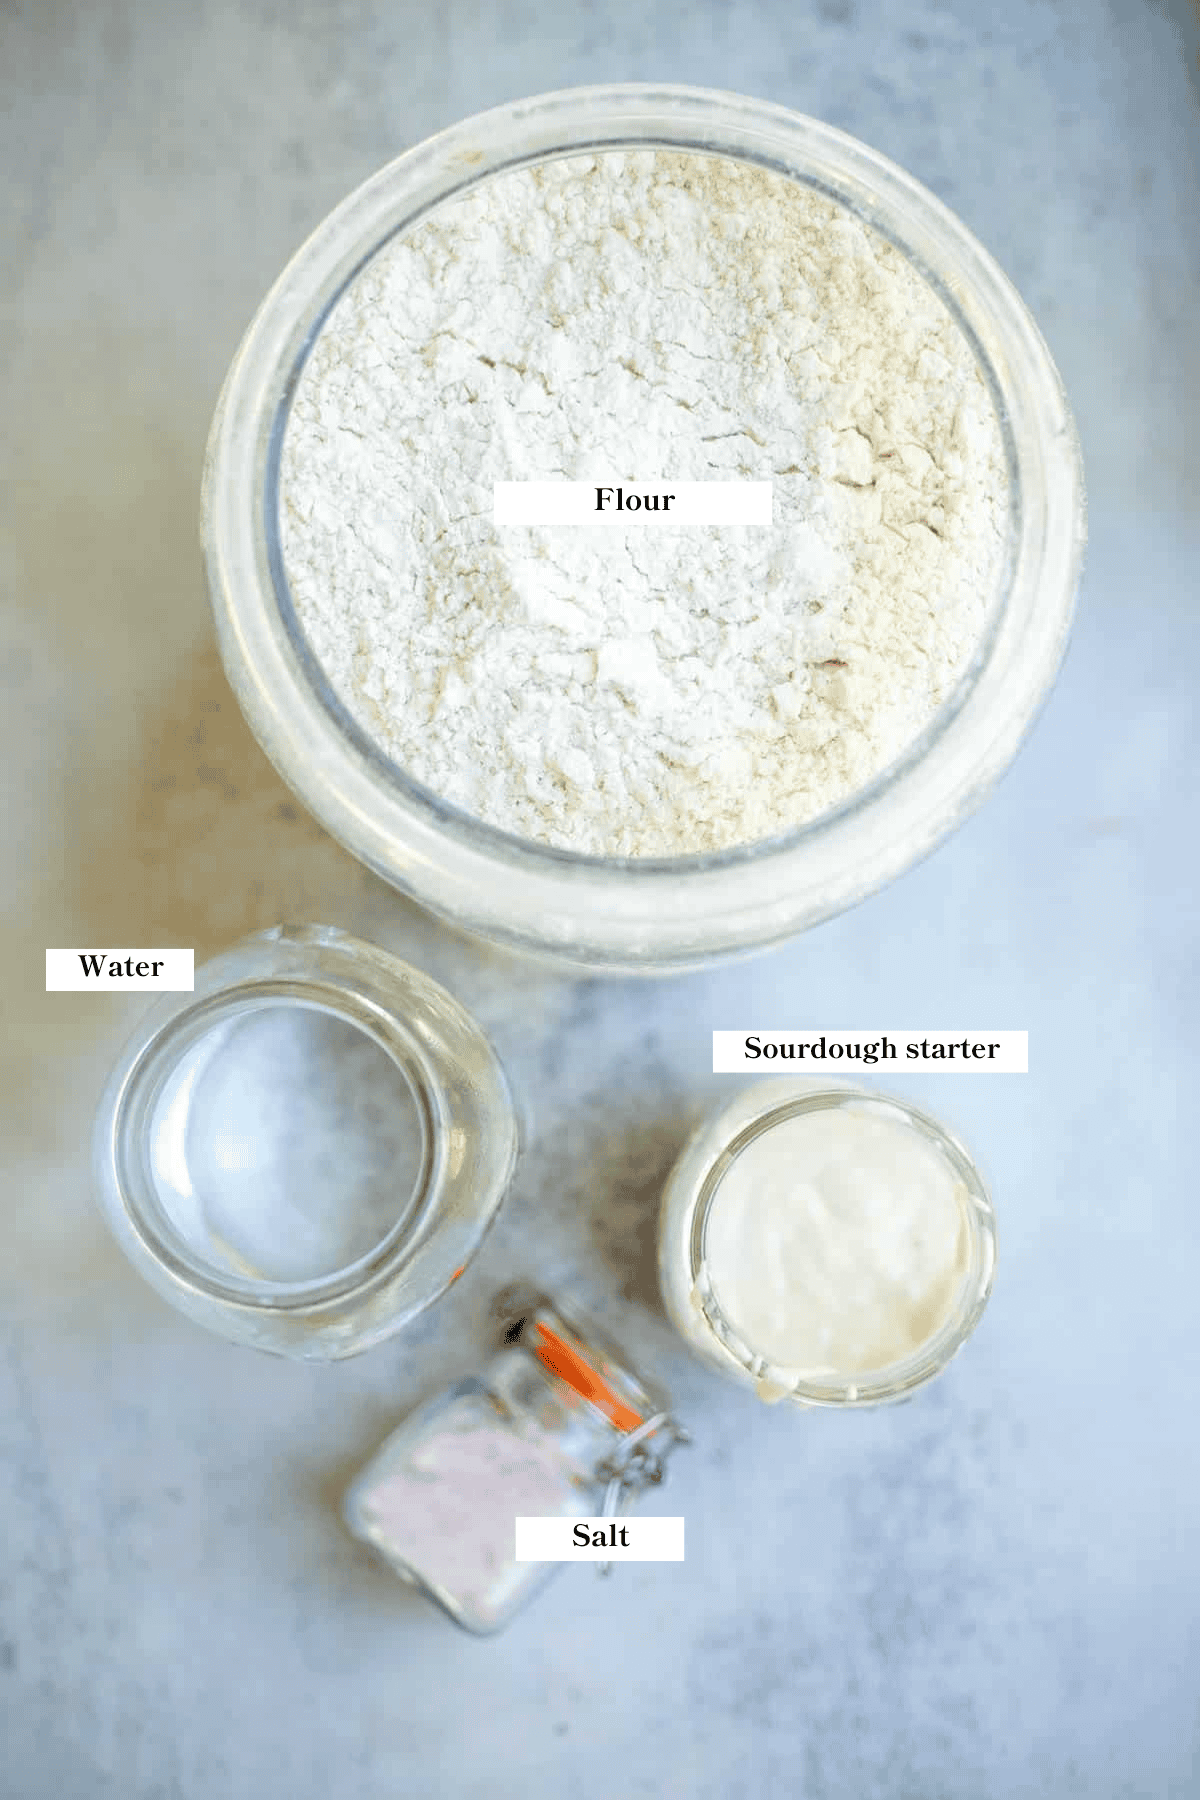
Water – Be sure to use filtered water, as regular tap water may affect your sourdough starter because of harmful additives like chlorine.
Active Sourdough Starter – Make sure it is active and bubbly! Feed starter about 4-12 hours before you plan on using it. This amount of time will depend on the temperature if your kitchen. Starters that have been stored in the fridge may take a bit longer to reach its peak activity before it is ideal to use. If you are new to sourdough you can check out this post to learn how to make a sourdough starter and this post to learn how to care for a sourdough starter.
A full ingredient list with exact amounts can be found in the recipe card below.
How to Make Sourdough Baguettes
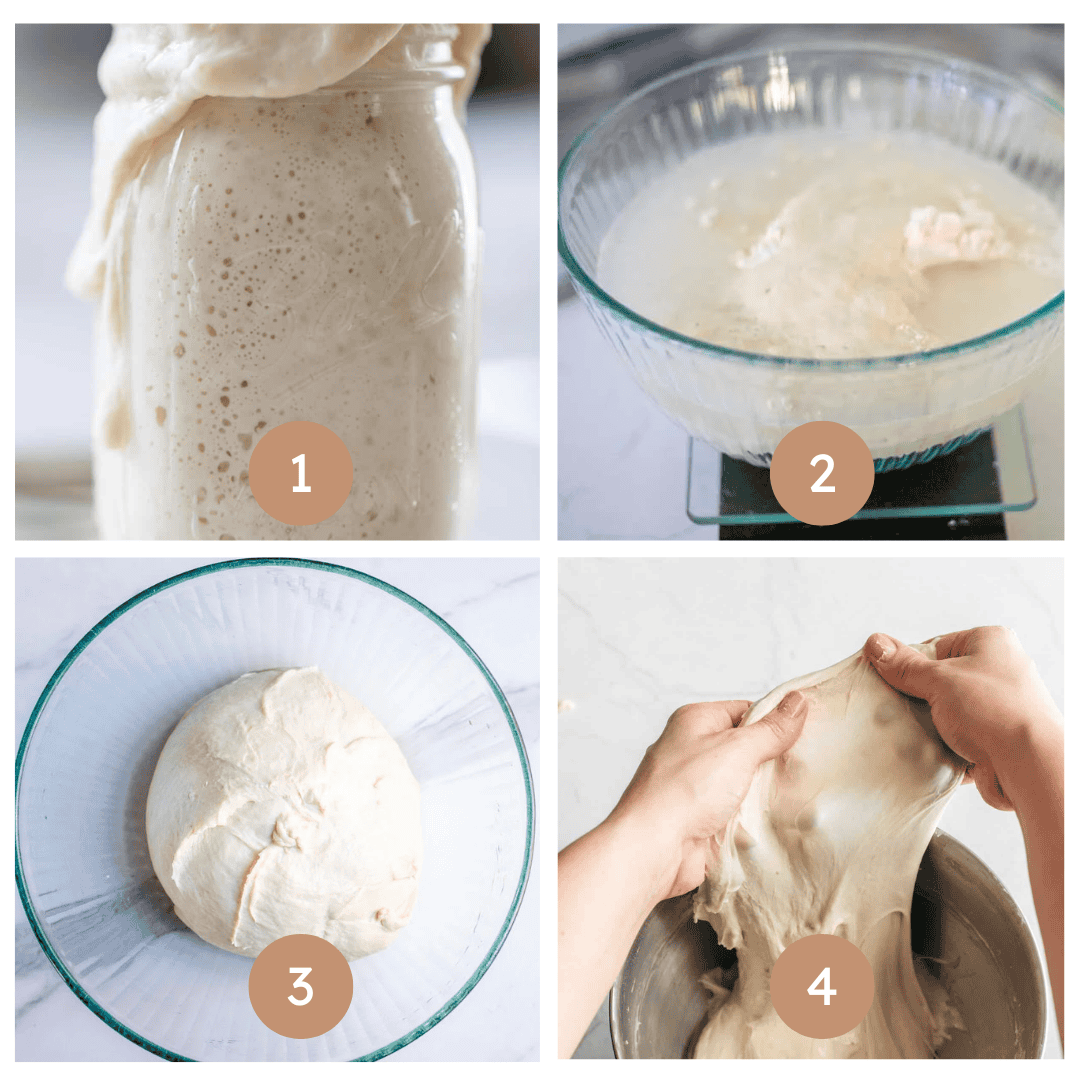
Step 1: Feed your sourdough starter 4-12 hours before starting the bread so it is active and bubbly once you begin. (Image 1)
Step 2: Combine your warm water and flour in a large bowl. You’ll want to let this mixture rest for 30 minutes for a process called autolyse. (Image 2)
Step 3: Using wet hands, dimple in your sourdough starter to the rested flour and water mixture. Sprinkle the salt on top. Mix the dough for about 5 minutes so the dough comes together. Cover the dough with plastic wrap or a damp towel and let the dough rest for 30 minutes. (Image 3)
Step 4: After the resting period, this dough will need 6 rounds of stretching and folding in order to develop the gluten and obtain a nice rise. With the dough in the bowl, grab the edge of the dough firmly and pull up – stretching it upwards. Then place the dough in your hands into the center. (Image 4)
Turn the bowl about a quarter turn and do this stretch and fold again. Repeat this process one to two more times. This is considered one stretch and fold round.
Repeat according to the directions below. If the dough is too sticky, you can dip your hand in water.
First 3 stretch and folds – every 15 minutes.
Last 3 stretch and folds – every 30 minutes.
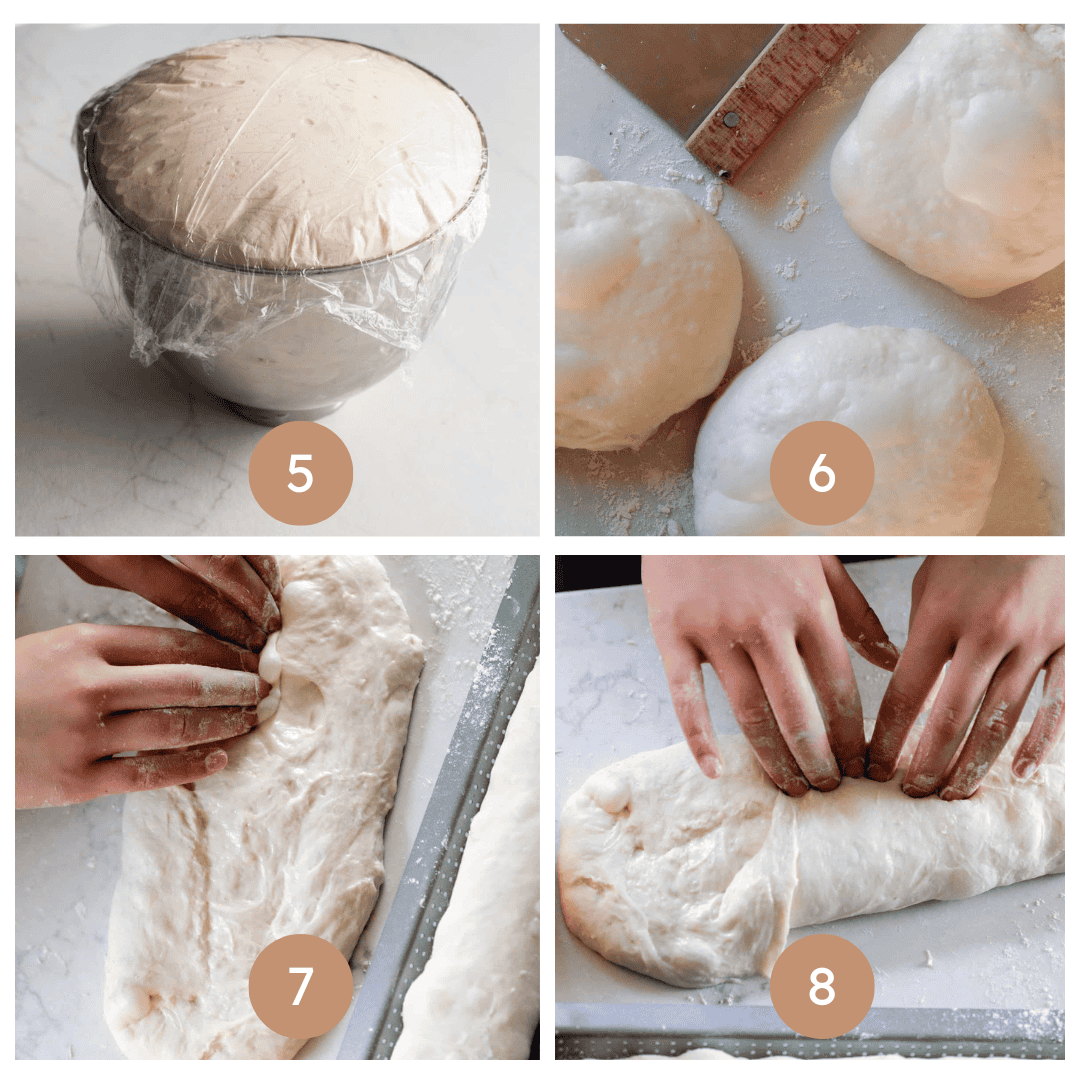
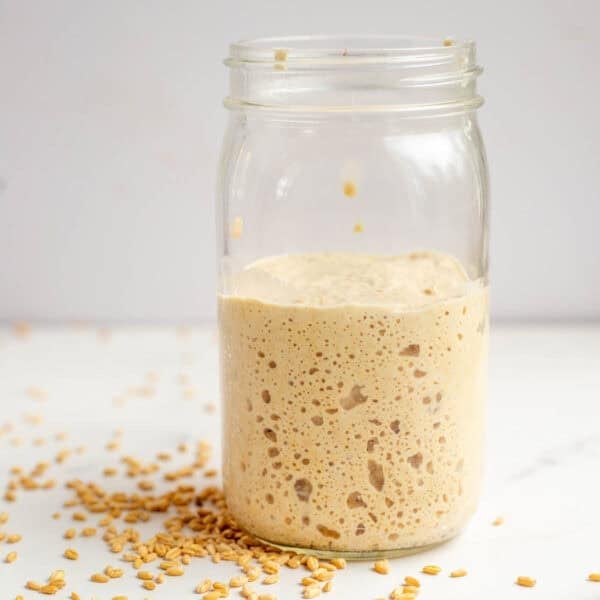
Step 5: When you are finished with the 6 rounds of stretch and folds, cover the dough with a wet towel or plastic wrap. Allow it to bulk-ferment at room temperature until it has doubled. (Image 5)
Step 6: On a clean work surface, divide the dough into three equal parts using a bench scraper. Pre-shape by providing slight tension and creating a ball with each piece of dough and allow to bench rest for about 20 minutes on the counter. (Image 6)
Step 7: For the final shape, shape the baguette dough by gently stretching the dough out into a rectangle about 10” long by 5” wide. Fold one long side into the middle and press your fingers into the seam all the way down it to seal it. Repeat with the other long edge, so that there is one seam in the middle where the two sides meet. (Image 7)
Step 8: Roll the dough over, so that it is seam side down, and gently create tension along the seam by pulling it against the counter. This will also elongate the shape as you continue to pull the dough. I like mine to be about 14” for a final length, so they can rest in my perforated baguette mold. Repeat for the other two pieces of dough. (Image 8)
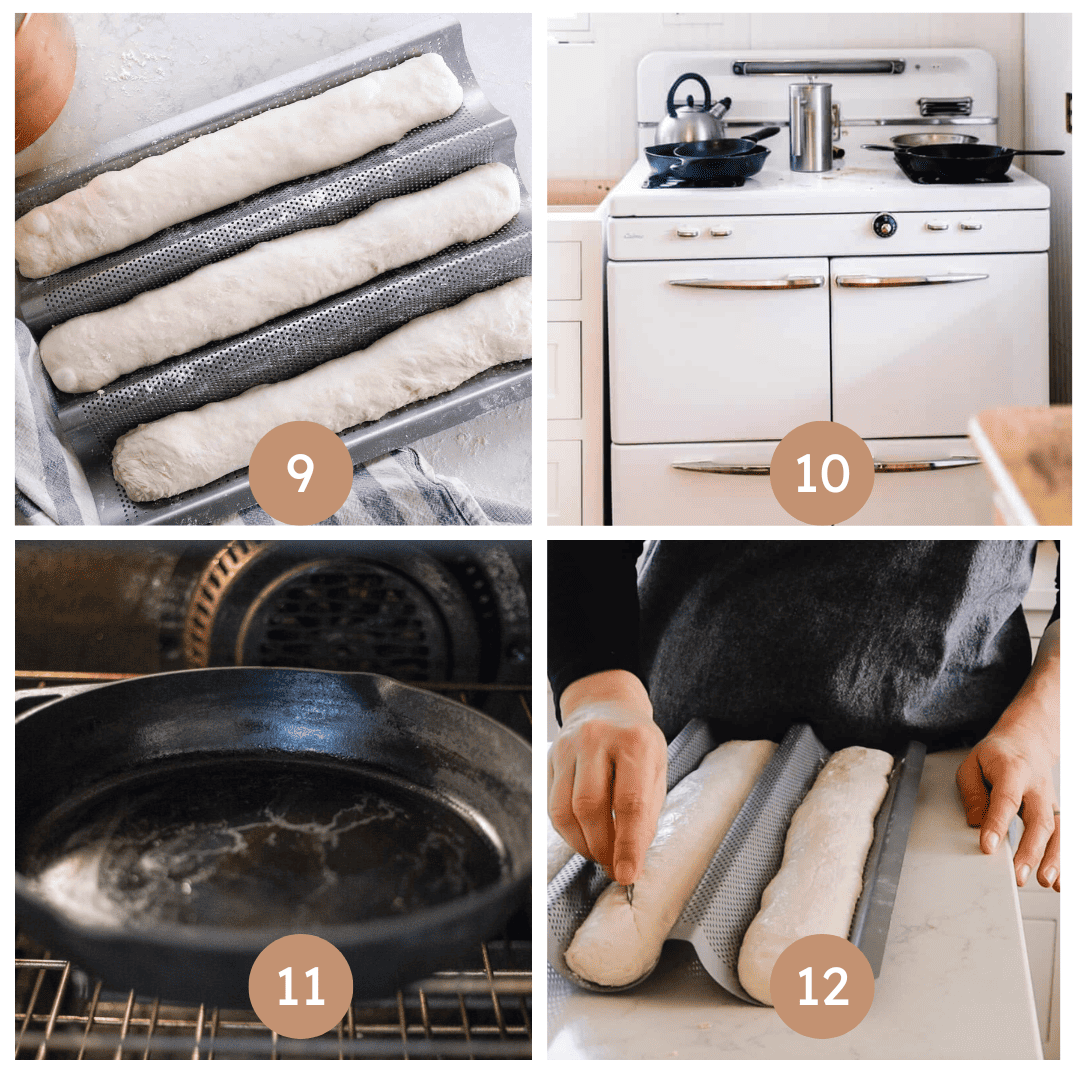
Step 9: Place your shaped baguettes in a baker’s couche or baguette tray or mold. A baker’s couche is a canvas cloth used to shape your baguettes. You could also make a DIY version using a tea or kitchen towel and a few clothes pins to help it keep its shape. If using a couche or cloth, you may want to place it all on a baking sheet so you can easily transport it. (Image 9)
Step 10: The next day, preheat a baking stone (optional) at 500 degrees for about an hour. Although I don’t actually bake directly on the pizza stone, I like to have it in there to keep the oven very hot when I put the cold baguettes in. This helps them to poof up, also known as oven spring. (Image 10)
Step 11: Get a pot or kettle of boiling water going. On the rack at the bottom of the oven, add a cast iron skillet. (Image 11)
Step 12: Remove the baguettes from the fridge. Score the top of the dough with a razor blade with 3 or 4 fairly deep scores cut at a 45 degree angle. (Image 12)
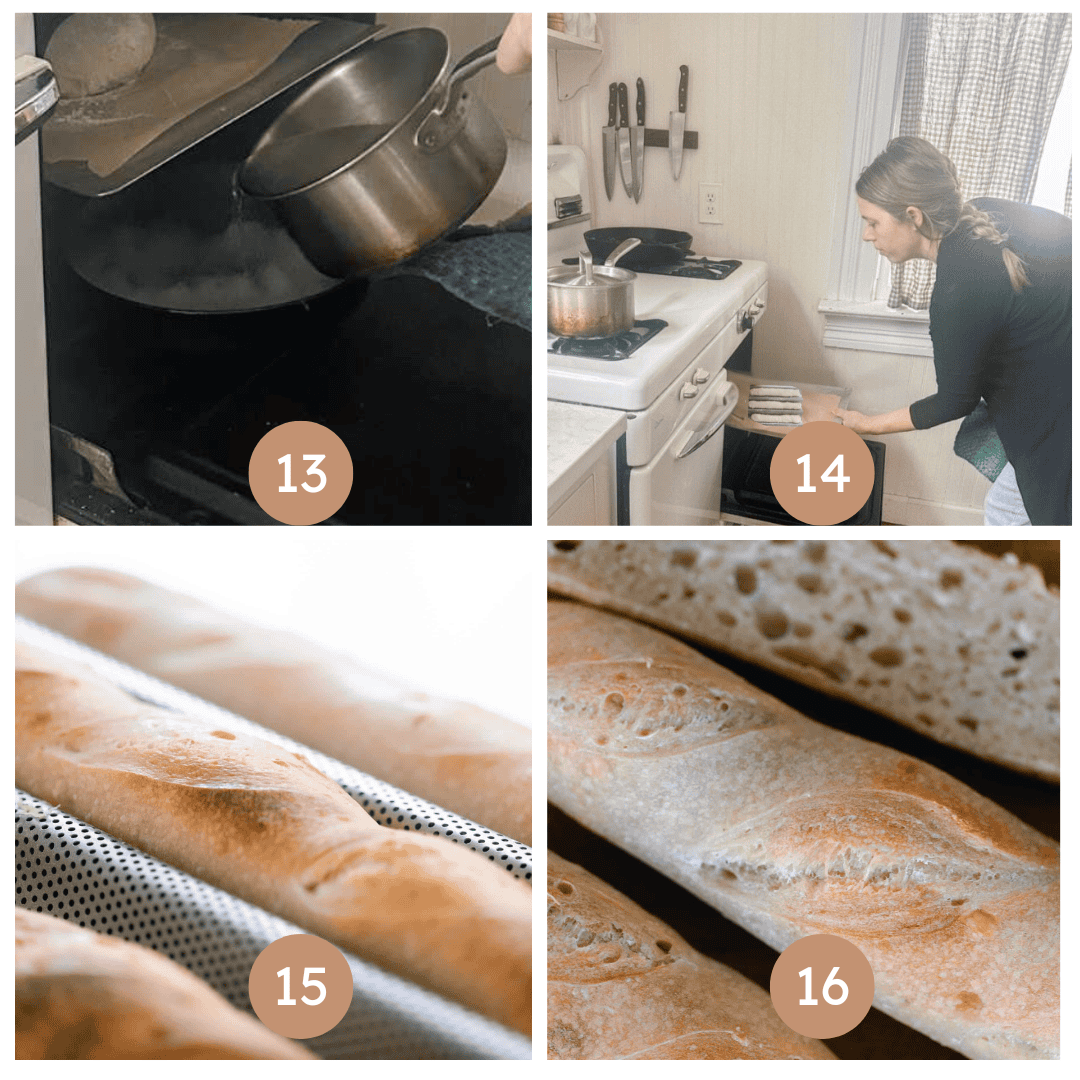
Step 13: Fill the cast iron skillet you placed in your oven with boiling water. (Image 13)
Step 14: Spritz the top of the baguettes with water for browning. (Image 14)
Step 15: Load the baguettes onto the stone. I leave mine in the perforated baguette pan, and place that on top of the stone. If you use a couche to shape your dough, remove the baguettes from the couche and place them directly on the stone. Do NOT put the couche in the oven. Carefully open the oven door, as you’ll likely have quite a bit of steam come out once opened. (Image 15)
Step 16: Reduce the heat to 450 degrees and bake for 35 minutes. In my oven, I achieve the best browning when I rotate the baguettes after about 20 minutes of baking. (Image 16)
Tips
- The timing for bulk fermentation will vary greatly depending on many factors – temperature, hydration, maturity and strength of the starter, etc. If you’d like, you can let this step go longer for further health benefits. I typically do this in the morning and let it go all day. When the dough is ready, there will be small bubbles on the surface.
- During the rising process and bulk fermentation, make sure to cover the dough with a damp towel or plastic wrap to avoid any unpleasant crusts from forming.
- When placing the cast iron pan in your oven that you will use with water to create steam, try not to place it directly under your baking bread. Rather, place it off to the side slightly so that the steam can rise to the baguettes easier and create a crisp crust.
- Leftover stale baguettes make delicious homemade sourdough croutons.
Troubleshooting
There could be a couple of factors at play here, but the most likely culprit is lack of moisture in the oven. Adding the boiling water to your oven may seem like overkill, but it is essential in developing a crisp, golden crust.
The starches in your dough will eventually absorb the moisture from the oven. With the right amount, the baguette will form a starch-like gel on the outside. This eventually turns into your crunchy crust.
The right moisture level makes all the difference in a perfect baguette.
Dense bread without that airy crumb tends to indicate a lack of yeast activity, meaning your dough did not proof long enough. Don’t forget – the bulk ferment may take a lot longer depending on temperature and other environmental factors.
Recipe FAQs
Thanks to the fermented grains in sourdough, it is typically easier to digest. That also means it’s easier on your body to absorb the vitamins and minerals in the bread.
A baguette is a French bread that is known for its long, thin shape and golden crust.
Traditionally, French baguettes are made with yeast. However, using sourdough starter as your leavening agent adds a delicious, tangy flavor that really takes this bread over the top!
The only difference is your leavener. Sourdough uses a special starter made with flour and water, while a traditional French baguette is normally made with commercial yeast.
You’ll still get the same shape and crust, but you’ll also get a more robust flavor with sourdough.
We love to have a piece of sourdough baguette as a side to dinner. It can go with almost anything, but we especially love it with soup, like my Roasted Red Pepper And Tomato Soup, and even eggs!
Adding a little herb butter on a warm slice will take it over the top.
Baker’s Timeline:
This can be started or made at any time. I like to start doughs at night time so they can rise all night. In the morning, they are ready to shape, boil, and bake.
Feed sourdough starter with flour and water.
12 p.m. – Combine your warm water and flour. You’ll want to let this mixture rest for 30 minutes for a process called autolyse.
12:30 p.m. – Add sourdough starter and salt. Mix dough. Let rest for 30 minutes.
1 p.m. – Begin 6 rounds of stretches and folds according to the schedule above.
3 p.m. – Cover your dough with a wet towel or plastic wrap. Allow it to bulk-ferment until it has doubled.
8:30 p.m. (or sooner/later) – Shape your dough into 3 equal parts and shape into balls. Let rest for 20 minutes.
9 p.m. – Complete final shaping of dough and place it in a baguette mold or baker’s couche. Cover and refrigerate overnight or up to 36 hours.
9 a.m. the next morning – Prep your oven and baguettes and bake!
More Sourdough Recipes from the Farmhouse
- Homemade Sourdough Oatmeal Cream Pies
- Delicious Homemade Sourdough Pita Chips
- 100% Fresh Milled Sourdough Bread
- Sourdough Bundt Cake
- Whole Wheat Sourdough Dinner Rolls
If you try this recipe and love it, I would love it if you could come back and give it 5 stars! Tag me on Instagram @farmhouseonboone.
Sourdough Baguette Recipe

Equipment
- 1 Baguette pan or baker's couche
Ingredients
- 625 grams all purpose flour
- 450 grams water
- 100 grams sourdough starter
- 13 grams salt
Instructions
- Feed your sourdough starter 4-12 hours before starting the bread so it is active and bubbly once you begin.
- Combine your warm water and flour in a large bowl. You’ll want to let this mixture rest for 30 minutes for a process called autolyse.
- Using wet hands, dimple in your sourdough starter to the rested flour and water mixture. Sprinkle the salt on top. Mix the dough for about 5 minutes so the dough comes together. Cover the dough with plastic wrap or a damp towel and let the dough rest for 30 minutes.
- After the resting period, this dough will need 6 rounds of stretching and folding in order to develop the gluten and obtain a nice rise. With the dough in the bowl, grab the edge of the dough firmly and pull up – stretching it upwards. Then place the dough in your hands into the center.
- Turn the bowl about a quarter turn and do this stretch and fold again. Repeat this process one to two more times. This is considered one stretch and fold round.
- Repeat according to the directions below. If the dough is too sticky, you can dip your hand in water.
- First 3 stretch and folds – every 15 minutes.
- Last 3 stretch and folds – every 30 minutes.
- When you are finished with the 6 rounds of stretch and folds, cover the dough with a wet towel or plastic wrap. Allow it to bulk-ferment at room temperature until it has doubled.
- On a clean work surface, divide the dough into three equal parts using a bench scraper. Pre-shape by providing slight tension and creating a ball with each piece of dough and allow to bench rest for about 20 minutes on the counter.
- For the final shape, shape the baguette dough by gently stretching the dough out into a rectangle about 10” long by 5” wide. Fold one long side into the middle and press your fingers into the seam all the way down it to seal it. Repeat with the other long edge, so that there is one seam in the middle where the two sides meet.
- Roll the dough over, so that it is seam side down, and gently create tension along the seam by pulling it against the counter. This will also elongate the shape as you continue to pull the dough. I like mine to be about 14” for a final length, so they can rest in my perforated baguette mold. Repeat for the other two pieces of dough.
- Place your shaped baguettes in a baker’s couche or baguette tray or mold. A baker’s couche is a canvas cloth used to shape your baguettes. You could also make a DIY version using a tea or kitchen towel and a few clothes pins to help it keep its shape. If using a couche or cloth, you may want to place it all on a baking sheet so you can easily transport it.
- The next day, preheat a baking stone (optional) at 500 degrees for about an hour. Although I don’t actually bake directly on the pizza stone, I like to have it in there to keep the oven very hot when I put the cold baguettes in. This helps them to poof up, also known as oven spring.
- Get a pot or kettle of boiling water going. On the rack at the bottom of the oven, add a cast iron skillet.
- Remove the baguettes from the fridge. Score the top of the dough with a razor blade with 3 or 4 fairly deep scores cut at a 45 degree angle.
- Fill the cast iron skillet you placed in your oven with boiling water.
- Spritz the top of the baguettes with water for browning.
- Load the baguettes onto the stone. I leave mine in the perforated baguette pan, and place that on top of the stone. If you use a couche to shape your dough, remove the baguettes from the couche and place them directly on the stone. Do NOT put the couche in the oven. Carefully open the oven door, as you’ll likely have quite a bit of steam come out once opened.
- Reduce the heat to 450 degrees and bake for 35 minutes. In my oven, I achieve the best browning when I rotate the baguettes after about 20 minutes of baking.
Notes
- Please double check amounts when using the multiplying feature in the recipe card.
- Bulk fermentation times will vary greatly depending on many factors – temperature, hydration, maturity and strength of the starter, etc. If you’d like, you can let this step go longer for further health benefits. I typically do this in the morning and let it go all day. When the dough is ready, there will be small bubbles on the surface.
- During the rising process and bulk fermentation, make sure to cover the dough with a damp towel or plastic wrap to avoid any unpleasant crusts from forming.
- The boiling water creates steam in the oven, which gives you oven spring. Basically, you have two options. You can either make your whole oven steamy with boiling water and heat, or enclose the baking process in a long Dutch oven. Of course, baguettes are too long to fit in a regular sized Dutch oven, which is why I opt for the stone and steam method.
- When placing the cast iron pan in your oven that you will use with water to create steam, try not to place it directly under your baking bread. Rather, place it off to the side slightly so that the steam can rise to the baguettes easier and create a crisp crust.
- Leftover stale baguettes make delicious homemade sourdough croutons.
Nutrition
Nutrition information is automatically calculated, so should only be used as an approximation.


I followed the baking instructions for using a glass pan and the boiling water, but my glass pan exploded when I poured the boiling water in. If there needs to be warnings or more clear instructions, they should be added. I was lucky in my situation, but there could have been serious injuries as it exploded while I was pouring the water in.
Was your glass pan already preheated in your oven? If the temperatures are close to the same, it should not shatter. Now it will shatter if the pan is cold and the water is hot! I’m so sorry you experienced this issue.
I have never had luck with baguettes but I needed to try and make some sonce the ones I picked up at the store had gotten moldy. Followed the recipe to a T and these were PERFECT. So crusty on the outside and delicious in the middle and even looked practically professional!
So glad this recipe turned out well for you!
I tried making your baguettes (inspired by the Olympics in Paris) and they are fabulous!
Can I freeze the dough after it has a cold rise? bake some baguetes one day and the others a few days later?
Yes, you can freeze them!
Hi I am making this today for the start of the Olympics in Paris. I was wondering why need the second long ferment in fridge?
Just for the health benefits. You can omit that step.
I make all of my sourdough boules with bread flour, so I have that in bulk but very little ap flour. Do I need to change anything in this recipe to successfully make these baguettes with bread flour instead? Thank you!
No, you can use it!
Weighed everything exactly & now on last S&F. Dough is wet. Guess it will be focaccia bread after is rises.
My dough couldn’t be shaped at the point it was to be divided in two. It doubled. It had bubbles. It was a wet sticky mess. I plopped it into the baguette pan, put it in the fridge and went to bed. We’ll see what tomorrow brings.
Sounds like it may have over fermented. Usually it will lose it’s shape and rise and become very sticky.
I’ve made these a couple times now and think I’ve got the recipe down. But they keep sticking to the pan! First time I dusted the pan with cornmeal, this time I placed the loaves into the cornmeal so they were more coated on the bottom. Still stuck. Is it the moisture from the cold rest? Is it my pan? Should I also oil the pan?
You could try oiling the pan and then dusting it with a bit of flour!
Thanks!
I love all your recipes that I’ve tried. This is my first time making baguettes. Everything went very well until shaping. I can’t say I actually shaped the dough, but I sort of did. The dough proofed perfectly. What was missing in the instructions was to put a bit of flour down and lightly flour one side of the dough and proceed from there. The instructions never say to do that. So I didn’t. When I went back to double check to see what I missed with the shaping I saw the photo where you’re shaping and there’s a bit of flour on the counter. It’s really important in my opinion to write that within the instructions. My dough is resting now in the fridge in a homemade couche. I expect the dough to bake well, but I’m a little nervous since shaping didn’t go super well. Thanks for all your great recipes.
Question!
Could this receipe be made into two loafs? I only have a baguette pan for 2 loafs at a time, not three. Or is possible to freeze one of the dough balls once its done BF? Any help is greatly appreciated!
You could make it into two loaves!
First time making baguettes, and these turned out perfect! Farmhouse on Boone always has reliable recipes, and these baguettes are no different. Will definitely be making again.