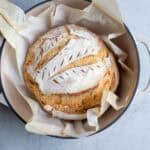

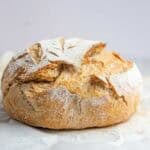
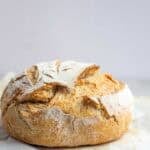
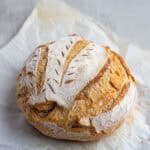
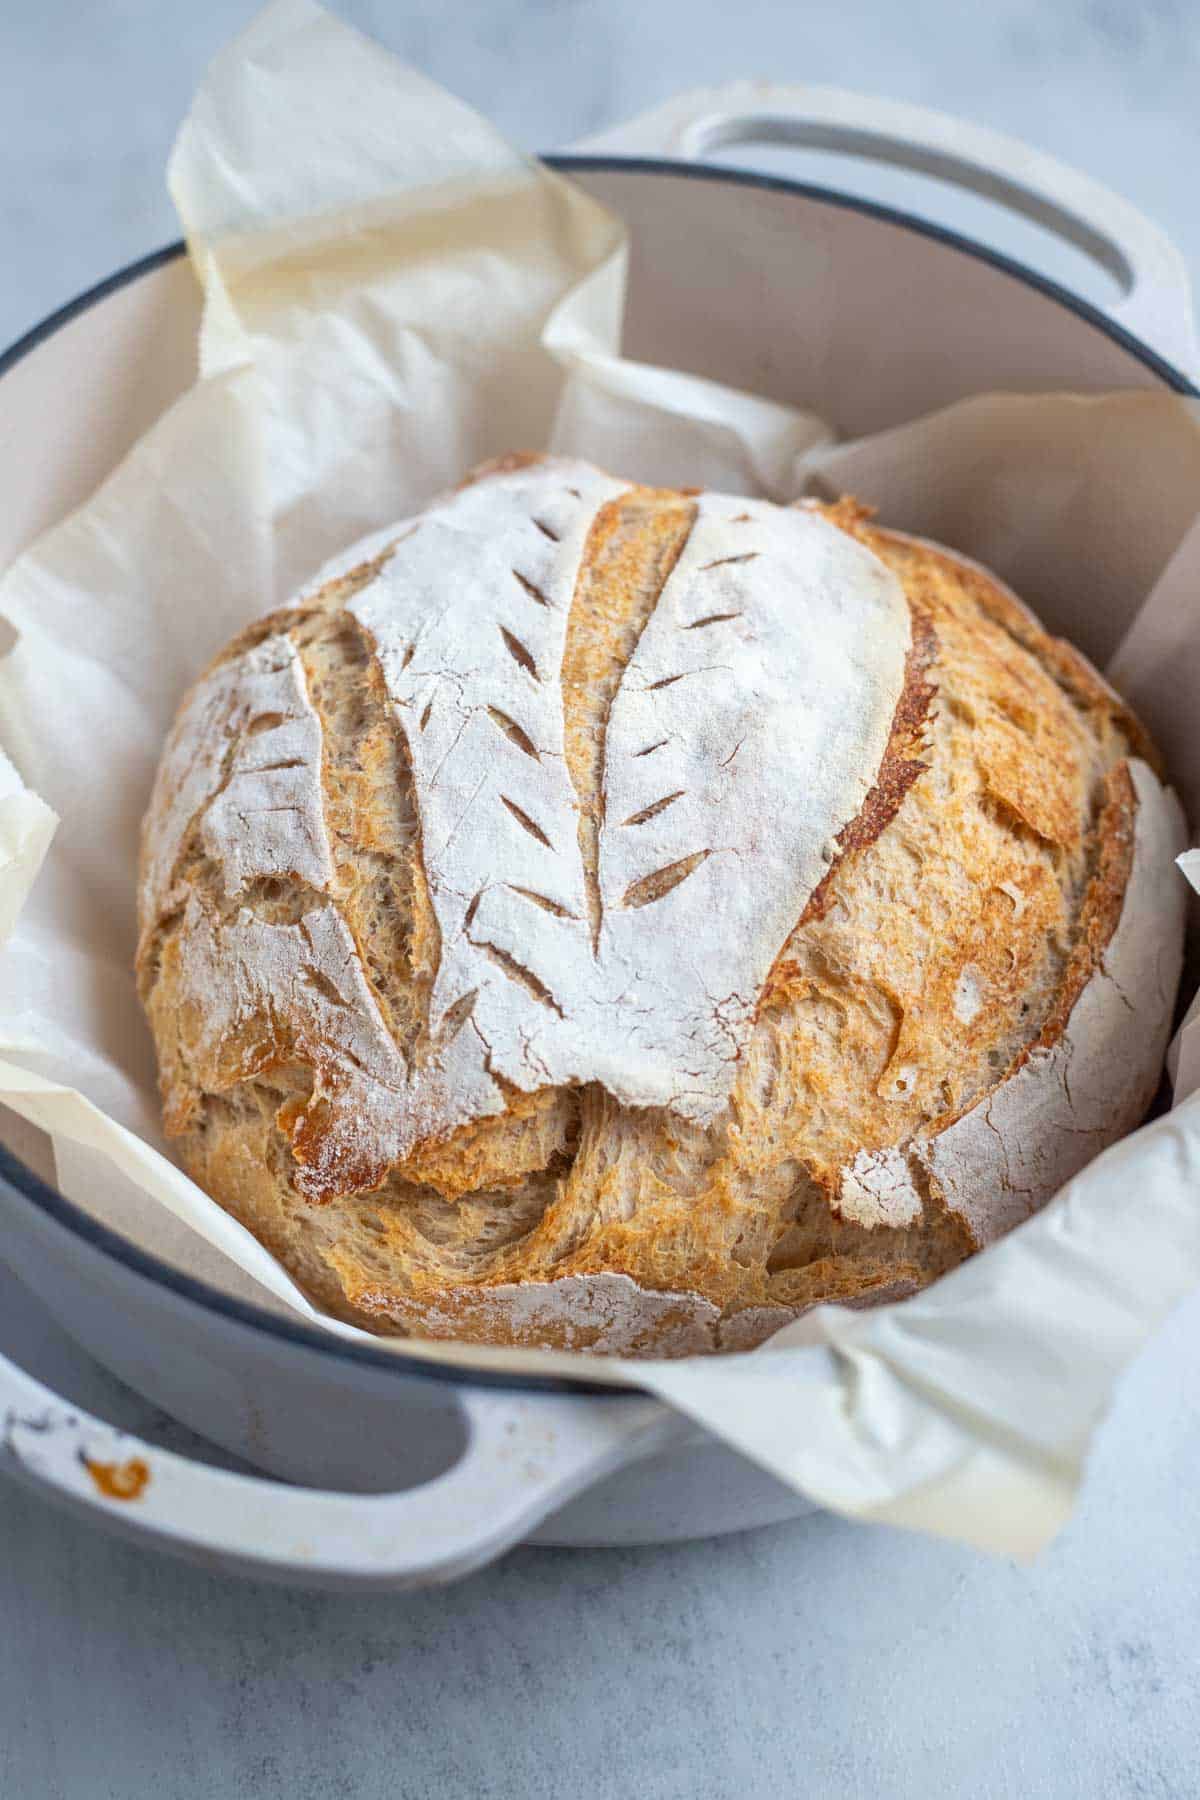
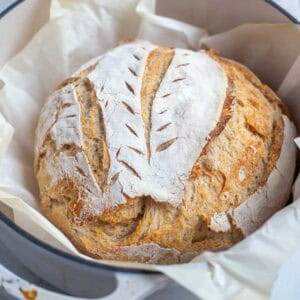
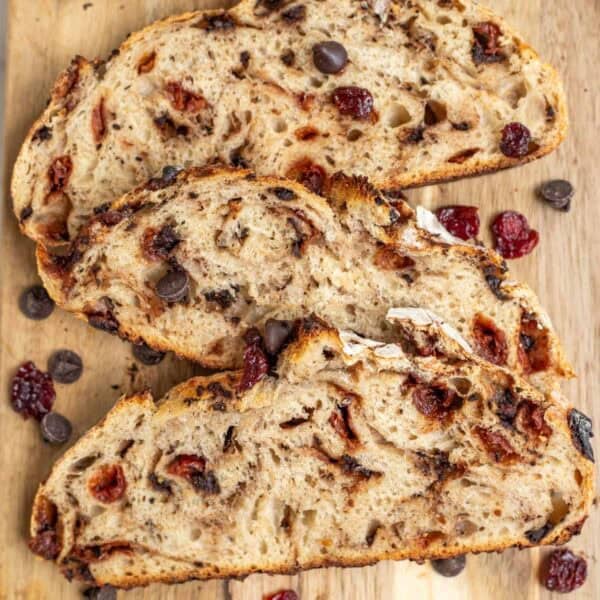
With a deliciously crusty exterior and chewy crumb, spelt sourdough bread is simple, wholesome, and long fermented for tangy sourdough flavor. You can easily prepare multiple loaves and store them in the fridge to bake hot, fresh bread for dinner throughout the week.
This sourdough spelt bread recipe is a great way to incorporate whole grains and ancient grains into your diet. Being very similar to my no-knead sourdough bread, the process and ingredients are simple and straightforward, while utilizing spelt grain. There are 100% spelt loaf recipes out there, and you can even use a spelt sourdough starter if you prefer, but I personally find this combination of bread flour with spelt flour to be the sweet spot.
This flour blend produces a tender crumb, plenty of air bubbles, a crispy crust, a sliceable loaf, and the nutty flavor that whole grain flours are known for. The crusty exterior makes it ideal for bruschetta, bread dipping oil, red pepper hummus, or serving with soups like slow cooker French onion and creamy carrot ginger.
So, What is Spelt Flour?
Spelt is an ancient whole grain wheat that acts similarly to all-purpose flour, but has a lower gluten content and slightly different gluten structure than wheat flour. These differences make spelt often more tolerable and digestible for those with gluten sensitivities.
Spelt is milled with the bran on, making it a whole wheat flour, and giving it a wonderful, earthy flavor that works well in breads, muffins, cookies, and much more.
Spelt is also packed with nutritional value in the form of fiber, iron, B vitamins, magnesium, zinc, and phosphorus. It is also much easier to work with than einkorn flour recipes, which is another ancient grain, and can generally be substituted one for one in most recipes calling for all-purpose flour.
Why You’ll Love This Recipe
Whole grain nutrition – Spelt offers more health benefits than regular all-purpose flour or even most modern whole wheat flours. It has a greater content of fiber, iron, B vitamins, magnesium, zinc, and phosphorus, while also being higher in protein and lower in gluten. Whole grains also have a deeper flavor and a heartier texture.
Sourdough simplicity – With a healthy sourdough starter, sourdough recipes are simple and nourishing. This simple recipe for sourdough spelt bread uses minimal ingredients and a straightforward process that works well for beginners or experienced bakers alike.
Versatile everyday loaf – The texture and flavor of this loaf make it the perfect bread to keep on hand. Slice and toast it to serve with breakfast, sop up soup with a crusty chunk, or smear it with butter and honey for a nourishing snack.
Ingredients
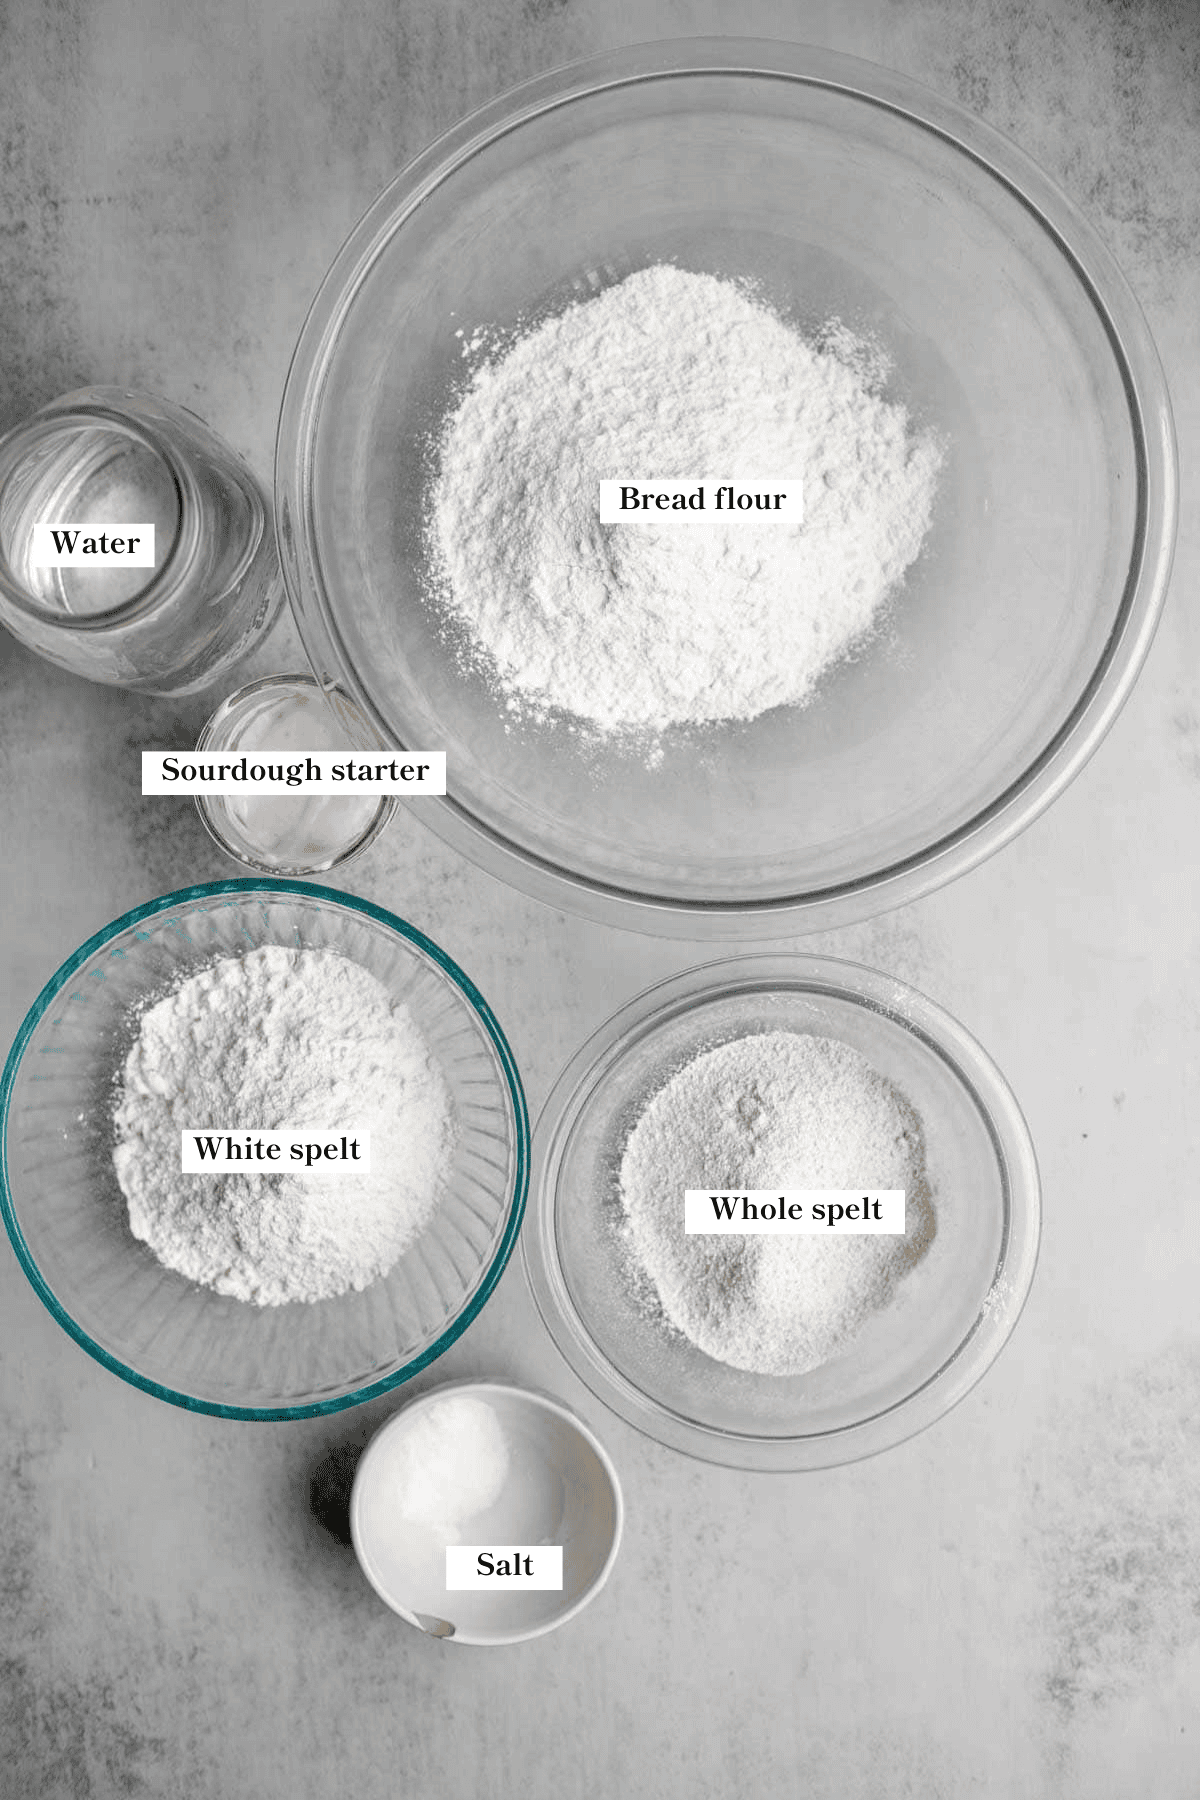
Bread flour – This helps maintain the structure of the bread, since spelt has less gluten content than regular wheat.
White spelt flour – This is spelt flour that has had the germ and bran removed, leaving a finer flour that lightens the texture of the loaf.
Whole spelt flour – Whole spelt is what you’ll typically find in the store. Since the germ and the bran remain in this flour, it gives a richer, whole grain flavor and heartiness to the recipe.
Active sourdough starter – To ensure the best rise, you need a starter that is recently fed, super active, and bubbly.
A full ingredient list with exact amounts can be found in the recipe card below.
Tools You May Need
How to Make Spelt Sourdough Bread

Step 1: Feed your sourdough starter 4-12 hours before starting the bread, ensuring it is active and bubbly.
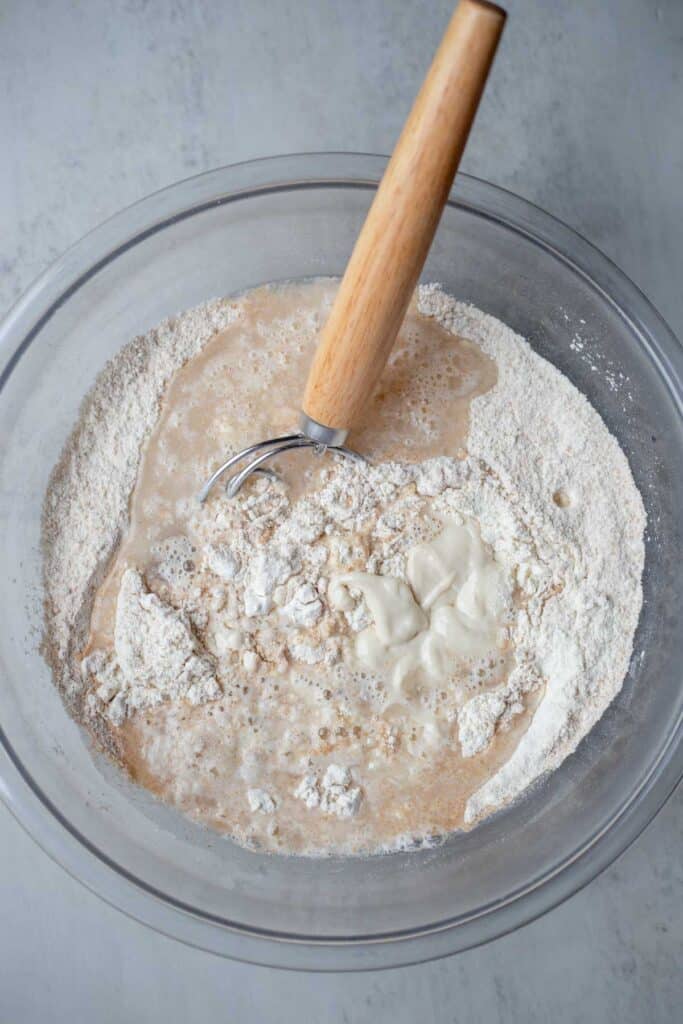
Step 2: Measure bread flour, white spelt, and whole spelt into a large mixing bowl. A kitchen scale works very well for this. Add sourdough starter, warm water, and salt to the flours, and stir until combined.
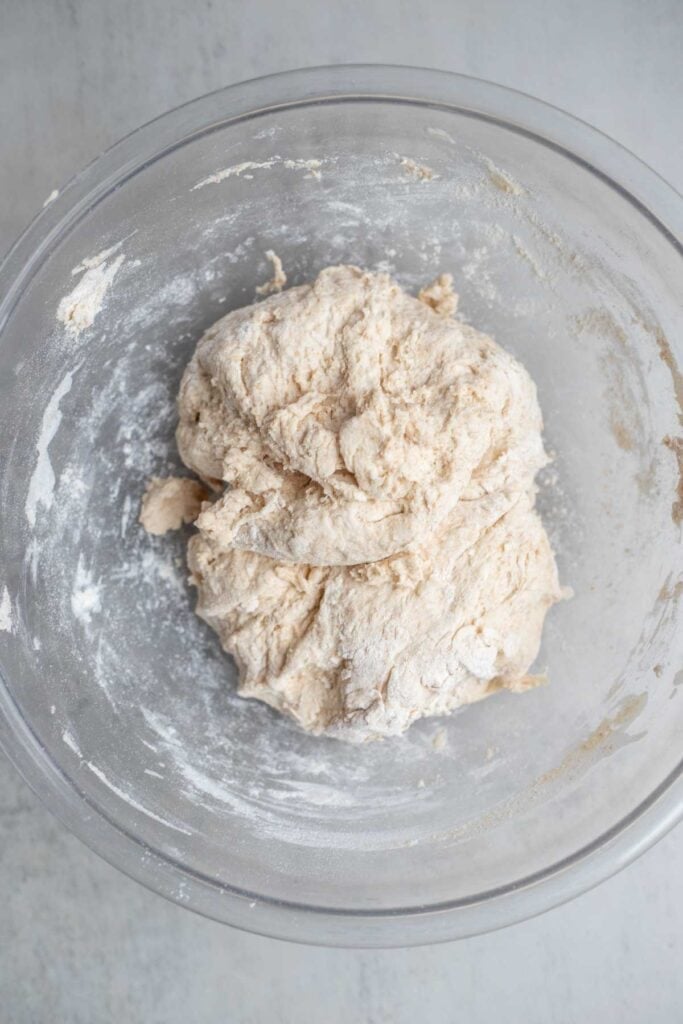
Step 3: Cover the bowl with a damp towel, lid, or plastic wrap, and let the dough rest for 30 minutes for the water to hydrate the flour. This process is called autolyse, and it allows all the flours to become hydrated.
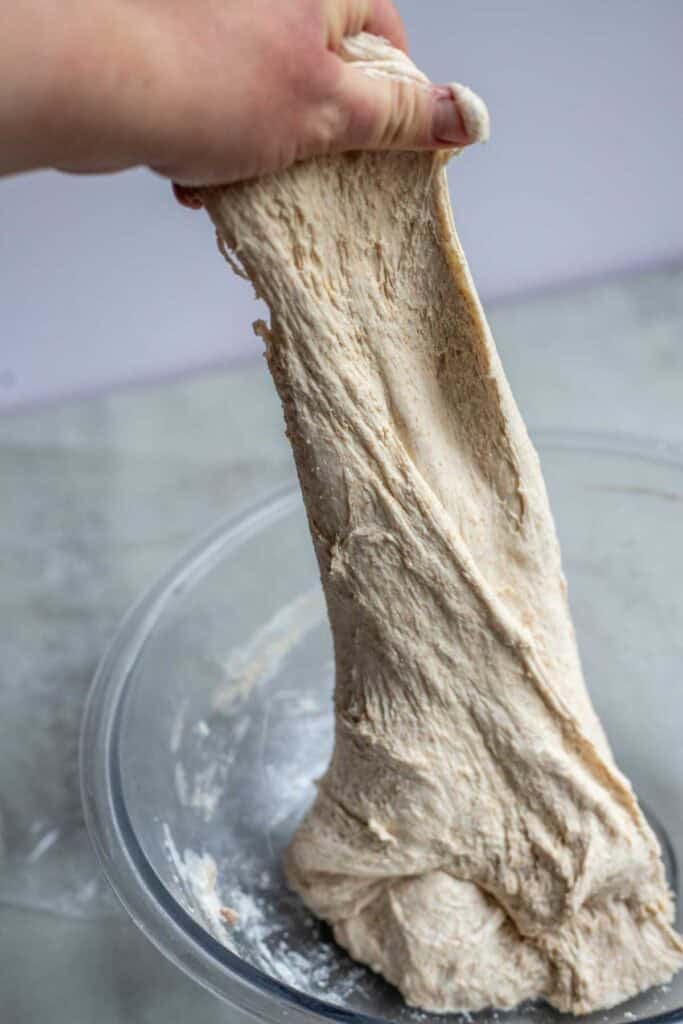
Step 4: Since this is a no-knead recipe, instead of kneading the dough, we will use the stretch and fold method. Stretch and folds are accomplished by firmly grabbing the edge of the dough in the bowl and pulling upwards. This is the stretch. Push the dough that is in your hands back into the center of the bowl, making a fold in the dough, and press. Turn the bowl about a quarter turn, repeating the stretch and fold action – stretching up; pressing back down to the center. Repeat this process a total of 3-4 times. This is considered one round of stretch and folds. Repeat for a total of 6 rounds according to the following schedule.
- Three rounds of stretch and folds every 15 minutes.
- Three more rounds of stretch and folds every 30 minutes.
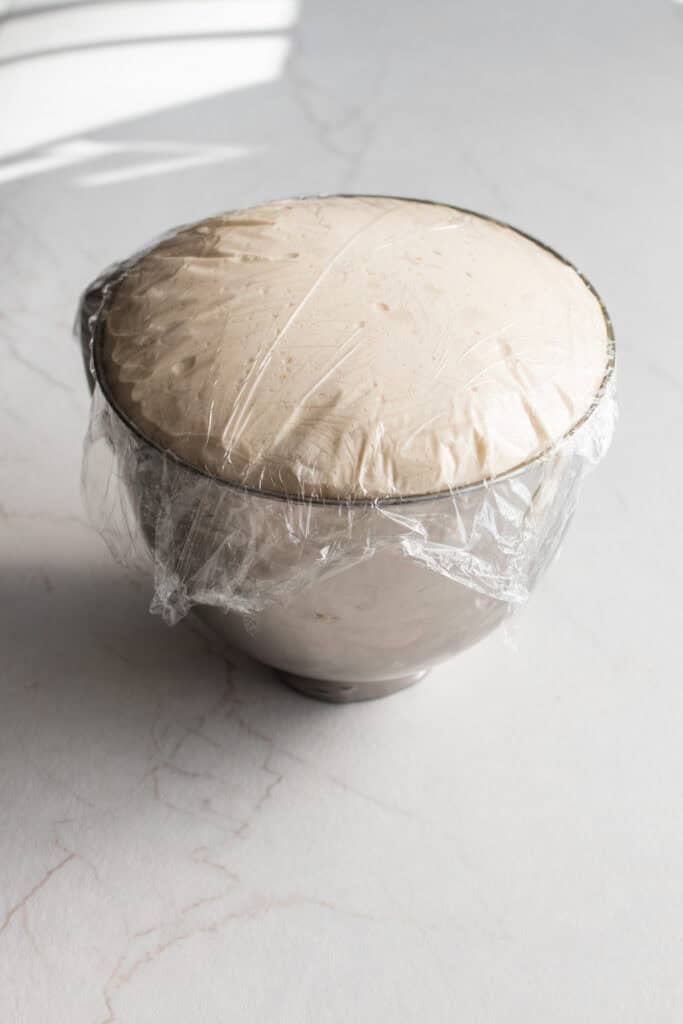
Step 5: Cover the dough with a damp towel or plastic wrap and allow it to bulk-ferment at room temperature until doubled. This may be anywhere from 3 to 8 hours, depending on the temperature of your home and the maturity of your sourdough starter. Be careful not to over-ferment, which may lead to a sticky dough that doesn’t rise. Over-fermenting can compromise the shape and structure of the bread.
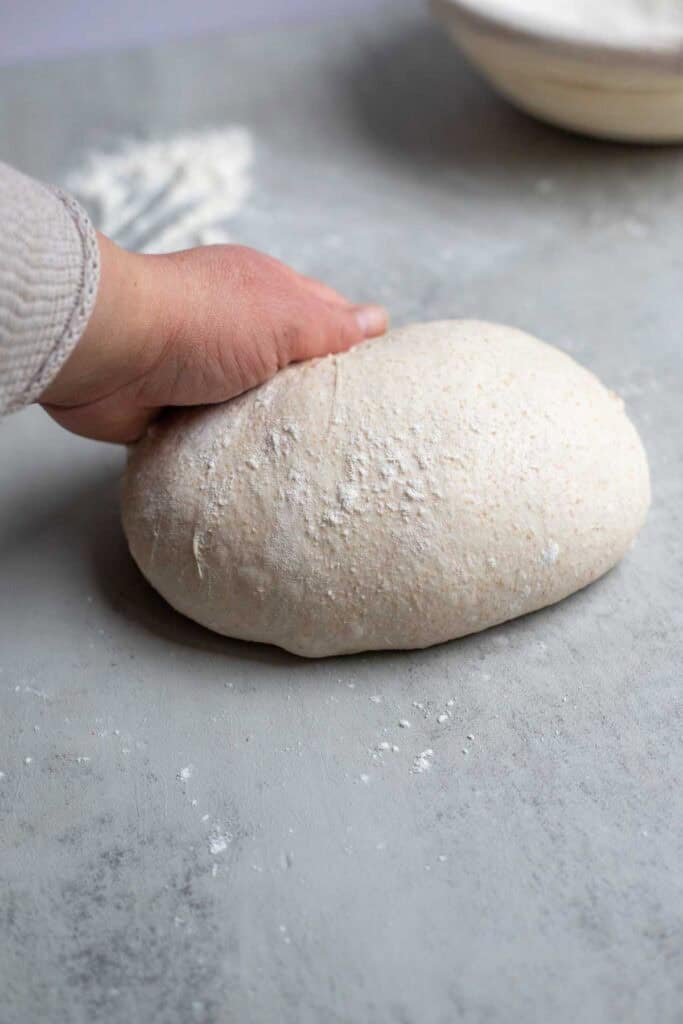
Step 6: After the bulk fermentation, shape the dough into a ball by gently spinning it toward you on a lightly floured work surface. Leave the dough uncovered on the counter for 20-30 minutes. This allows the surface to develop a skin, so that it doesn’t stick to the tea towel or banneton basket during the overnight rise.
Step 7: Turn the dough over (the air-exposed, skin-side down) onto your lightly floured surface and shape again. I pull each side and fold it into the dough, rolling it up. Gently pull the bread dough against the countertop towards you, creating tension on the surface. This will provide better oven spring when baking and better structure in the final result, so don’t skip this step.
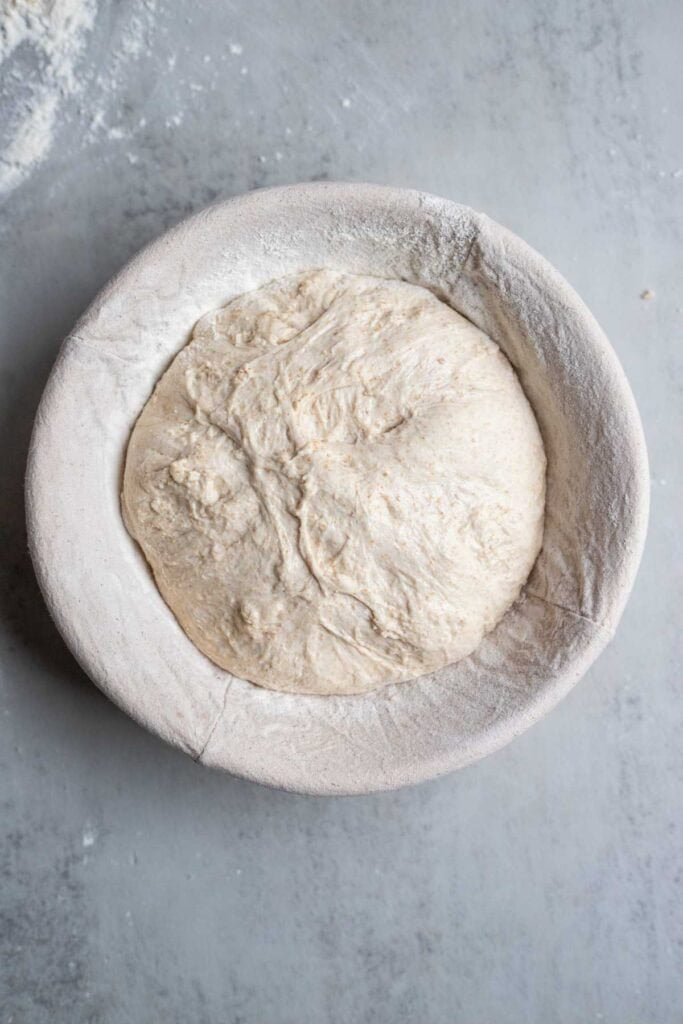
Step 8: Transfer to a floured banneton or bowl with a lightly floured tea towel, seam-side up. Cover with plastic (I usually use a large plastic bag) and proof 12-15 hours (or overnight) in the refrigerator. You can actually leave the dough for a couple of days in the fridge. It will develop a more sour flavor the longer it sits.
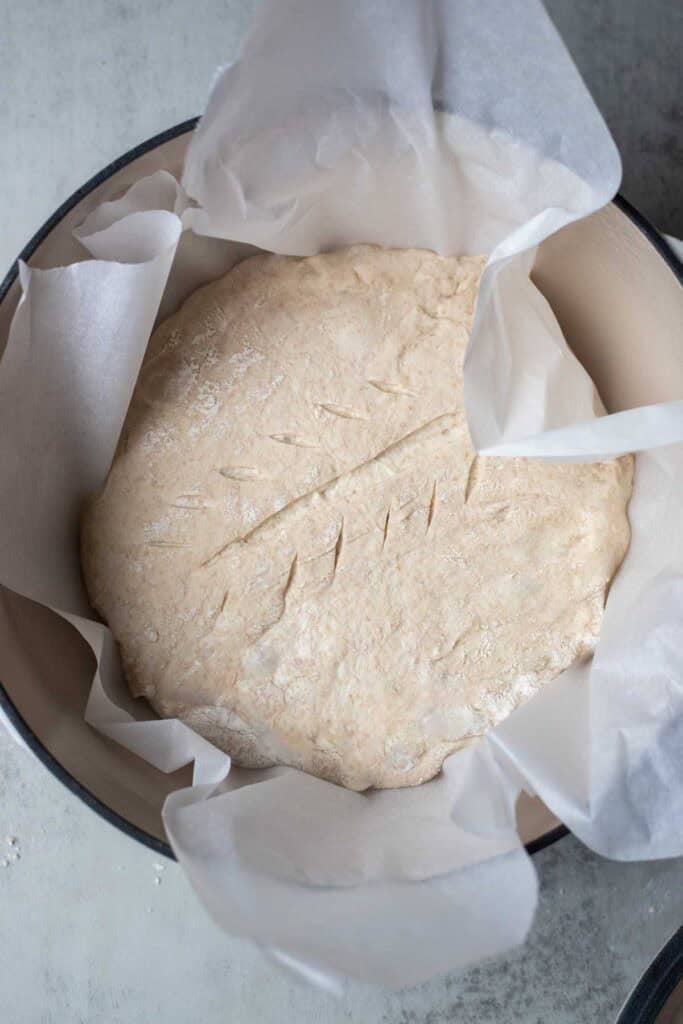
Step 9: After the final proof, preheat a Dutch oven to 500 degrees Fahrenheit for one hour. Remove the dough from the fridge immediately before baking. Place seam-side down onto parchment paper, dust with flour on top, and score with a razor or lame.
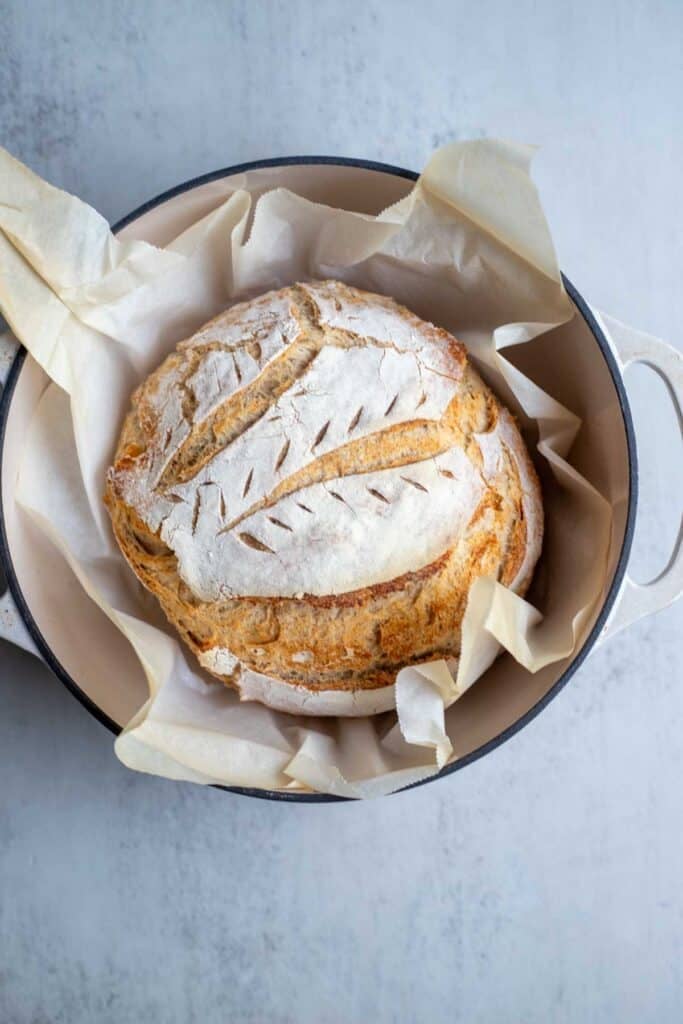
Step 10: Place the parchment paper and dough into the preheated Dutch oven and cover with the lid. Reduce the oven temperature to 475 degrees Fahrenheit and bake for 20 minutes. Take the lid off and bake for another 20 minutes or until golden brown. Set the loaf on a cooling rack and cool completely before slicing.
Tips
- I like the mix of whole spelt and white spelt, but you can substitute one or the other for all of the spelt component that you have.
- Wet hands help with working sticky dough, so give your hands a dip or a spritz of water while doing the stretch and folds.
- Whole grain spelt flour ferments quickly at room temperature, so stick to the recommendations to avoid over-fermentation and a sloppy dough. The cold proof is much more forgiving because cold temperatures essentially pause the sourdough fermentation process. This allows for preparing multiple loaves and keeping them in the fridge to bake later in the week.
- A dough scraper makes cleaning up your work surface super easy.
- Let the sourdough loaf cool completely before slicing to avoid a gummy texture.
- Store loosely covered at room temperature.
Recipe FAQs
Yes, spelt adds a wonderful flavor, and it produces a moist loaf. It also acts really similarly to all-purpose flour, making it pretty easy to handle while still giving the loaf structure.
Spelt sourdough is sourdough bread that uses some combination of spelt flour.
Yes. You can feed your starter spelt flour without any issue.
Spelt sourdough bread does contain gluten, but the gluten is more broken down via fermentation than a regular loaf, which may help with digestion. Spelt flour also has lower gluten content and a different gluten structure that may be more tolerable for those who are gluten sensitive. However, if you have celiac disease, stick with gluten-free sourdough and gluten-free starter.
You can store uncut bread in a paper or linen bag at room temperature. Once cut, store the cut side down on a cutting board lightly covered or keep in a storage bag at room temperature for several days. This bread also freezes well. To freeze, store the bread in an airtight bag or container once completely cooled. Freeze for 2-3 months and thaw at room temperature.
Baker’s Timeline:
This can be started or made at any time. I like to start doughs at night time so they can rise all night. In the morning, they are ready to shape and bake.
Feed sourdough starter with flour and water.
If the sourdough starter is mature, then proceed to creating the dough. Combine the ingredients, then cover and let rest for 30 minutes.
Begin stretch and fold schedule. First 3 stretch and folds, every 15 minutes. Last 3 stretch and folds, every 30 minutes. Cover the dough with a wet towel or plastic wrap and allow it to bulk ferment until doubled.
Shape dough. Sit out 20 – 30 minutes, uncovered. Turn over and shape again.
Transfer to a floured banneton or bowl with a floured tea towel, then cover with plastic wrap. Place in the refrigerator for 12 – 15 hours.
Preheat a Dutch oven at 500 degrees Fahrenheit for one hour.
Take dough out of fridge, dust with flour, and score. Turn the oven down to 475 degrees Fahrenheit, add dough to the parchment-lined Dutch oven, and bake for 20 minutes with the lid on. Remove the lid, then bake for another 20 minutes. Allow the bread to cool before slicing.
More Sourdough Recipes from the Farmhouse
- Sourdough Rye Bread
- Homemade Sourdough Bagels
- Sourdough Croissant Bread
- Easy Sourdough Dinner Rolls
- Soft Multigrain Sourdough Bread
If you try this recipe and love it, I would love it if you could come back and give it 5 stars! Tag me on Instagram @farmhouseonboone.
Spelt Sourdough Bread
Equipment
Ingredients
- 2 cups bread flour, 250 grams
- 1 1/2 cups white spelt, 175 grams
- 3/4 cup whole spelt, 100 grams
- 1/2 cup sourdough starter, 100 grams
- 1 1/2 cups water, 325 grams
- 2 teaspoons salt, 10 grams
Instructions
- Measure bread flour, white spelt, and whole spelt into a large bowl. Add recently fed and active sourdough starter, warm water, and salt to the flours, stirring until combined.
- Cover the bowl with a damp towel, lid, or plastic wrap, and let the dough rest for 30 minutes for the water to hydrate the flour.
- Grab the edge of the dough in the bowl, stretch upwards, and press back down to the center. Turn the bowl a quarter turn, and repeat the process 3-4 times. This is one round. Complete six rounds of stretch and folds.
- Three rounds of stretch and folds every 15 minutes.
- Three more rounds of stretch and folds every 30 minutes.
- Cover the dough with a damp towel or plastic wrap and bulk-ferment at room temperature until doubled. This may be anywhere from 3 to 8 hours, depending on the temperature of your home and the maturity of your sourdough starter.
- After the first fermentation period, shape the dough into a ball. Leave the dough uncovered on the counter for 20-30 minutes to develop a skin. This keeps it from sticking to the tea towel or banneton basket during the fridge rise.
- Turn the dough over (the air-exposed, skin-side down) onto your lightly floured surface and shape again, creating tension on the surface as you spin the ball of dough towards you.
- Transfer to a floured banneton or a bowl with a lightly floured tea towel, seam side up. Cover and proof 12 – 15 hours (or overnight) in the refrigerator.
- Preheat a Dutch oven to 500 degrees Fahrenheit for one hour. Remove the dough from the fridge immediately before baking. Place seam-side down onto parchment paper, dust with flour on top, and score with a razor or lame.
- Place the parchment paper and dough into the preheated Dutch oven and cover with the lid. Lower the oven temperature to 475 degrees Fahrenheit and bake for 20 minutes. Remove the lid and bake for another 20 minutes or until golden brown. Cool completely before slicing.
Notes
Nutrition
Nutrition information is automatically calculated, so should only be used as an approximation.


Can sourdough starter be frozen for future use?
You can freeze sourdough starter, but you will have to feed it a few times to wake it up when you thaw it out.
Has anyone tried making this in the bread machine?
Hi, Lisa!
Could I substitute the all purpose with AP spelt? Thank you!! Trying to incorporate more ancient grains for my family.
What size of dutch oven do you use???? There are sooo many sizes. I can’t tell from the picture.
Hi Sharon. I am on the Low FODMAP diet, and bake everything 100% spelt. In receipes with AP flour, I usually add 10% ekstra fine flower to what the AP is supposed to be. I bake everything, like rolls and bread that way. Works prefectly fine. In cake receipes I don’t add extra, sice you don’t need the extra gluten-effect in cakes. Love from Norway.
475 is too hot. Burnt my crust turned down the oven to 450 and baked during uncovered time for 15 minutes
I find a 7 qrt works well for my breads and others dishes.
Beautifully crafted recipe: clear writing, elegant photos. Brava!
I’m an experienced baker, with only a few forays into sourdough-making. My question is about the overnight rest: if, instead, one were to rest the dough for a few hours in a warm, moist rising cabinet, might one be able to bake the bread within a few hours? I do not expect the results to be the same, nor for any sort of guarantee of success: I only seek your best guess. (The baked beans will be ready in 5 hours. Can I do a sourdough speed run?)
I planned on using One Degree Organics Sprouted spelt flour.. does the sprouted aspect change anything or can I use it the same as your spelt flours listed?
No, that should be just fine.
I, too, have been looking for the video…and after seeing your response have gone back and looked under every picture but I still haven’t seen a video. In the note that says ‘see video’ one would expect to click on that for access but it seems to just be a part of the information and not a link…please advise…
Thanks! Have your book and love it.
It’s after the fourth paragraph in the blog article!
I’m not understanding the shaping of the dough with a shoelace pattern. It says see video. But I’m not sure where the video is. Thank you.
The video is towards the top. Right after the first picture.
The best loaf I have ever made! I’ve been baking sourdough for 3 years now and just recently started graining my own flour. It’s definitely a learning curve so I was very nervous about trying this recipe. The flavor and texture are perfect!
Fabulous recipe. My best sourdough yet! Have only been making sourdough for 2 months. Created my own starter. I made two versions. One using a mixer and the other by hand. Both came out terrific. Nice oven spring and beautiful crumb. It’s a good thing I have kids and grandchildren nearby to eat all the bread I’ve been baking.
What kind of berries are you grinding for your *bread flour*?
Thank you,
Patty